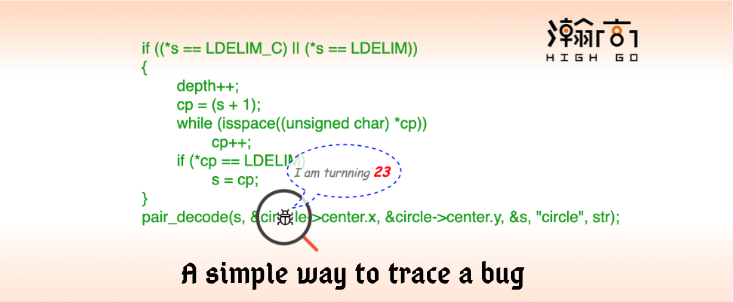
knowledge is power

0%

Featured image

1. Overview

Whenever I tried to study PostgreSQL source code a little deeper, I always wanted to find some tools to help me understand better as I really don’t want to read the code line by line for a particular feature, but at the same time, I really wanted to figure it out quickly. Simply put, I was kind of “lazy” at that movement. Luckily, I found one very simple way to help me when I was studying the Geometric Types in PostgreSQL. This simple method helped me find out a bug exist since 1997. Thanks to Tom Lane who helpped fix it and committed it to Postgresql. The commit is “35d1eefb29d03d5a85f71038679f1f8a14358255” with below comments.

1
2
3
4
5
6
Fix circle_in to accept "(x,y),r" as it's advertised to do.

Our documentation describes four allowed input syntaxes for circles,
but the regression tests tried only three ... with predictable
consequences. Remarkably, this has been wrong since the circle
datatype was added in 1997, but nobody noticed till now.

In this blog, I will use this story to explain how did I figure out this bug using a script in a very simple way.

2. Find a bug born in 1997

A few months ago, I was trying to see what was all the Geometric Types PostgreSQL can support by checking the official document. In the section 8.8.7. Circles, the different ways to insert a circle were described like below.

1
2
3
4
5
6
Circles are represented by a center point and radius. Values of type circle are specified using any of the following syntaxes:

< ( x , y ) , r >
( ( x , y ) , r )
( x , y ) , r
x , y , r

I was so suprised that there are some many ways to draw a circle in PostgreSQL, and accidently I had a psql console connected to a server at that moment. So, I decided to try all the methods one by one. However, when I followed the 3rd way to insert a circle, I encountered an error, i.e. invalid input syntax for type circle. Here is the what did at that moment.

1
2
3
4
5
CREATE TABLE tbl_circle(id serial PRIMARY KEY, a circle);
INSERT INTO tbl_circle(a) VALUES('( 1 , 1 ) , 5'::circle );

ERROR: invalid input syntax for type circle: "( 1 , 1 ) , 5"
LINE 1: INSERT INTO tbl_circle(a) VALUES('( 1 , 1 ) , 5'::circle );

The first thoughts came to my mind was that I must have typed something wrong. But after carefully checked each character, I couldn’t find any error. However, I conldn’t believe what I saw on the screen, therefore I called my colleague to help me do a quick check. The result was the same. Then I started to think if I can go a little further to find out the bug before reporting to the community, it might help some. But, the question was how to find the issue out within limited time (I did have a lot of work need to be done in the same day, in other words, “I was busy”. Well, “busy” is actually one of the main reasons I want to discuss about this simple method).

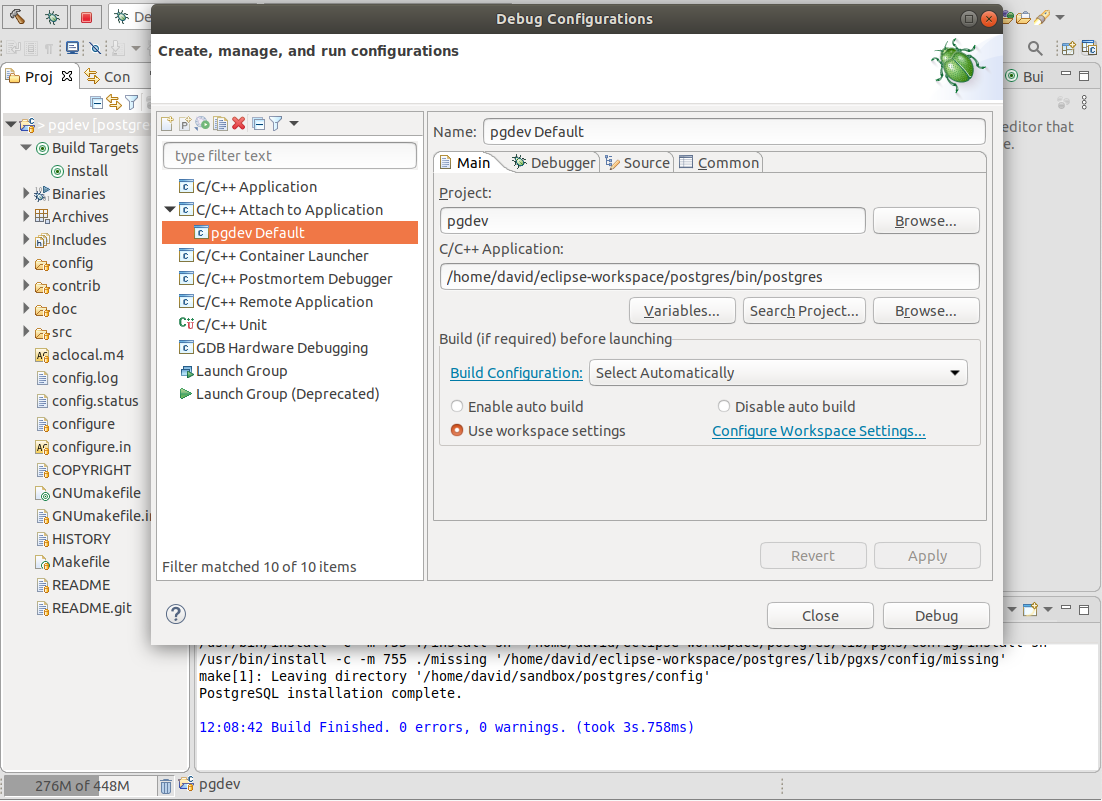
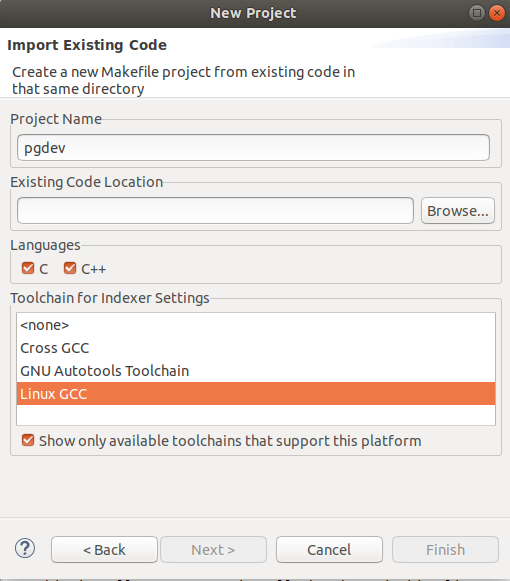
Obviously, I was not so familiar with the data type related circle in PostgreSQL source code, but I did know how to compile PostgreSQL from source code and how to use gdb to run a simple debug (keep in mind, these are all the prerequisite).

I started to compile the source code with gdb enabled like below.
./configure --enable-cassert --enable-debug CFLAGS="-ggdb -O0 -g3 -fno-omit-frame-pointer”

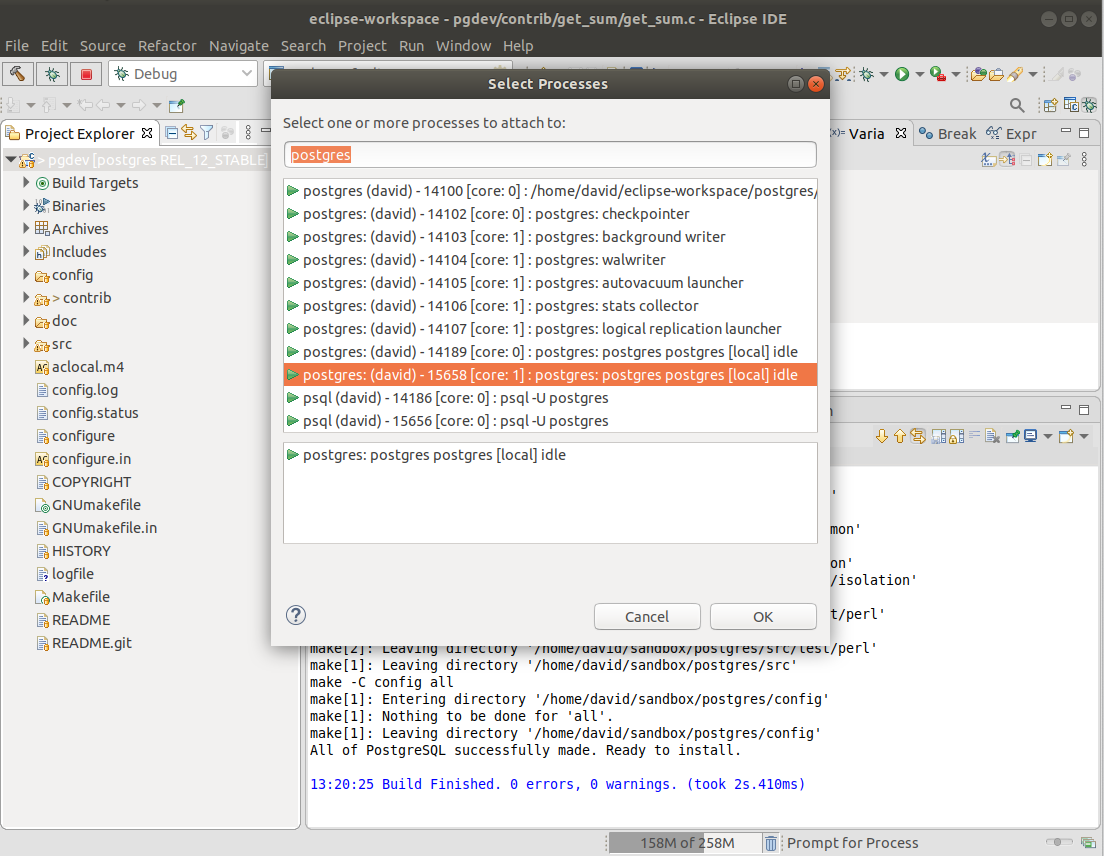
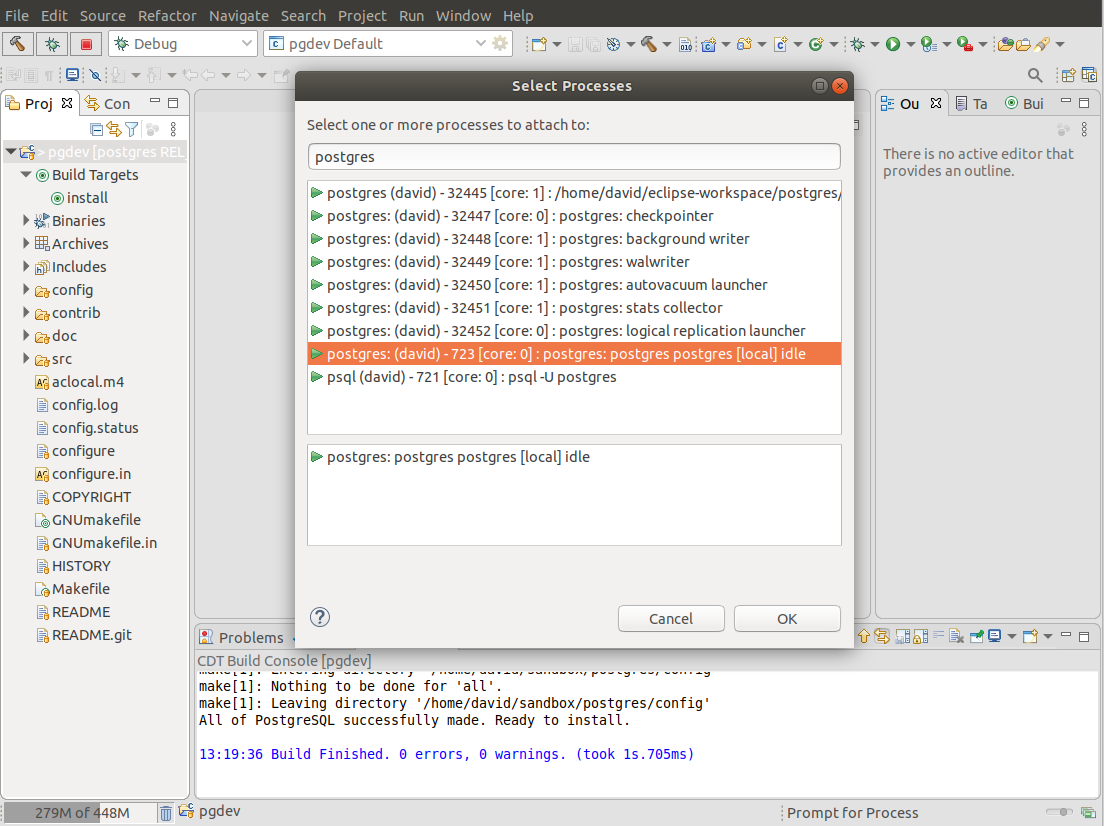
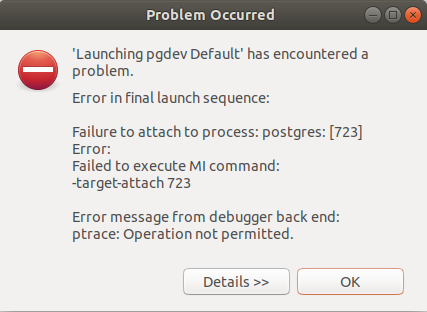
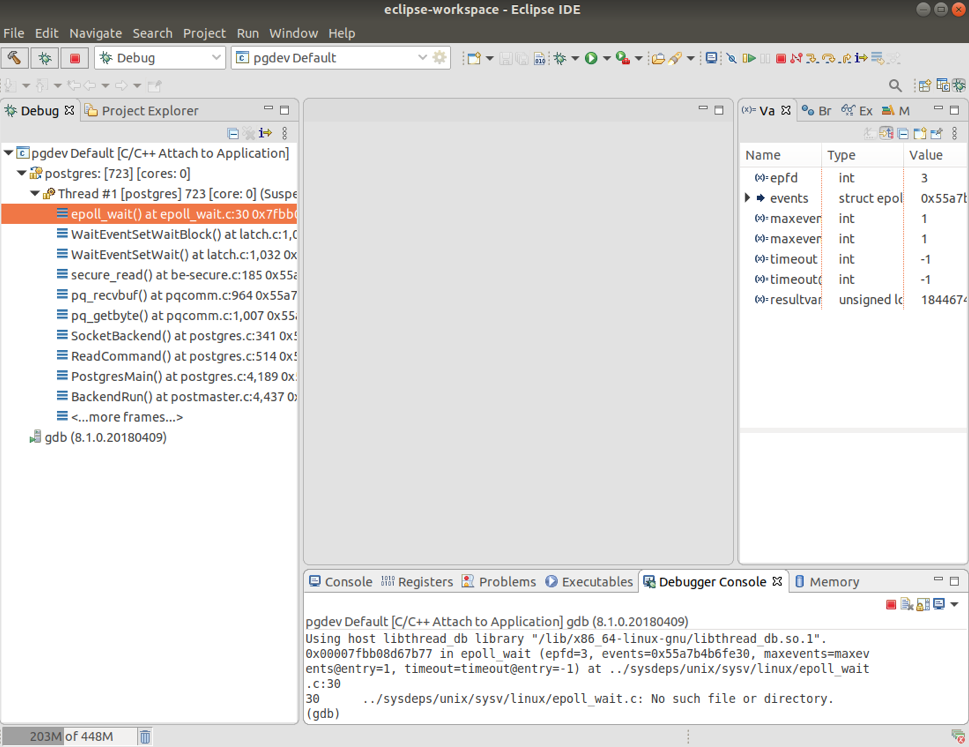
After the PostgerSQL server restarted, I used gdb to attach to the postgres running in background which connected to my psql console. I set up a breakpoint to the function transformExprRecurse (well, this is another prerequisite). I tried to repeat the circle insert query, and the gdb stopped at transformExprRecurse. Now, I was totally stuck. I didn’t know how to locate the bug, I had no idea what was behind the circle data type, and in which file it was implemented etc.. Then how could I move a litter further?

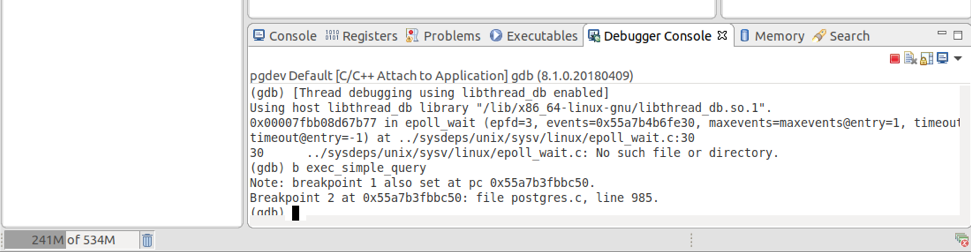
Well, I did have one thing in my mind that I need to quickly find out the difference between the working data type and the non-working data type. To achieve this, a simple way would be just type a next and then press enter. I started to do it. But after repeated 3 times, I gave it up. I realized that I didn’t know how many times I have to repeat the process and it was not possible for me to capture the difference. Then I started to question myself whether there was a way to automatically type next and then enter until the circle insert query was finished. Thanks to google, yes, I found this. I copied and pasted the script and added transformExprRecurse as the default breakpoint. The scpript was ended up like below,

1
2
3
4
5
6
7
8
9
10
11
12
13
14
15
16
17
18
19
20
21
22
23
24
25
26
27
28
29
30
# file: step_mult.gdb

set pagination off
set detach-on-fork off
set schedule-multiple on
handle SIGUSR1 noprint nostop
handle SIGUSR2 noprint nostop
macro define __builtin_offsetof(T, F) ((int) &(((T *) 0)->F))
macro define __extension__
python gdb.events.exited.connect(lambda x: [gdb.execute('inferior 1'), gdb.post_event(lambda: gdb.execute('continue'))])

set logging file gdb.log
set logging on

break transformExprRecurse

####
define step_mult
set $step_mult_max = 100000
if $argc >= 1
set $step_mult_max = $arg0
end

set $step_mult_count = 0
while ($step_mult_count < $step_mult_max)
set $step_mult_count = $step_mult_count + 1
printf "step #%d\n", $step_mult_count
step
end
end

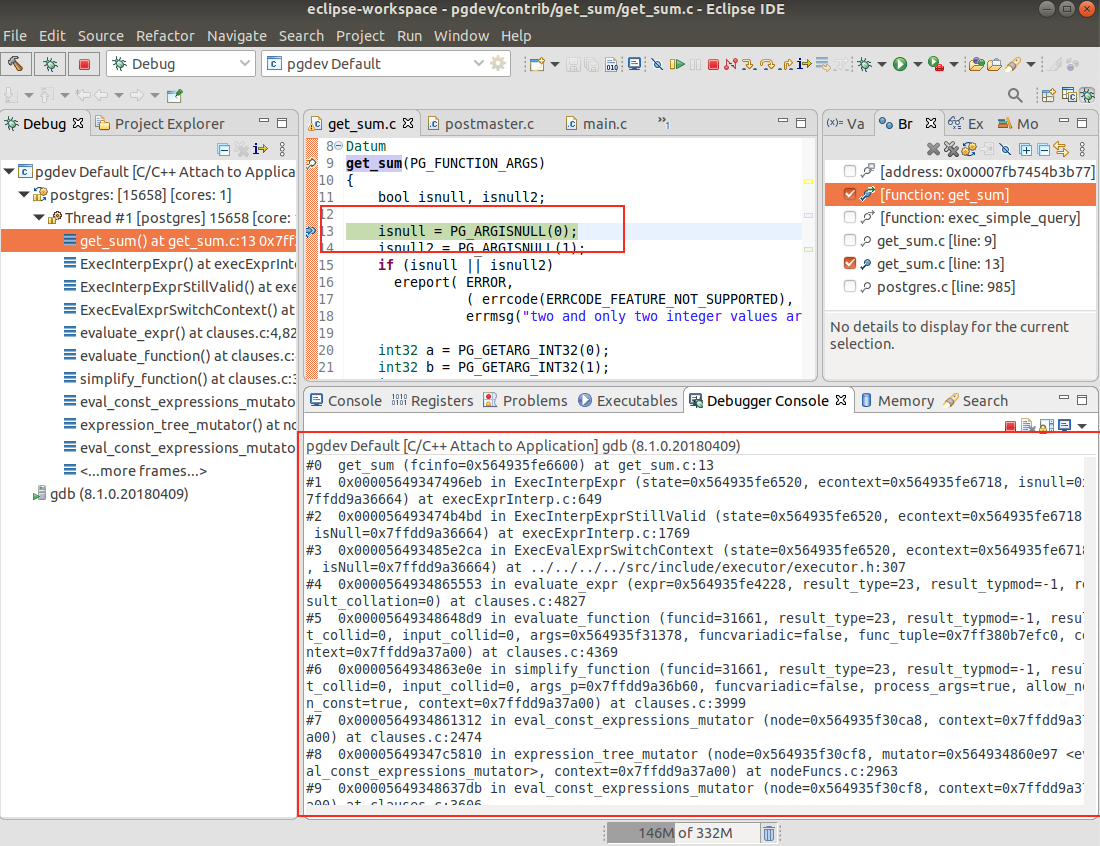
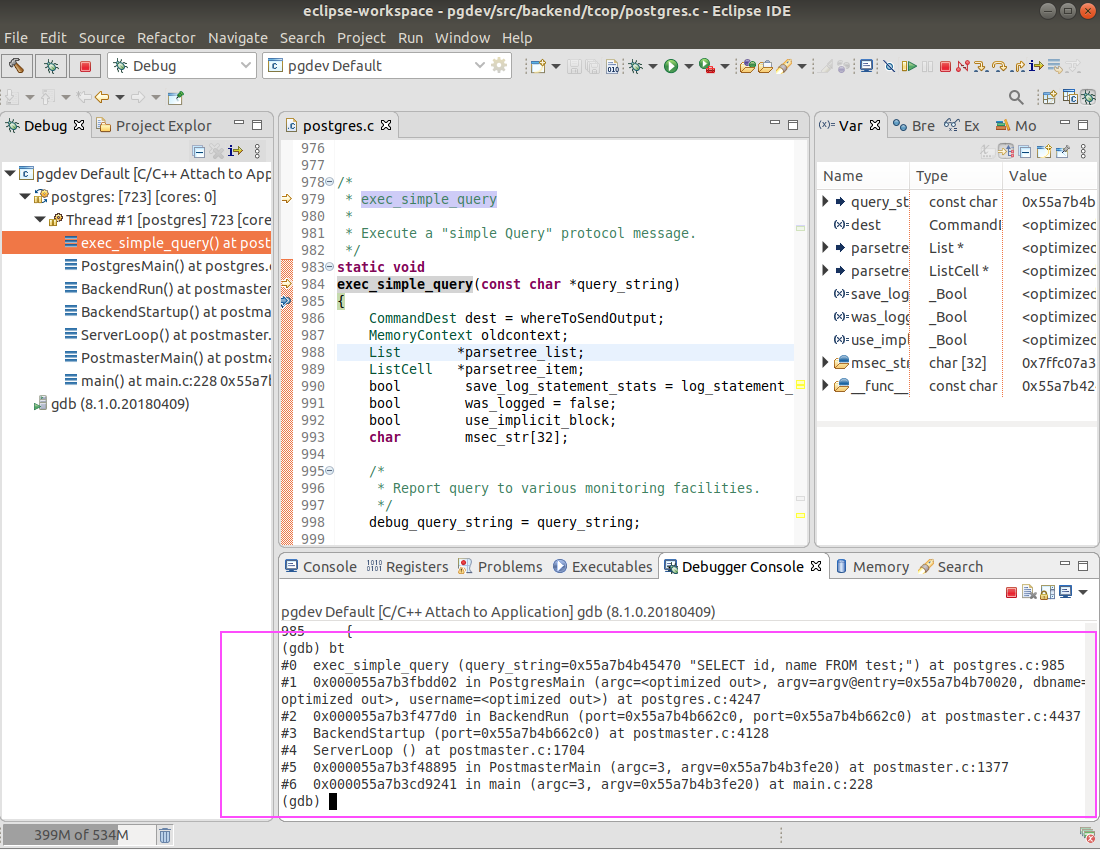
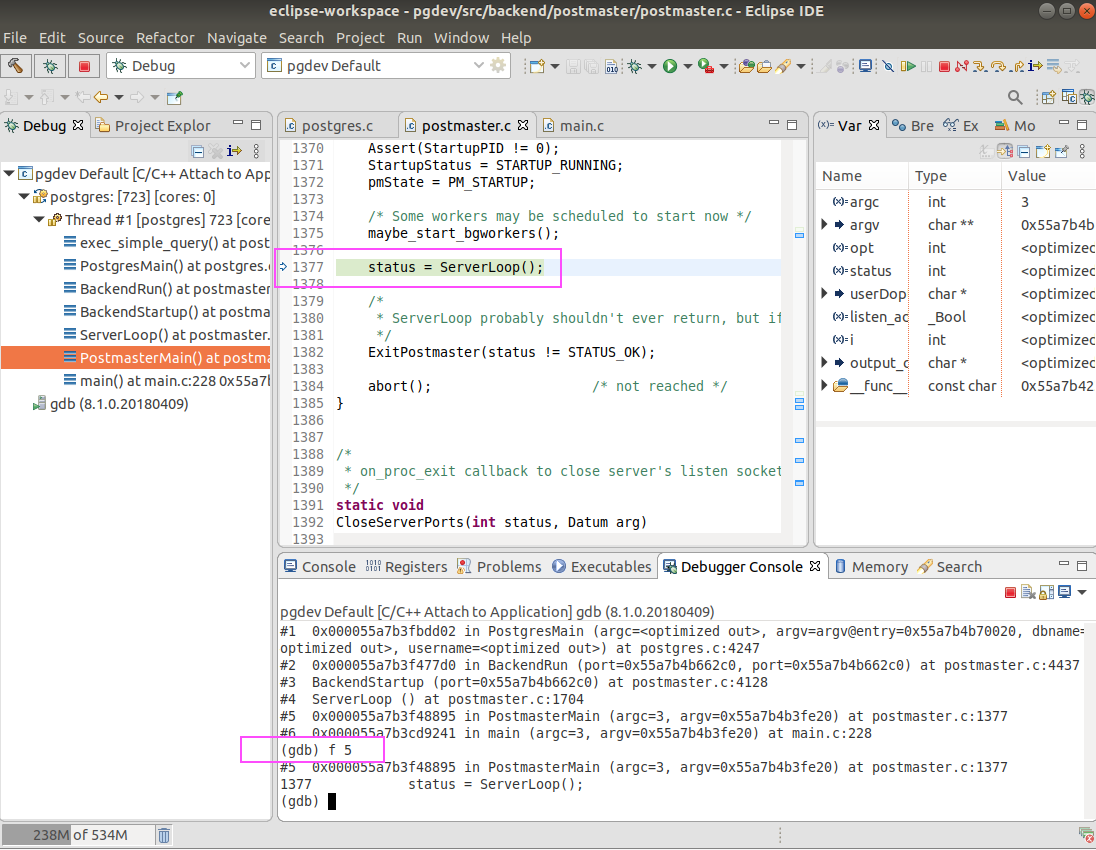
I re-attach the postgres, ran the command source step_mult.gdb within gdb console, and then let the postgres continue to run in the background. I switched to another console and started to insert a circle using the 3rd way again. Postgres stopped at exec_simple_query, then I ran step_mult 10000. After a while, I saw the error message on my psql console again. I changed the log file gdb.log to gdb-2nd.log and repeated the steps, but this time I inserted a circle using the 2nd way. Now, I got two gdb log files which contain all the single step for the working and non-working circle data types.

I used a very nice Intelligent Comparison tools to compare these two gdb log files and I foud the difference like below. diff image
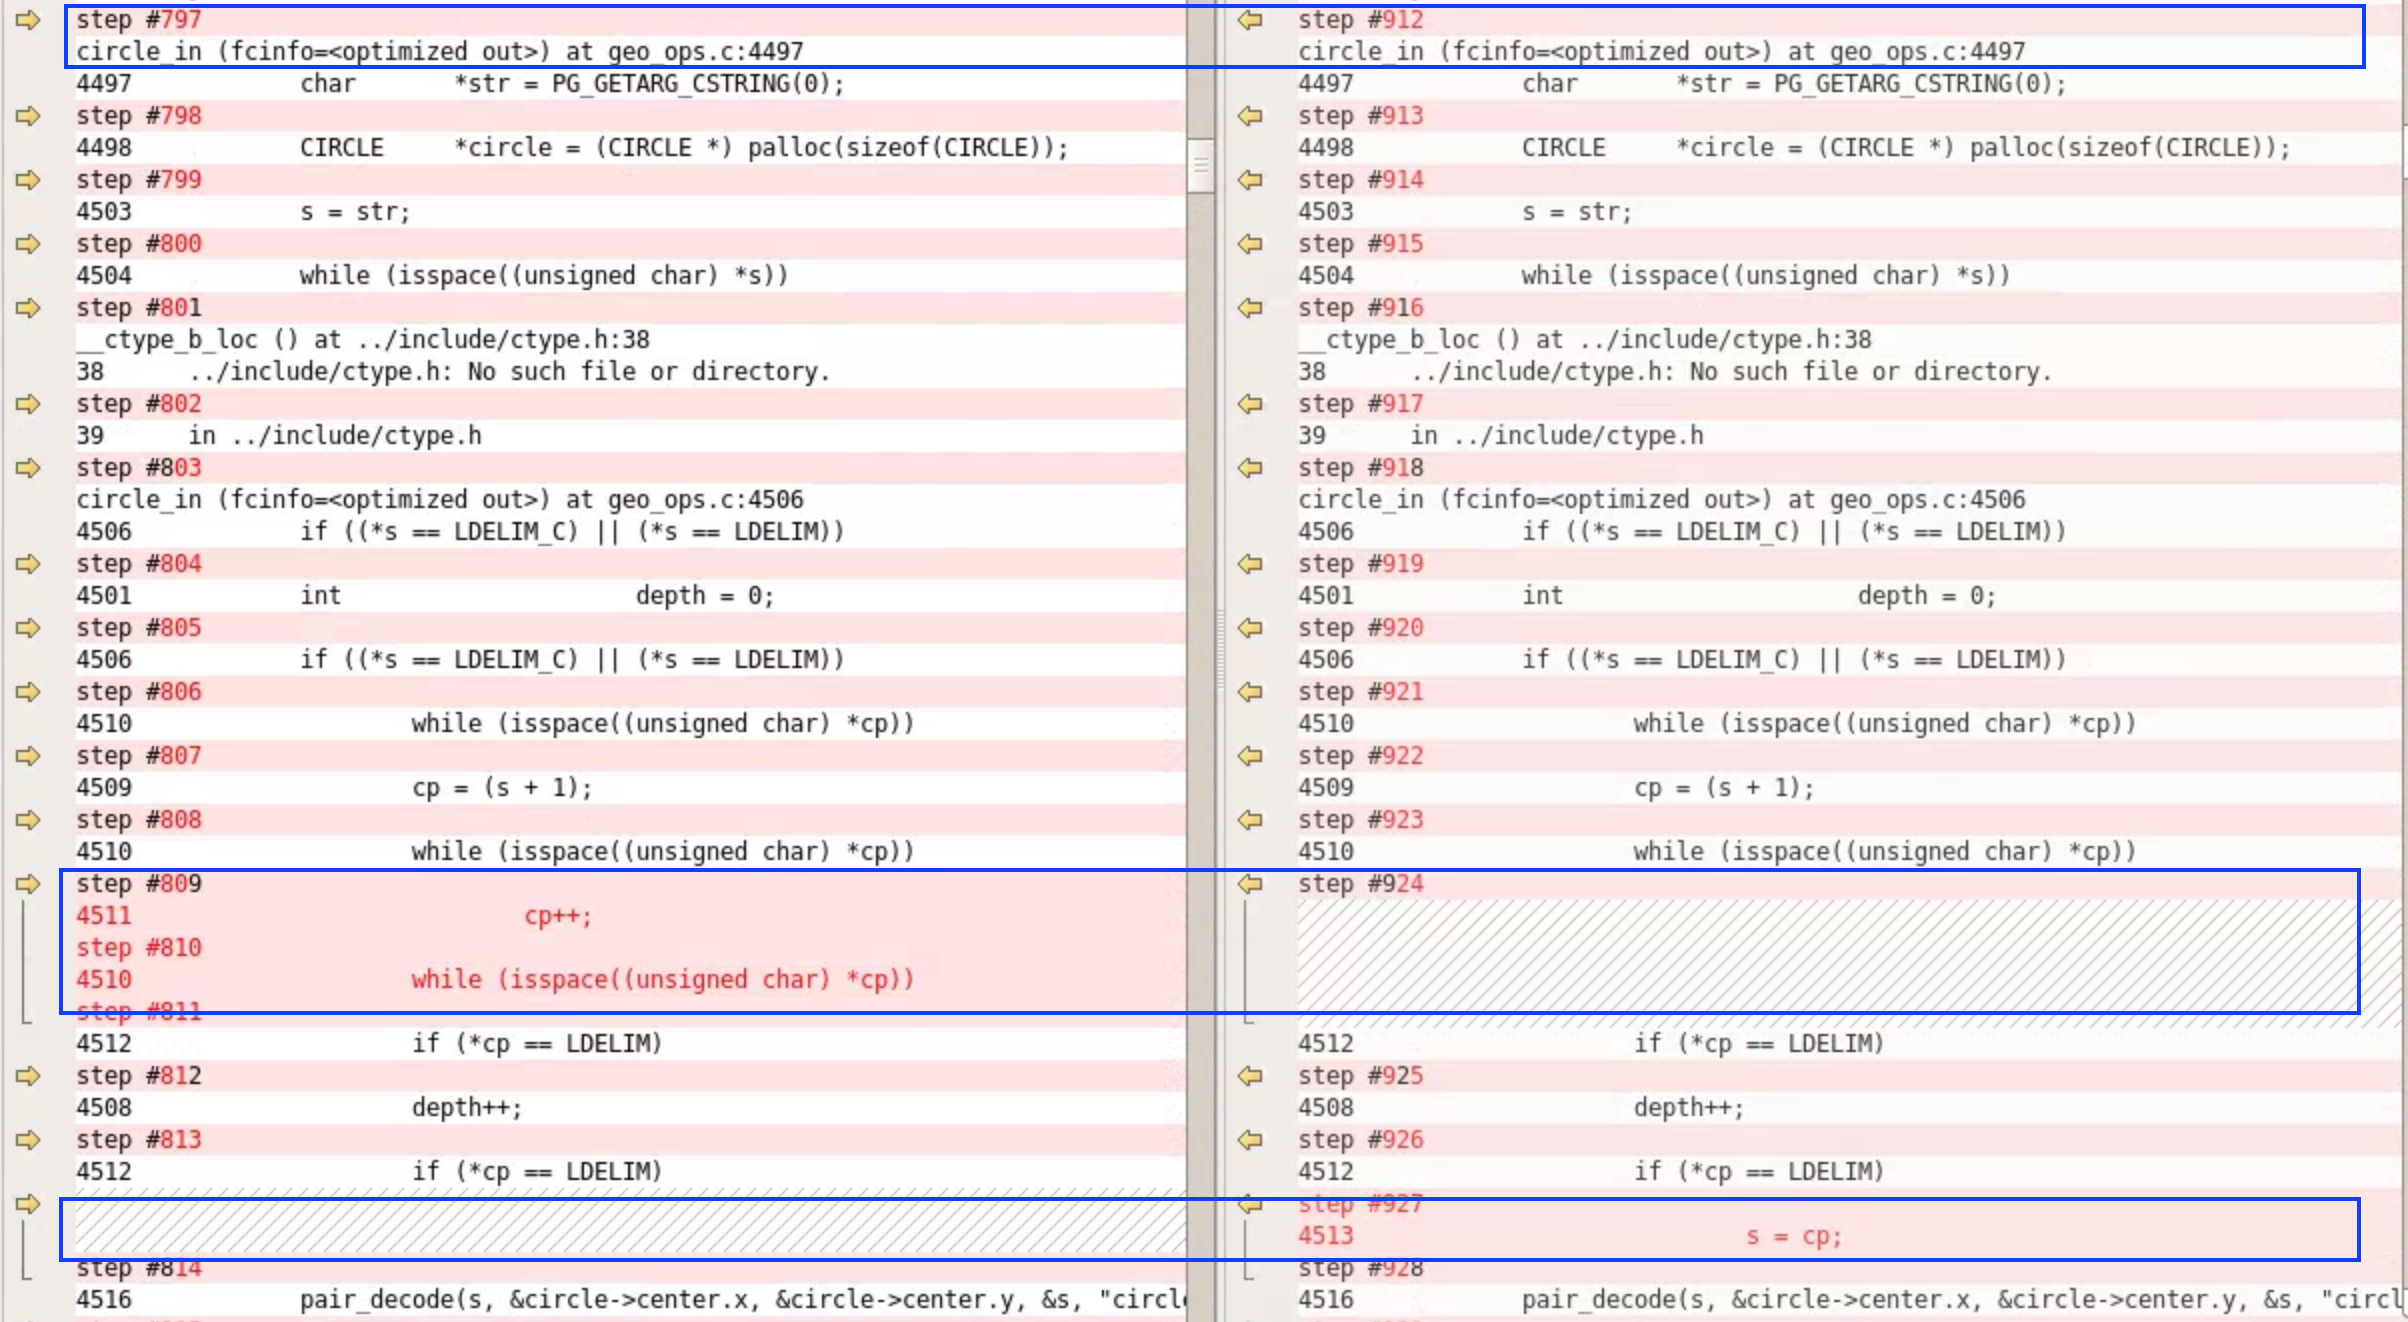
. The big difference I saw was showing in circle_in function within src/backend/utils/adt/geo_ops.c.

Now, I figured out where the data type circle was implemented. To proof that it was the right place to fix this issue, I made a quick dirty fix. Then I performed a test and found the 3rd data type was kind of fixed.

At this point, I was more confident to report this issue to the community with my dirty patch to proof that PostgreSQL doesn’t work with the 3rd way to draw a circle. The entire process took me about an hour, but I think finding out a bug which has stayed in PostgreSQL about 23 years in an hour is not that bad.

3. Summary

PostgreSQL is one of the best open source RDBMS in the world, and there are many other open source projects like it. As a software engineer, you might encounter something like me in your daily work. If you find something fishy but don’t have enough time, then try the way I did. It may surprise you, who knows. From my opinion, this method may be suitable for below sisutations:

1) A feature is working in one use case but it doesn’t work in another very similar use case;
2) To find a function execution path in different conditions;

Featured image

1. Overview

PostgreSQL is an open-source RDMS and running across many platforms including Linux (all recent distributions), Windows, FreeBSD, OpenBSD, NetBSD, Mac OS X, AIX, HP/UX, IRIX, Solaris, Tru64 Unix, and UnixWare. There are many discussions about how to build Postgres and extensions from source code on a Linux-like environment, but sometimes, a developer may want to quickly setup a Windows environment to check a feature for cross-platform support. This blog is going to explain how to build Postgres and extensions from source code on Windows platforms and it was tested on Windows 7, 10 and 2019 Server.

2. Environment setup

This blog refers to the official document and the blog Compiling PostgreSQL extensions with Visual Studio on Windows, but providing many detailed screenshots on the latest version Visual Studio 2019 for building an extension as a standlone VS2019 project.

3. Install VS2019, Windows SDK and other tools

Download the latest Visual Studio 2019 package. During the installation process, selecting the option Desktop development with C++ is enough to build Postgres. This option will install MSVC for VS 2019, Windows 10 SDK and some basic C/C++ building tools. As described in the official document, ActiveState Perl is required to run the build and generate scripts, and ActiveState TCL is required for building PL/Tcl. If the you build from a released source code tar file, then install above tools should be enough for the default configuration, however if you build with the source coded cloned from github, then you need to install Bison and Flex, which can be found here.
If you prefer to use Linux style commands as much as possible, then you can install git bash. After all the tools has been installed, you need to edit the system environment variables to include all the binaries paths, for example, windows environment image

4. Build postgres

If you have an extension need to be built under the source code tree, then it is time to clone or copy your extension to contrib folder before starting the build. To build Postgres is pretty simple, just turn on VS 2019 terminal i.e. Developer Command Prompt for VS 2019 and then navigate to the windows build folder inside the postgres source code, for example, c:\Users\Administrator\Downloads\postgres\src\tools\msvc> and then run build.bat.

5. Regress test

If the build is succeeded, then you can perform a regress test by running vcregress check. To perform a regress test for the extensions, run the command vcregress contribcheck. If you are developing an extension on Windows and you want to speed up the build, then you can build your extension only by running the build script with the extension name, for example, build.bat wal2mongo. However, you can’t run a regress test for each individual extension. This can be worked around by removing all other extension from contrib folder temporally.

6. Build extension in an independent project using VS 2019

Sometimes a developer may want to build an extension within VS2019 IDE. This is a little bit tricky and not even recommended to do it in this way but it is possible. The blog mentioned above has a detailed discussion about this topic. Here, we provide a step by step guide to walk you through the whole process on VS 2019.

  • Start VS 2019 and Create a new project
  • Select Empty Project template, which will create a C/C++ for Windows without any starting files.
  • Give a name for this extension project, for example wal2mongo (We use wal2mongo to demonstrate how to build an extension using VS 2019)
  • Right click on the project, select Add then New Item...
  • Select C++ File (.cpp) template and name the file as wal2mongo.c
  • Copy the whole content from this file to the newly created wal2mongo.c file
  • Add PGDLLEXPORT after the keyword extern, otherwise MSVC will not export its symbol.
    the original file,
    before change image
    and how it looks like after the changes.
    after change image
  • Right click the project, select Properties and then change following in order,
    1 Click on Configuration Properities -> General -> Configuration Type, then select Dynamic Library (.dll)
    vs pro-1 image
    2 Click on Configuration Prosperities -> C/C++ -> General, add the including paths in the order below
    vs pro-2 image
    3 Click on Configuration Prosperities -> C/C++ -> Code Generation -> Enable C++ Exceptions, select No
    vs pro-3 image
    4 Configuration Prosperities -> C/C++ -> Advanced -> Compile As, select Compile as C Code(/TC)
    vs pro-4 image
    5 Click on Configuration Prosperities -> Linker -> General -> Additional Library Directories, enter the lib path where your Postgres libraries are installed
    vs pro-5 image
    6 Click on Configuration Prosperities -> Linker -> Input -> Additional Dependencies, add postgres.lib
    vs pro-6 image
    7 Click on Configuration Prosperities -> Linker -> Manifest File -> Generate Manifest, select No (/MANIFEST:NO)
    vs pro-7 image
  • Finally, right click on the project and then select build.
    If everything goes fine, then you should see wal2mongo.dll is created. Copy wal2mongo.dll to the lib folder where the Postgres libraries were installed. Then you should be able to test this extension as normal.

7. Summary

In this blog, we discussed how to build postgres and extension on Windows, especially to build an extension within VS2019.

Featured image

1. Overview

“Postgres, is a free and open-source relational database management system (RDBMS) emphasizing extensibility and SQL compliance.” This is the highlight of PostgreSQL in a sentence from Wikipedia. Yes, the extensibility of PostgreSQL is extremely useful when you have some special requirements. This blog will discuss how to use logical decoding output plugin to replicate multiple PostgreSQL servers to a single MongoDB server and the environment setup using docker compose for a quick Proof of Concept.

2. Logical decoding output plugin

Start from version 9.5, PostgreSQL provides a solution to allow users to write their own decoding logic to reformat the output before sending it to the subscriber through a wal sender. This feature is called logical decoding output plugin. With this feature, other applications can get a specific data format from PostgreSQL database easily, and then use their own existing tools or algorithms to continue the data analysis. For example, replicating multiple Postgres servers to a single MongoDB server and then perform the real-time analytics and data visualization in MongoDB. There are many different decoding plugins available at here, however wal2mongo is only one can generate a JavaScript format data that can be used by MongoDB directly. You can use it following this blog to practice how data replication can be done from multiple Postgres databases to a MongoDB database using logical decoding output plugin.

  • Logical decoding output plugin framework

The logical decoding output plugin framework has a few predefined callback interfaces. These callbacks are registered in an initialization function named _PG_output_plugin_init, which will be called when the plugin is loaded as a shared library. After hookup with these interfaces by referring to the example test_decoding, the output decoding plugin will get notified about the changes that is happening via various callback interfaces. In these callback interfaces, the one will get noticed each time when an insert, update or delete happens is LogicalDecodeChangeCB. Most of the output formatting related logic should be done in a function which is registered to this interface, such as, map a Postgres data type to a MongoDB native data type.
Before writing your own logical decoding plugin, two basic things need to be mentioned here: one is the change callback interface is triggered based on each row, i.e. if you have multiple rows changed in one transaction, then you will get multiple times call back; the other is that the callback is triggered only by the row changes that have been safely saved to WAL files. The changes that were rolled back by the transaction will not trigger the callback.

  • wal2mongo decoding plugin

wal2mongo is a logical decoding plugin, it mainly converts the DML operation such as insert, update and delete into a JavaScript format which later can be imported into MongoDB by using mongo client.

  • Logical decoding data changes flow
    flow chart image
    The diagram above shows the data changes flow. We can use psql client to simulate the Application and perform database operation such as create table, insert records, update records and then delete records. The Postgres server backend will save the database changes to WAL first and then notify the WAL sender. The WAL sender will read the changes from WAL and get the output decoded by wal2mongo and then send the changes to the connected subscriber, i.e pg_recvlogical in this blog. pg_recvlogical will save the output as a JavaScript file, then later it will be imported to MongoDB using mongo client.

To exercise this, we need to change wal_level to logical and make sure max_wal_senders is at least 2, then restart Postgres server after the changes.

  • Example of wal2mongo output

wal2mongo is designed to replicate the data changes from Postgres to MongoDB, not like a Postgres standby which need to replicate everything. Therefore, the focus is on the mostly used DML operation such as INSERT, UPDATE and DELETE. The diagram below shows the steps inclduing create a table, insert some records, do some update, and then perform a delete and how the data output looks like. Here, you have to change the table replica identity to full, otherwise, you won’t be able to replicate the UPDATE correctly.
seq chart image

2. Automatic the environment setup using docker compose

Setup an environment like the one mentioned above to test a logical output plugin may take some time, especially when a user just wants to give a quickly try. I will introduce an easy way using docker to do the work. A Docker environment can be very useful when you want to practice a new technology which requires a complicated setup, or multiple machines to be available. It also help when you need such an environment from time to time, especially when you need it to be available “immediately” and then discard it after you finished your work.
To achieve such an environment with multiple Postgres servers and one MongoDB server, I built two docker images: one is a dedicated postgres with wal2mongo installed, and the other one is a dedicated mongod with the pg_recvlogical tools installed. Here is a cluster environment running on a sinlge physical machine using the files available at here.
docker image

  • Dockerfile for postgres
    This Dockerfile is to build a docker image with the latest PostgreSQL 12.2 offical release and the wal2mongo installed.
    1
    2
    3
    4
    5
    6
    7
    8
    9
    10
    11
    12
    13
    14
    15
    16
    17
    18
    19
    20
    FROM centos:centos7
    MAINTAINER The CentOS Project <cloud-ops@centos.org>

    RUN yum -y install https://download.postgresql.org/pub/repos/yum/reporpms/EL-7-x86_64/pgdg-redhat-repo-latest.noarch.rpm
    RUN yum -y update; yum -y install sudo epel-release yum-utils net-tools which \
    postgresql12-server postgresql12 \
    git gcc make clang zlib-devel readline-devel postgresql12-devel; yum clean all

    RUN usermod -aG wheel postgres
    RUN echo "export PATH=/usr/pgsql-12/bin:$PATH" | tee -a /var/lib/pgsql/.bashrc
    RUN echo "postgres ALL=(root) NOPASSWD:ALL" > /etc/sudoers.d/postgres && chmod 0440 /etc/sudoers.d/postgres

    USER postgres
    RUN eval "sudo -E env "PATH=$PATH" USE_PGXS=1 make CLANG=/usr/bin/clang with_llvm=no install"

    VOLUME ["/var/log/pgsql", "/var/lib/pgsql"]
    EXPOSE 5432

    COPY run.sh .
    CMD ["/run.sh"]

What inside the run.sh script is just a simple postgres start command. The way I used it here is to avoid rebuild the image when you want to start the container in different ways.

1
2
#!/bin/bash
/usr/pgsql-12/bin/pg_ctl -D /var/lib/pgsql/12/data -l /var/log/pgsql/logfile start
  • Dockfile for mongod
    The dockerfile for mongod has the offical MongoDB 4.25 release and pg_recvlogical 12.2 installed.

    1
    2
    3
    4
    5
    6
    7
    8
    9
    10
    11
    12
    13
    14
    15
    16
    17
    FROM centos:centos7
    MAINTAINER The CentOS Project <cloud-ops@centos.org>

    COPY mongodb.repo /etc/yum.repos.d/
    RUN yum -y install mongodb-org-4.2.5 mongodb-org-server-4.2.5 \
    mongodb-org-shell-4.2.5 mongodb-org-mongos-4.2.5 \
    mongodb-org-tools-4.2.5 postgresql12-contrib; yum clean all
    RUN mkdir -p /data/db

    RUN usermod -aG wheel mongod
    RUN echo "mongod ALL=(root) NOPASSWD:ALL" > /etc/sudoers.d/mongod && \
    chmod 0440 /etc/sudoers.d/mongod
    RUN echo "export PATH=/usr/pgsql-12/bin:$PATH" | tee -a /root/.bashrc
    VOLUME ["/data/db", "/var/log/mongodb"]

    EXPOSE 27017
    ENTRYPOINT ["/usr/bin/mongod", "--bind_ip_all"]
  • Service compose file
    The service docker compose file is to help setup two Postgres servers and one MongodDB servere, and make sure they are be able to communicate using hostname.

    1
    2
    3
    4
    5
    6
    7
    8
    9
    10
    11
    12
    13
    14
    15
    16
    17
    18
    19
    20
    21
    22
    23
    24
    25
    26
    27
    28
    29
    version: '3.0'

    services:
    mongo:
    restart: always
    image: "mongod:4.2.5"
    ports:
    - "27017:27017"
    volumes:
    - ./data/mgdata:/data/db
    - ./scripts/p2m.sh:/p2m.sh

    pg1:
    restart: always
    image: "postgres:12.2"
    ports:
    - "5432"
    volumes:
    - ./data/pg1data:/var/lib/pgsql/12/data
    - ./scripts/data_gen.sh:/data_gen.sh

    pg2:
    restart: always
    image: "postgres:12.2"
    ports:
    - "5432"
    volumes:
    - ./data/pg2data:/var/lib/pgsql/12/data
    - ./scripts/data_gen.sh:/data_gen.sh

    You can easily extend the Postgres servers by adding more instances to this service docker compose file.

To build the containers, run command docker-compose -f service-compose.yml up -d. After a while, you should see two Postgres servers and one MongoDB server are running like below.

1
2
3
4
5
$ docker ps
CONTAINER ID IMAGE COMMAND CREATED STATUS PORTS NAMES
935a3d339e71 mongod:4.2.5 "/usr/bin/mongod --b…" About a minute ago Up About a minute 0.0.0.0:27017->27017/tcp pg2mongo_mongo_1
d9497be07ce5 postgres:12.2 "/run.sh" About a minute ago Up About a minute 0.0.0.0:54322->5432/tcp pg2mongo_pg2_1
50eb555b5719 postgres:12.2 "/run.sh" About a minute ago Up 38 seconds 0.0.0.0:54321->5432/tcp pg2mongo_pg1_1

To setup the logical replication slot on each postgres server, and connect to each slot using pg_recvlogical then pipe the data changes to mongo client and feed the changes to MongoDB automaticlly, run a command like this docker exec -it pg2mongo_mongo_1 bash /p2m.sh 1 2. Where the p2m.sh is a simple demo script to allow you using pg_recvlogical to create slot, and connect to the slot then dump the message to a internal pipe. Then the mongo client will read the pipe and import the changes to MongoDB. You can check it by log into the mongod container and type a ps -ef to see the running services.

  • Generate database changes
    To simulate the data changes, you can use pgbench. There are two ways to do it: one is to log into each postgres instance and type the pgbench command; the other way is to map a local script to all postgres instances, then run the script from your host machine. For example docker exec -it pg2mongo_pg1_1 bash /data_gen.sh

  • Verify the data changes
    To verify the data changes, you can log into the mongod container, and then use the mongo cient to check the data changes imported automatically. For example,

    1
    2
    3
    4
    > use mycluster_postgres_w2m_slot2;
    switched to db mycluster_postgres_w2m_slot2
    > db.pgbench_accounts.count();
    10028
  • Modify the output plugin and reinstall it
    You can log into any postgres server and find out the source code and make some changes, then recompile, install it and run a regression test, etc. For example,

    1
    2
    3
    4
    5
    6
    7
    8
    9
    10
    11
    docker exec -it pg2mongo_pg1_1 bash
    bash-4.2$ cd /var/lib/pgsql/sources/wal2mongo/
    ...
    bash-4.2$ USE_PGXS=1 make clean CLANG=/usr/bin/clang with_llvm=no
    ...
    bash-4.2$ USE_PGXS=1 make CLANG=/usr/bin/clang with_llvm=no
    ...
    bash-4.2$ USE_PGXS=1 make installcheck-force CLANG=/usr/bin/clang with_llvm=no
    ...
    bash-4.2$ sudo -E env "PATH=$PATH" USE_PGXS=1 make CLANG=/usr/bin/clang with_llvm=no install
    ...

3. logical decoding output plugin limitations

The logical decoding output plugin is pretty useful feature, but still has some limitations. For example,

  • Only physical relation tables can trigger logical decoding callback, views and sequences cannot trigger
  • The tables must have primary key and replica identity need to be set properly
  • Database schemas are not be able to be replicated
  • No large objects can be replicated

4. Summary

In this blog, we discussed how to use the logical decoding output plugin to replicate multiple PostgreSQL servers to a single MongoDB server, and provide a docker environment setup to perform a quick Proof Of Concept.

Featured image

1. Overview

In previous two blogs, we explained how to setup Kerberos, and how to configure PostgreSQL to support GSSAPI user authentication. This blog will be focusing on how to check GSSAPI authentication, encryption and user principal information when given different connection options.

2. pg_stat_gssapi view

According to the official PostgreSQL document, “PostgreSQL supports GSSAPI for use as either an encrypted, authenticated layer, or for authentication only.“ To check the authentication, encryption and user principal, we need to use pg_stat_gssapi view, which is a dynamic statistics views containing one row per backend and showing the information about GSSAPI authentication and encryption used on this connection.

Before start the test below, make sure the PostgreSQL server and the psql client has the option --with-gssap enabled during build time.

3. Authentication and Encryption status

  • Scenario 1:

Both authentication and encryption are enabled when the host-based authentication is configured with hostgssenc and gss in pg_hba.conf
Set below user authentication rule to pg_hba.conf and disable all other rules.

1
hostgssenc  postgres  postgres  192.168.0.102/32  gss include_realm=0 krb_realm=HIGHGO.CA

Initiate the user postgres credential cache using kinit, and then connect to PostgreSQL server with user postgres

1
2
3
4
5
6
7
8
9
10
11
12
postgres@pg:~$ psql -d postgres -h pg.highgo.ca -U postgres
psql (12.2)
GSSAPI-encrypted connection
Type "help" for help.

postgres=# SELECT pid, gss_authenticated, encrypted, principal from pg_stat_gssapi where pid = pg_backend_pid();
pid | gss_authenticated | encrypted | principal
------+-------------------+-----------+--------------------
2274 | t | t | postgres@HIGHGO.CA
(1 row)

postgres=#

From the result, we can see this connection is encrypted and the user is authenticated with principal postgres@HIGHGO.CA.

  • Scenario 2:

The encryption will be disabled, but user authentication is still enabled when the host-based authentication is configured with hostnogssenc and gss in pg_hba.conf
Set below user authentication rule to pg_hba.conf and disable all other rules.

1
hostnogssenc  postgres  postgres  192.168.0.102/32  gss include_realm=0 krb_realm=HIGHGO.CA
1
2
3
4
5
6
7
8
9
10
11
postgres@pg:~$ psql -d postgres -h pg.highgo.ca -U postgres
psql (12.2)
Type "help" for help.

postgres=# SELECT pid, gss_authenticated, encrypted, principal from pg_stat_gssapi where pid = pg_backend_pid();
pid | gss_authenticated | encrypted | principal
------+-------------------+-----------+--------------------
2291 | t | f | postgres@HIGHGO.CA
(1 row)

postgres=#

The result tells no encryption, but user has been authenticated using principal postgres@HIGHGO.CA

  • Scenario 3:

Both encryption and authentication are all enabled when the host-based authentication is configured with host and gss in pg_hba.conf.
Set below user authentication rule to pg_hba.conf and disable all other rules.

1
host  postgres  postgres  192.168.0.102/32  gss include_realm=0 krb_realm=HIGHGO.CA
1
2
3
4
5
6
7
8
9
10
11
12
postgres@pg:~$ psql -d postgres -h pg.highgo.ca -U postgres
psql (12.2)
GSSAPI-encrypted connection
Type "help" for help.

postgres=# SELECT pid, gss_authenticated, encrypted, principal from pg_stat_gssapi where pid = pg_backend_pid();
pid | gss_authenticated | encrypted | principal
------+-------------------+-----------+--------------------
2309 | t | t | postgres@HIGHGO.CA
(1 row)

postgres=#

This result is the same as the first one, meaning, host is equivalent to hostgssenc when gss is specified.

  • Scenario 4:

The authentication will be disabled, but encryption is still on when the host-based authentication is configured with host and trust in pg_hba.conf.
Set below user authentication rule to pg_hba.conf and disable all other rules.

1
host  postgres  postgres  192.168.0.102/32  trust
1
2
3
4
5
6
7
8
9
10
11
12
postgres@pg:~$ psql -d postgres -h pg.highgo.ca -U postgres
psql (12.2)
GSSAPI-encrypted connection
Type "help" for help.

postgres=# SELECT pid, gss_authenticated, encrypted, principal from pg_stat_gssapi where pid = pg_backend_pid();
pid | gss_authenticated | encrypted | principal
------+-------------------+-----------+-----------
2322 | f | t |
(1 row)

postgres=#

This result tells that the encryption will be always on when --with-gssapi is enabled during build time, unless hostnogssenc is specified in the host-based authentication file.

  • Scenario 5:

Both authentication and encryption will be disabled when the host-based authentication is configured with host and trust in pg_hba.conf, and the client psql requests a non-gssenc mode connection, i.e. gssencmode=disable.
Set below user authentication rule to pg_hba.conf and disable all other rules.

1
host  postgres  postgres  192.168.0.102/32  trust
1
2
3
4
5
6
7
8
9
10
11
postgres@pg:~$ psql -h pg.highgo.ca -U postgres -d "dbname=postgres gssencmode=disable"
psql (12.2)
Type "help" for help.

postgres=# SELECT pid, gss_authenticated, encrypted, principal from pg_stat_gssapi where pid = pg_backend_pid();
pid | gss_authenticated | encrypted | principal
------+-------------------+-----------+-----------
2328 | f | f |
(1 row)

postgres=#

You can also achieve the same result by setting the environment PGGSSENCMODE=disable from the client side. For example,

1
PGGSSENCMODE=disable psql -h pg.highgo.ca -U postgres -d postgres

4. Summary

In this blog, we discussed how to check authentication, encryption and user principal in 5 different scenarios. As you can see once --with-gssapi is enabled in PostgreSQL, the encryption will always be turned on unless you specify hostnogssenc in the host-based authentication file, or manually disable gssenc mode from a client side. Knowing the difference might help you when working the security related environment setup using GSSAPI.

Featured image

1. Overview

In previous blog, we have setup Kerberos, added all required principals and verified each principal. This blog will explain all the necessary configuration, i.e. postgresql.conf, pg_hba.conf and pg_ident.conf, in PostgreSQL for user authentication using GSSAPI with Kerberos.

2. Build PostgreSQL with GSSAPI

The official PostgreSQL release for Ubuntu has GSSAPI enabled for user authentication with Kerberos, however if you want to build it from source code, you can simply enable it by giving the option --with-gssapi in configure process like below.

1
$ ./configure --with-gssapi --prefix=/home/postgres/pgapp

There is another option --with-krb-srvnam, PostgreSQL uses the default name of the Kerberos service principal. According to Postgres official document, “There’s usually no reason to change this unless you have a Windows environment, in which case it must be set to upper case POSTGRES“. In this blog, we keep it as default, and no extra configuration required for it. After enabled --with-gssapi option, you can build, install, initialize database, change configuration and start database service as normal. The commands used in this blog are list below.

1
2
3
4
make && make install
export PATH=/home/postgres/pgapp/bin:$PATH
export PGDATA=/home/postgres/pgdata/data
initdb -D $PGDATA

3. Keytab file

If you have followed the previous blog “part-1: how to setup Kerberos on Ubuntu”, then you should already have the keytab file. Now, copy the keytab file to Service Server (Postgres Server) and put it to a folder with appropriate permissions to the user owning the Postgres process. For example, user postgres and folder /home/postgres/pgdata/data in this blog. The instance principal extracted from KDC server can be verified using ktutil on Service Server.

1
2
3
4
5
6
7
8
9
10
postgres@pg:~$ ktutil 
ktutil: list
slot KVNO Principal
---- ---- ---------------------------------------------------------------------
ktutil: read_kt postgres.keytab
ktutil: list
slot KVNO Principal
---- ---- ---------------------------------------------------------------------
1 1 postgres/pg.highgo.ca@HIGHGO.CA
ktutil:

postgres/pg.highgo.ca@HIGHGO.CA is the principal we defined in previous blog in the format of primary/instance@REALM. In this example, postgres is the service, /pg.highgo.ca is the instance using the hostname.

4. PostgreSQL Configuration

Once keytab file has been set properly, we can configure the keytab file location in postgresql.conf like below.
krb_server_keyfile = '/home/postgres/pgdata/data/postgres.keytab'.

Other than the keytab, we also need Postgres Server to allow connection from the network by change the listen_addresses.

1
listen_addresses = '*'

This is the minimum changes in postgresql.conf required for GSSAPI user authentication with Kerberos.

5. PostgreSQL Client Authentication

pg_hba.conf is the file used to control clients authentication in PostgreSQL, where hba stands for host-based authentication. A default pg_hba.conf file is installed when the data directory is initialized by initdb. For details please refer to the rules defined for this file, which provides a summary of the contents of the client authentication configuration file. The basic rule is that “The first record with a matching connection type, client address, requested database, and user name is used to perform authentication. There is no fall-through or backup: if one record is chosen and the authentication fails, subsequent records are not considered. If no record matches, access is denied.” In this blog, we will be focusing on GSSAPI releated users authentication using two key words, i.e. hostgssenc and hostnogssenc for the tests. For now, just put below two lines started with hostgssenc after IPv4 local connections.

1
2
3
4
# IPv4 local connections:
host all all 127.0.0.1/32 trust
hostgssenc postgres david 192.168.0.0/24 gss include_realm=0
hostgssenc postgres postgres 192.168.0.0/24 gss include_realm=0

Here is how we define the user authentication for using GSSAPI according to PostgreSQL document.

  • hostgssenc is used to match a TCP connection made with GSSAPI encryption.
  • postgres is the database name.
  • david and postgres are the users allowed to connect to the database.
  • 192.168.0.0/24 is the network for this particular setup.
  • gss include_realm=0 means the authentication method gss is used with the option include_realm=0 which indeicates the realm name from the authenticated user principal will be stripped off before being passed through the user name mapping.

6. PostgreSQL User Name Maps

pg_indent.conf is used to map the users. The mapping can be used when user want to use email like user name e.g. postgres@highgo.ca to log in the database. For example, postgres@highgo.ca could be mapped to just postgres. According to PostgreSQL document, if hostgssenc is used, then only three authentication options are allowed: gss, reject, and trust. When gss is selected as the authentication option, then you can use below three option to specify the gss in further details.

  • include_realm: default set to 1, if 0 is specified as above example, then realm name from the authenticated user principal is stripped off.
  • map: is the mapping between system and database user names. The mapping supports regular expression when system user started with /. For example, mymap /^(.*)@mydomain\.com$ \1 is to remove the domain part for users from system user names.
  • krb_realm: is used to match user principal names. If this parameter is set, only users of that realm will be accepted.
    For example,
    1
    hostgssenc  postgres  postgres  192.168.0.0/24  gss include_realm=1 map=mymap krb_realm=HIGHGO.CA
    Where, gss include_realm=1 map=mymap krb_realm=HIGHGO.CA is saying, match a TCP connection with GSS encryption enabled and map system user using mymap defined in pg_ident.conf for user from reamlm HIGHGO.CA only.

7. User Authentication

Now, we have one database admin user postgres setup on PostgreSQL server, let’s restrict this postgres user has to connect to Postgre server using GSSAPI user authentication with Kerberos.

7.1. database admin user local authentication

Disable all other user authentication in pg_hba.conf, set user authentication to allow gss with include_realm=0 only, then restart Postgres server.

1
hostgssenc  postgres  postgres  192.168.0.0/24  gss include_realm=0

From Postgres server terminal, run kdestroy -A to clean all cached credentials, then run klist to check.

1
2
$ klist
klist: No credentials cache found (filename: /tmp/krb5cc_1001)

No credentials cached yet, then run kinit postgres to initial the user authentication.

1
2
$ kinit postgres
Password for postgres@HIGHGO.CA:

Now, check the cached credentials again,

1
2
3
4
5
6
7
$ klist
Ticket cache: FILE:/tmp/krb5cc_1001
Default principal: postgres@HIGHGO.CA

Valid starting Expires Service principal
2020-03-15 14:17:07 2020-03-16 00:17:07 krbtgt/HIGHGO.CA@HIGHGO.CA
renew until 2020-03-16 14:17:04

After the credentials has been cached, let’s try to log in use database admin user postgres

1
2
3
4
5
6
$ psql -d postgres -h pg.highgo.ca -U postgres
psql (12.2)
GSSAPI-encrypted connection
Type "help" for help.

postgres=# \q

As the message GSSAPI-encrypted connection above indicates the connection is encrypted. Let’s check the cached credentials again,

1
2
3
4
5
6
7
8
9
10
11
$ klist
Ticket cache: FILE:/tmp/krb5cc_1001
Default principal: postgres@HIGHGO.CA

Valid starting Expires Service principal
2020-03-15 14:17:07 2020-03-16 00:17:07 krbtgt/HIGHGO.CA@HIGHGO.CA
renew until 2020-03-16 14:17:04
2020-03-15 14:21:21 2020-03-16 00:17:07 postgres/pg.highgo.ca@
renew until 2020-03-16 14:17:04
2020-03-15 14:21:21 2020-03-16 00:17:07 postgres/pg.highgo.ca@HIGHGO.CA
renew until 2020-03-16 14:17:04

We can see the credentials for service principal postgres/pg.highgo.ca has been cached.
GSSAPI Postgres
From the above wireshark capture,

  • message 1: AS_REQ is the initial user authentication request triggered by kinit.
  • message 2: KRB Error is the reply from Authentication Server to ask password for user postgres
  • message 3: AS_REQ is the user authentication request encrypted using postgres‘s password
  • message 4: AS_REP is the encrypted reply from Authentication Server. Upon now, kini is done, and user postgres‘s credential has been cached.
  • message 5: TGS_REQ is the request from psql to Ticket Granting Server (TGS) for a service ticket.
  • message 6: TGS_REP is the reply from Ticket Granting Server which contains a service session key generated by TGS and encrypted using a temporary session key generated by AS for user postgres.

Within the service principal expire time, any new log in from the same machine with user postgres will not be required to provide the password. If you use wireshark to monitor the traffic again, you won’t see any KRB5 message between KDC and Postgres Server.

7.2. database admin user remote authentication

Now, let’s run the same test from the Client machine to observer the authentication messages.

1
2
3
4
5
6
7
8
9
10
11
12
13
14
15
16
17
18
19
20
21
22
23
24
25
26
27
28
29
30
$ kdestroy -A
$ klist
klist: No credentials cache found (filename: /tmp/krb5cc_1000)

$ klist
Ticket cache: FILE:/tmp/krb5cc_1000
Default principal: postgres@HIGHGO.CA

Valid starting Expires Service principal
2020-03-15 14:57:53 2020-03-16 00:57:53 krbtgt/HIGHGO.CA@HIGHGO.CA
renew until 2020-03-16 14:57:50

$ psql -d postgres -U postgres -h pg.highgo.ca
psql (12.2)
GSSAPI-encrypted connection
Type "help" for help.

postgres=# \q

$ klist
Ticket cache: FILE:/tmp/krb5cc_1000
Default principal: postgres@HIGHGO.CA

Valid starting Expires Service principal
2020-03-15 14:57:53 2020-03-16 00:57:53 krbtgt/HIGHGO.CA@HIGHGO.CA
renew until 2020-03-16 14:57:50
2020-03-15 14:58:00 2020-03-16 00:57:53 postgres/pg.highgo.ca@
renew until 2020-03-16 14:57:50
2020-03-15 14:58:00 2020-03-16 00:57:53 postgres/pg.highgo.ca@HIGHGO.CA
renew until 2020-03-16 14:57:50

GSSAPI Client
The result is almost the same as authenticate user postgres on PostgreSQL server, but if you look at the wireshark, you will find the PostgreSQL Server, i.e. 192.168.0.102 didn’t involve in the entire user authentication process. In other words, PostgreSQL Server only rely on the keytab file extracted from KDC server.

If you want to use a different user to log into database, then you need create the user on PostgreSQL server as database user, and create the principal for this user on KDC server. Create corresponding user authentication in pg_hba.conf file and restart PostgreSQL server. Then you should be able to use the new user to log in database from either Client machine or PostgreSQL server machine.

8. Common errors

Some common errors may happen during the PostgreSQL user authentication with Kerberos. Here is a short list.

  • Try to connect before the user credentials has been cached

    1
    2
    $ psql -d postgres -h pg.highgo.ca -U postgres
    psql: error: could not connect to server: FATAL: no pg_hba.conf entry for host "192.168.0.103", user "postgres", database "postgres"
  • User doesn’t exist in KDC

    1
    2
    $ psql -d postgres -h pg.highgo.ca -U jack
    psql: error: could not connect to server: FATAL: no pg_hba.conf entry for host "192.168.0.103", user "jack", database "postgres"
  • Service principal is expired

    1
    2
    3
    4
    $ psql -d postgres -h pg.highgo.ca -U postgres
    psql: error: could not connect to server: could not initiate GSSAPI security context: Unspecified GSS failure. Minor code may provide more information
    could not initiate GSSAPI security context: Ticket expired
    FATAL: no pg_hba.conf entry for host "192.168.0.103", user "postgres", database "postgres"

    9. Summary

    In this blog, we explained how to enable GSSAPI from source code and the keytab file, discussed those three key configuration files, i.e. “PostgreSQL Configuration”, “PostgreSQL Client Authentication” and “PostgreSQL Users Mapping”, and we also demonstrated user authentication from different hosts with Kerberos. In next blog, we will discuss how to check authentication and encryption status for different connection requests.

Featured image

1. Overview

PostgreSQL supports many secure ways to authenticate users, and one typical way is to use GSSAPI with Kerberos. However, when I was trying to investigate one issue which is related with GSSAPI in PostgreSQL, I couldn’t find a tutorial that I can follow to setup the environment easily. After some effort spent on Kerberos environment setup, I decided to write a blog to share what I have learned.

Since PostgreSQL GSSAPI user authentication does involve many background knowledge, I separate this blog into 3 parts:

  • part-1 will be focusing on the basic concepts used in Kerberos, Servers/Clients/Services/Users setup, and environment verification;
  • part-2 will discuss all related configuration files required on PostgreSQL for using GSSAPI user authentication;
  • part-3 will explain how to check GSSAPI authentication, encryption and user principal information for different connection options to have a better understanding about GSSAPI on PostgreSQL.

2. Basic Concepts for Kerberos

Kerberos is a network authentication protocol, which is designed to allow users to prove their identities over a non-secure network in a secure manner. This protocol is an industry-standard protocol for secure authentication with the messages designed to against spying and replay attacks. It has been built into a wide range of software such as, Chrome, Firefox, OpenSSH, Putty, OpenLDAP, Thunderbird and PostgreSQL etc. There are some open source implementations available such as, krb5 implemented by MIT used by most of the Unix-like Operating Systems, and heimdal used by OSX. Before dive into any detailed environment setup, some key concepts used in Kerberos need to be explained here.

Realm: Realm is equivalent to a domain or a group that all the users and servers belong to. It is required during Kerberos installation. For example, HIGHGO.CA, will be used as the Realm in this blog (change it according to your needs).

Principal: any users and services are defined as a principal in Kerberos. For example, david, postgres, postgres/pg.highgo.ca etc.

Instance: Kerberos uses Instance to manage service principals and especially for administrative principals. For example, root/admin where root is the principal and /admin is the instance.

SS: Service Server provides the services. For example, pg.highgo.ca is a server provide PostgreSQL database access service.

KDC: Key Distribution Center contains one database of all principals and two components:

  • AS: Authentication Server is responsible for the initial authentication request from users triggered by kinit.
  • TGS: Ticket Granting Server assigns the requested resource on a Service Server to the users. In this blog, both AS and TGS are all deployed on the same KDC server, i.e. kdc.highgo.ca.

TGT: Ticket Granting Ticket is a message used to confirm the identity of the principals and to deliver session keys which is used for future secured communication among user, TGS, and SS.

Keytab: a file extracted from the KDC principal database and contains the encryption key for a service or host. For example, postgres.keytab is the keytab file and will be used on PostgreSQL server, i.e. hg.highgo.ca.

Client: a workstation needs to access a Service Server. For example, psql running on a Client machine and want to connect to PostgreSQL server.

3. Kerberos environment setup

GSSAPI Diagram
When PostgreSQL authenticates a user with Kerberos, the overall processes in above diagram can be interpreted in below order.

  • Client initiates the authentication process, AS sends Client a temporary session key (grey key) encrypted with Client’s key (blue key);
  • Client uses the temporary session key to request services, TGS grants the services and sends two copies of the communication session keys (yellow key): one encrypted using temporary session key and another encrypted using Service Server’s key (green key);
  • Client forwards the communication session key to Service Server(PG) to confirm the user authentication. If it succeeded then both Client and Service Server will use the communication session key for the rest of the communication.

The realm, hostnames, and IP addresses used in this diagram are list below.

  • Realm: HIGHGO.CA
  • KDC (AS+TGS): kdc.highgo.ca (192.168.0.101)
  • Service Server (Postgres Server): pg.highgo.ca (192.168.0.102)
  • Client (psql): client (192.168.0.103)

In the following sections, we will discuss the setup in details. Here is the list of all the steps.

  1. setup hostname and IP addresses for each machine
  2. install Kerberos server packages on KDC server machine
  3. add admin principal to KDC server
  4. install Kerberos client packages on Client and Service server machine
  5. add Service server principal to KDC server
  6. add Client principal to KDC server
  7. verify principal on Service server machine
  8. verify principal on Client machine
3.1. Hostname and IP addresses

Because Kerberos protocol has a timestamp involved, all three machines need to have the clock to be synchronized at all the time. This can be done by setup an NTP client pointing some NTP servers in a production environment, but for simple, you can set all three machines in the same time zone with Internet connected. If you don’t have a DNS server ready or if you don’t want to use DNS, then you can manually set up the hostname by performing below commands on a Unix-like machine.

1
$ sudo vim /etc/hostname

Set kdc, pg and client accordingly to KDC, Service Server and Client machines

1
$ sudo vim /etc/hosts

Set below information to /etc/hosts for all three machines (change the hostname and IP addresses to fit your environment).

1
2
3
192.168.0.101	kdc.highgo.ca		kdc
192.168.0.102 pg.highgo.ca pg
192.168.0.103 client.highgo.ca client

After the setup for all three machines are done, restart all three machines.

3.2. KDC server installation

To setup Kerberos on KDC machine, two packages, i.e. krb5-kdc and krb5-admin-server need to be installed.

1
$ sudo apt install krb5-kdc krb5-admin-server

During the installation, the Kerberos will first ask for configuration of the realm. If you have the hosts setup already following about steps, then the realm will automatically show up, then simply click OK.
Kerberos Realm

Then it will ask to configure the Kerberos server, in our case, enter kdc.highgo.ca
Kerberos Server

And then ask for the administrative server, in our case, again, kdc.highgo.ca
Kerberos Admin Server

In the last step, it will remind you to use krb5_newrealm to setup the realm. Simply click OK.
Kerberos OK

Now, let’s run the krb5_newrealm with sudo to set up the master key for KDC database.

1
2
3
$ sudo krb5_newrealm
Enter KDC database master key:
Re-enter KDC database master key to verify:

Before start the Kerberos configuration, here are some basic kerberos tools need to know.

  • kadmin.local: KDC database administration tool used manage principal and policy.
  • kinit: used to obtain and cache Kerberos ticket-granting ticket.
  • klist: used to list principal and tickets held in a credentials cache, or the keys held in a keytab file.
  • ktutil: used to read, write, or edit entries in a keytab.
3.3. Admin Principal setup

Once KDC server has been installed, we need to create an admin user to manage principals, and it is recommended to use a different username. In our case, root/admin. Below are the commands used for the setup.

1
2
3
4
5
6
7
8
$ sudo kadmin.local
Authenticating as principal root/admin@HIGHGO.CA with password.
kadmin.local: addprinc root/admin
WARNING: no policy specified for root/admin@HIGHGO.CA; defaulting to no policy
Enter password for principal "root/admin@HIGHGO.CA":
Re-enter password for principal "root/admin@HIGHGO.CA":
Principal "root/admin@HIGHGO.CA" created.
kadmin.local: exit

You can check the principal root/admin by running listprincs root/admin.

1
2
kadmin.local:  listprincs root/admin
root/admin@HIGHGO.CA

Next, we need to assign the appropriate access control list to the admin user in the Kerberos configuration file /etc/krb5kdc/kadm5.acl which is used to manage access rights to the Kerberos database.

1
2
$ sudo vim /etc/krb5kdc/kadm5.acl
root/admin@HIGHGO.CA *

The above configuration gives all privileges to admin principal root/admin.

Now, finally it is time to restart Kerberos service.

1
$ sudo systemctl restart krb5-admin-server.service

Once Kerberos service is running again, we can perform a quick test. First, try klist to see if any credentials cache exists, then try to see if root/admin can be authenticated. If no error, then try to use klist again to list the principal cached.

1
2
$ klist
klist: No credentials cache found (filename: /tmp/krb5cc_1000)

The “No credentials cache found” tells us there is no principal has been authenticated yet. Let’s run kinit root/admin to see if we can get it authenticated.

1
2
$ kinit root/admin
Password for root/admin@HIGHGO.CA:

If no error during root principal init, then run klist again.

1
2
3
4
5
6
7
$ klist
Ticket cache: FILE:/tmp/krb5cc_1000
Default principal: root/admin@HIGHGO.CA

Valid starting Expires Service principal
2020-03-12 17:18:53 2020-03-13 03:18:53 krbtgt/HIGHGO.CA@HIGHGO.CA
renew until 2020-03-13 17:18:51

If the credentials cache is found, then the KDC administrative principal setup is done.

3.4. Service Server and Client installation

For Service Server and Client, we only need to install the client/user related packages. Run below commands on both Service Server and Client machines.

1
$ sudo apt install krb5-user libpam-krb5 libpam-ccreds auth-client-config

Same as KDC Server setup, it will ask for Realm, Kerberos server and Administrative server. Enter exactly the same information used for KDC Server and then click OK. After the installation is done, we should have below information configured in /etc/krb5.conf

1
2
3
4
5
[realms]
HIGHGO.CA = {
kdc = kdc.highgo.ca
admin_server = kdc.highgo.ca
}

Now, back to KDC Server side to add principals for Service Server and Client.

3.5. Add principal for Service Server
  • Add a principal postgres which is the database user and the Linux login user.

    1
    2
    3
    4
    5
    6
    $ sudo kadmin.local
    kadmin.local: addprinc postgres
    WARNING: no policy specified for postgres@HIGHGO.CA; defaulting to no policy
    Enter password for principal "postgres@HIGHGO.CA":
    Re-enter password for principal "postgres@HIGHGO.CA":
    Principal "postgres@HIGHGO.CA" created.
  • Add a principal postgres/pg.highgo.ca as a principle instance for Service server

    1
    2
    3
    4
    5
    kadmin.local:  addprinc postgres/pg.highgo.ca
    WARNING: no policy specified for postgres/pg.highgo.ca@HIGHGO.CA; defaulting to no policy
    Enter password for principal "postgres/pg.highgo.ca@HIGHGO.CA":
    Re-enter password for principal "postgres/pg.highgo.ca@HIGHGO.CA":
    Principal "postgres/pg.highgo.ca@HIGHGO.CA" created.
  • Extract the service principal from KDC principal database to a keytab file, which will be used to configure PostgreSQL Server. The file should be saved to current folder when run below commands.

    1
    2
    3
    4
    5
    $ ktutil 
    ktutil: add_entry -password -p postgres/pg.highgo.ca@HIGHGO.CA -k 1 -e aes256-cts-hmac-sha1-96
    Password for postgres/pg.highgo.ca@HIGHGO.CA:
    ktutil: wkt postgres.keytab
    ktutil: exit
3.6. Add principal for Client
  • add a principal david for Client, this is the login user for Clinet OS, and later will be used to log into database
    1
    2
    3
    4
    5
    kadmin.local:  addprinc david
    WARNING: no policy specified for david@HIGHGO.CA; defaulting to no policy
    Enter password for principal "david@HIGHGO.CA":
    Re-enter password for principal "david@HIGHGO.CA":
    Principal "david@HIGHGO.CA" created.
  • check all the principals using listprincs to confirm david@HIGHGO.CA, postgres@HIGHGO.CA and postgres/pg.highgo.ca@HIGHGO.CA are all successfully created.
    1
    2
    3
    4
    5
    6
    7
    8
    9
    10
    11
    kadmin.local:  listprincs 
    K/M@HIGHGO.CA
    david@HIGHGO.CA
    kadmin/admin@HIGHGO.CA
    kadmin/changepw@HIGHGO.CA
    kadmin/kdc.highgo.ca@HIGHGO.CA
    kiprop/kdc.highgo.ca@HIGHGO.CA
    krbtgt/HIGHGO.CA@HIGHGO.CA
    postgres/pg.highgo.ca@HIGHGO.CA
    postgres@HIGHGO.CA
    root/admin@HIGHGO.CA
3.7. Verify principal on Service Server

After the above principals have been created from KDC Server, let’s back to Service Server to verify the principal using klist and kinit.

1
2
postgres@pg:~$ klist
klist: No credentials cache found (filename: /tmp/krb5cc_1001)
1
2
postgres@pg:~$ kinit postgres/pg.highgo.ca
Password for postgres/pg.highgo.ca@HIGHGO.CA:
1
2
3
4
5
6
7
postgres@pg:~$ klist
Ticket cache: FILE:/tmp/krb5cc_1001
Default principal: postgres/pg.highgo.ca@HIGHGO.CA

Valid starting Expires Service principal
2020-03-12 18:25:23 2020-03-13 04:25:23 krbtgt/HIGHGO.CA@HIGHGO.CA
renew until 2020-03-13 18:25:20
3.8. Verify principal on Client

Now, back to Client machine to verify the principal using klist and kinit.

1
2
david@client:~$ klist
klist: No credentials cache found (filename: /tmp/krb5cc_1000)
1
2
david@client:~$ kinit david
Password for david@HIGHGO.CA:
1
2
3
4
5
6
7
david@client:~$ klist
Ticket cache: FILE:/tmp/krb5cc_1000
Default principal: david@HIGHGO.CA

Valid starting Expires Service principal
2020-03-12 18:21:41 2020-03-13 04:21:41 krbtgt/HIGHGO.CA@HIGHGO.CA
renew until 2020-03-13 18:21:38

If the principals verification are all success on both Service Server and Client machines, then we are ready to configure PostgreSQL and prepare GSSAPI user authentication with Kerberos.

4. Summary

In this blog, we explained the basic concepts used in Kerberos, performed a step by step setup on Ubuntu, added all the required principals to KDC, and also verified each principal which will be used in next two blogs.

Reference:

  1. Kerberos on ubuntu
  2. Kerberos wiki
  3. PostgreSQL GSSAPI Authentication

1. Overview

PostgreSQL is one of the most popular free open-source relational database management systems in the world. Other than complies to SQL standard, PostgreSQL also provides a great extensibility which allows users to define their own extensions. With such a great feature, PostgreSQL is not only a database but also an application development platform. In this tutorial, we will go through the entire process about creating an extension, running test against this extension, and debugging the extneson using Eclipse.

2. Create an extension

To create an extension in PostgreSQL, you need at least two files: control file and SQL script file. The control file uses a naming convention extension_name.control. let‘s create an extension call get_sum, then the confile file should contain the basic information like below.

1
2
3
4
5
6
$ cat get_sum.control 
# get_sum postgresql extension
comment = 'simple sum of two integers for postgres extension using c'
default_version = '0.0.1'
module_pathname = '$libdir/get_sum'
relocatable = false
  • comment comments about this extension

  • default_version the version of this extension which is also part of the SQL script file

  • module_pathname specifies the shared library path for this extension

The SQL script file must be named as extension_name--version.sql.

1
2
3
4
5
6
7
$ cat get_sum--0.0.1.sql 
--complain if script is sourced in psql, rather than via CREATE EXTENSION
\echo Use "CREATE EXTENSION get_sum" to load this file. \quit

CREATE OR REPLACE FUNCTION get_sum(int, int) RETURNS int
AS '$libdir/get_sum'
LANGUAGE C IMMUTABLE STRICT;

The second line is to avoid loading this SQL script using psql, and the rest declares the get_sum function will be created in shared library using c language.

Typically, an extension not only defines new objects, but also adds new logic to deal with those new objects. To boost the performance, you should write the logic in C code with a Makefile. PostgreSQL provides a build infrastructure for extension called PGXS, which uses a global variable USE_PGXS to include the global PGXS makefiles. One typical Makefile example found in PostgreSQL is something like below.

1
2
3
4
5
6
7
8
9
10
11
12
13
14
MODULE_big = dblink
… …

ifdef USE_PGXS
PG_CONFIG = pg_config
PGXS := $(shell $(PG_CONFIG) --pgxs)
include $(PGXS)
else
SHLIB_PREREQS = submake-libpq
subdir = contrib/dblink
top_builddir = ../..
include $(top_builddir)/src/Makefile.global
include $(top_srcdir)/contrib/contrib-global.mk
endif

With PGXS build infrastructure, you can build your extension by simply typing make If you put your extension under the contrib folder within PostgreSQL source tree, or you have to specify the PG_CONFIG to tell the make command where to find out the pg_config If you put your extension somewhere else.

In the latest PostgreSQL official document, the assumption that an extension should be under the PostgreSQL source tree has been removed. The reason is that there are more and more extension coming from the Internet, and it is not easy to manage so many extensions within PostgreSQL source tree. Let’s follow the latest instruction to build our Makefile.

1
2
3
4
5
6
7
8
9
10
$ cat Makefile 
MODULES = get_sum
EXTENSION = get_sum # the extersion's name
DATA = get_sum--0.0.1.sql # script file to install
REGRESS = get_sum_test # the test script file

# for posgres build
PG_CONFIG = pg_config
PGXS := $(shell $(PG_CONFIG) --pgxs)
include $(PGXS)
  • MODUELS specifies the shared object can be used in psql

  • EXTENSION specifies the extension name

  • DATA specifies the SQL scripts

  • REGRESS specifies the regression test script file

The rest is following the latest recommendation from postgreSQL official website. In other words, we should always provide the PG_CONFIG when building or testing the extension.

Once the Makefile is set, you need to create a C file. In this tutorial, we build a simple get_sum function to explain how to add a C file into the extension.

1
2
3
4
5
6
7
8
9
10
11
12
13
14
15
16
17
18
19
20
21
22
23
24
25
26
27
28
$ cat get_sum.c
#include "postgres.h"
#include "fmgr.h"

PG_MODULE_MAGIC;

PG_FUNCTION_INFO_V1(get_sum);

Datum
get_sum(PG_FUNCTION_ARGS)
{
bool isnull, isnull2;

isnull = PG_ARGISNULL(0);
isnull2 = PG_ARGISNULL(1);
if (isnull || isnull2)
ereport( ERROR,
( errcode(ERRCODE_FEATURE_NOT_SUPPORTED),
errmsg("two and only two integer values are required as input")));

int32 a = PG_GETARG_INT32(0);
int32 b = PG_GETARG_INT32(1);
int32 sum;

sum = a + b;

PG_RETURN_INT32(sum);
}

Here, the header file postgres.h includes most of the basic stuff needed for interfacing with Postgres. It should be included in every C-File when declares Postgres functions. The header file fmgr.h needs to be included in order to use PG_GETARG_XXX, PG_RETURN_XXX and PG_ARGISNULL macros. The details about the macros are defined here. This extension function is declared as get_sum with two integers as input parameters, and the result is the sum of these two input parameters.

3. Test an extension

In order to verify this extension, we need to follow PostgreSQL regression test framework to add some test cases. First, we need to create a folder named as sql, which contains the SQL test scripts need to be run.

1
2
3
4
5
6
7
8
9
10
11
12
13
14
15
16
17
$ cat sql/get_sum_test.sql 
CREATE EXTENSION get_sum;
SELECT get_sum(1::INT, 1::INT);
SELECT get_sum(101::INT, 202::INT);
SELECT get_sum(0::INT, 0::INT);
SELECT get_sum(-1::INT, 0::INT);
SELECT get_sum(-1::INT, -1::INT);
SELECT get_sum(-101::INT, -202::INT);
SELECT get_sum(NULL::INT, 11::INT);
SELECT get_sum(-1::INT, NULL::INT);
SELECT get_sum(0::INT, 2147483647::INT);
SELECT get_sum(-2147483648::INT, 0::INT);
SELECT get_sum(2147483647::INT, 2147483647::INT);
SELECT get_sum(-2147483648::INT, -2147483648::INT);
SELECT get_sum(-2147483648::INT, 2147483647::INT);
SELECT get_sum(2147483647::INT, -2147483648::INT);
SELECT get_sum(111111111111111::INT, 222222222222222::INT);

Then we need to create another folder called expected, as the name indicated, it holds the expected output corresponding to the test SQL script. To build the expected output, as recommended by postgresSQL: run the test once, a results folder will be generated with the test results named as script_name.out, check the result to see if it is what you expected, then simply copy this result file to expected folder. If you run the test again, the regress test framework will compare a new test results output against the file in expected folder, if any difference found, then a .diff file will be created. Now, let’s run a test.

1
2
cd crontrib/get_sum/
make PGUSER=postgres PG_CONFIG=~/eclipse-workspace/postgres/bin/pg_config install

Build and install the extension including shared library, contorl and SQL script files, then run installcheck to test the extension function using the SQL test scripts.

1
make PGUSER=postgres PG_CONFIG=~/eclipse-workspace/postgres/bin/pg_config installcheck

If the extension function works properly, then you should see the message like below,

1
2
3
4
5
6
7
8
9
10
11
12
13
/home/david/eclipse-workspace/postgres/lib/pgxs/src/makefiles/../../src/test/regress/pg_regress --inputdir=./ --bindir='/home/david/eclipse-workspace/postgres/bin' --dbname=contrib_regression get_sum_test  	
(using postmaster on Unix socket, default port)
============== dropping database "contrib_regression" ==============
DROP DATABASE
============== creating database "contrib_regression" ==============
CREATE DATABASE
ALTER DATABASE
============== running regression test queries ==============
test get_sum_test ... ok 24 ms

=====================
All 1 tests passed.
=====================

4. Debug an extension

This get_sum is a very simple example to show the basic when creating a new extension from scratch. In reality, the extension will be way complicated, and you might need to keep debugging the extension until it works as designed. If you follow my previous post, then we can use Eclipse to debug this extension.

First, turn on a Linux terminal and start the postgers services,

1
$ pg_ctl -D $HOME/pg12data/data/ -l logfile start

And then start a psql connection,

1
2
3
$ psql -U postgres
psql (12.1)
Type "help" for help.

Now, create the extension for get_sum,

1
2
postgres=# CREATE EXTENSION get_sum;
CREATE EXTENSION

Turn on another terminal, run ps -ef |grep postgres to find out the pid of the postgres which is dealing with requests coming from current psql connection.

Switch back to the Eclipse, right click on project, select Debug As, then select Debug Configurations…. Fill in the information as shown below then click Debug.

GitHub Logo

A window will pop up like below for you to choose the right progres to attach.
GitHub Logo

Switch to the psql terminal, then type a query to use this extension, for example,

1
postgres=# select get_sum(111, 222);

The terminal should be frozen immediately. Switch back to Eclipse, and you should see the postgres stopped inside get_sum c function. If you type bt from the Debugger Console, then the backtrace should show up like below and you can dig into it to see how the extension is eventually called.
GitHub Logo

Now, you can try to print out the input variables and the result before and after, and compare with the psql console input and output. If anything goes wrong, you use Elipse to find out the issue and fix the extension code from there.

Below is the Eclipse debugging message,
GitHub Logo

This is the psql console screenshot,
GitHub Logo

All the source code used in this tutorial is available here

5. Summary

In this blog, we discussed how to create an extension from scratch within PGXS build infrastrature, how to create some test cases to test the extension, and we also covered the procedure of debugging an extension using Eclipse.

Reference:

1. A Guide to Create User-Defined Extension Modules to Postgres

2. How to build and debug PostgreSQL 12 using latest Eclipse IDE on Ubuntu 18.04

1. Overview

This tutorial provides detailed instructions to help a newbie setup the building and debugging environment with the latest Eclipse IDE for C/C++ Developers for current Postgres 12.1 release on LTS Ubuntu 18.04. Below is the key requirement.

  • Linux: ubuntu-18.04.3-desktop-amd64
  • Postgres: REL_12_STABLE branch
  • Eclipse: eclipse-cpp-2019-12-R-linux-gtk-x86_64.tar.gz

2. Install Ubuntu 18.04 Desktop

Go to the Ubuntu official website to download the latest LTS Ubuntu 18.04.3 Desktop (64-bit) and Install it on a virtual machine such as VirtualBox. The option “Minimal Installation” with web browser and basic utilities is good enough for this tutorial.

3. Install git and checkout PostgreSQL source code

PostgreSQL has the source code available on github, in order to check out the source code, you need to install git using the command below.

1
$ sudo apt install git -y

PostgreSQL has a version 12 released in October 2019, and later was upgraded to 12.1 in November. This tutorial will use the latest PostgreSQL12 stable branch to explain how to build and debug the source code using the latest Eclipse IDE. Run the commands below to check out version 12.

1
2
3
4
5
6
7
8

$ mkdir sandbox
$ cd sandbox/
$ git clone https://github.com/postgres/postgres
$ cd postgres/
$ git checkout REL_12_STABLE
$ git branch
* REL_12_STABLE

Now, we are on PostgreSQL 12 stable release branch.

4. Install PostgreSQL build dependency

In order to build PostgreSQL source code, we need to install the basic build dependency with below command.

1
$ sudo apt install -y pkg-config build-essential ibreadline-devbison flex

With the command above, the basic libraries and utilities for building c and cpp code will be installed, such as, dpkg-dev, gcc, g++, make and libc6-dev. Moreover, the libraries and tools required by PostgreSQL such as libreadline, zlib, bison and flex will also be installed as well.

5. Configure PostgreSQL and generate Makefiles

Before importing PostgreSQL source code into Eclipse as a project, we need to use the configure script provided by PostgreSQL to generate the Makefiles. Run the command below to prepare the Makefiles for Eclipse later to use.

1
$ ./configure --prefix=$HOME/eclipse-workspace/postgres --enable-debug CFLAGS='-O0'

--prefix is used to define the installation path, in this case, all the PostgreSQl binaries, libraries, and utilities will be installed to $HOME/eclipse-workspace

--enable-debug is used to enable gdb debugging option, so that we can use Eclipse to set up a breakpoint to trace the source code.

--CFLAG is used to specify the compile options, -O0 is used to remove code optimization.

If all the dependency has been installed properly, then Makefile.global should be generated in ./src folder. To verify the Makefile.global has been created properly, using vi to open it and check the CFLAG parameter to make sure -g and -O0 are set. It should look like below.

1
CFLAGS = -Wall -Wmissing-prototypes -Wpointer-arith -Wdeclaration-after-statement -Werror=vla -Wendif-labels -Wmissing-format-attribute -Wformat-security -fno-strict-aliasing -fwrapv -fexcess-precision=standard -Wno-format-truncation -g -O0

It is better to run the commands below to test if everything has been set up properly before import posgtres source code into Eclipse. After a while, if you see the message “All of PostgreSQL successfully made. Ready to install.” then we are ready to setup Eclipse IDE.

1
2
3
4
$ cd $HOME/sandbox/postgres
$ make
… …
All of PostgreSQL successfully made. Ready to install.

6. Install Eclipse IDE for C/C++ Developers

Now, go to the Eclipse website and download the latest Eclipse IDE for C/C++ Developers for Linux 64-bit. After the download is finished, simply untar the file to a folder, for example, /opt. If you prefer to open the Eclipse from Desktop, then you need to run below commands to set up the Desktop Shortcut.

1
2
3
4
5
6
7
8
# Update Packages Index
$ sudo apt-get update

# Install GNOME Panel
$ sudo apt-get install --no-install-recommends gnome-panel -y

# Create Desktop Shortcuts
$ gnome-desktop-item-edit ~/Desktop/ --create-new

Make sure you choose the right eclipse binary and then fill in the Name and Comment.

GitHub Logo

Eclipse requires a JRE environment to be installed, so run below command before open Eclipse.

1
$ sudo apt install default-jre -y

7. Import Postgres project

After the JRE environment has been installed successfully, double click eclipse icon from Desktop to open the IDE. From Project Explorer, click on Import project…, then fill in the information like below screenshot and then click Finish button.

GitHub Logo

After project importing finished, right click on the project, select Build Targets, then Create…, and fill in install to the Target name, then click on OK.

GitHub Logo

To build and install PostgreSQL, right click on Build Target, then click Build…, and select install and click on Build.

It may take a while to compile all the source code and install the binaries, libraries, and utilities. Once finished, you should see a message from Eclipse Console “PostgreSQL installation complete.”

Open a Linux terminal, type below commands if PostgreSQL has been installed into the folder $HOME/eclipse-workspace/postgres.

1
2
3
4
5
6
7
$ cd $HOME/eclipse-workspace/postgres
$ ls -l
total 16
drwxrwxr-x 2 david david 4096 Dec 28 12:08 bin
drwxrwxr-x 6 david david 4096 Dec 28 12:08 include
drwxrwxr-x 4 david david 4096 Dec 28 12:08 lib
drwxrwxr-x 6 david david 4096 Dec 28 12:08 share

8. Configure and start Postgres server

Now, run below commands to setup the environment variables PATH and PGDATA in the Linux terminal.

1
2
3
$ export PATH=$HOME/eclipse-workspace/postgres/bin:$PATH
$ mkdir -p $HOME/pg12data/data/
$ export PGDATA=$HOME/pg12data/data/

Here, we set up the path for looking up all PosgreSQL binaries, create a new folder for PosgreSQL database files and settings and then export it as an environment variable PGDATA to this terminal.

After the environment has been setup, we need to use the same terminal to initialize the database and setup a superuser password. Notes, the database initialization needs to be done only once.

1
2
3
$ initdb -D $HOME/pg12data/data/ -U postgres -W
Enter new superuser password: postgres
Enter it again postgres

Now, it is time to bring up the postgres server from the terminal by using the command below.

1
2
3
$ pg_ctl -D $HOME/pg12data/data/ -l logfile start
waiting for server to start.... done
server started

To check if all the services has started properly, run below commands,

1
2
3
4
5
6
7
8
9
10
$ ps -ef |grep postgres
david 32445 1 0 12:35 ? 00:00:00 /home/david/eclipse-workspace/postgres/bin/postgres -D /home/david/pg12data/data
david 32447 32445 0 12:35 ? 00:00:00 postgres: checkpointer
david 32448 32445 0 12:35 ? 00:00:00 postgres: background writer
david 32449 32445 0 12:35 ? 00:00:00 postgres: walwriter
david 32450 32445 0 12:35 ? 00:00:00 postgres: autovacuum launcher
david 32451 32445 0 12:35 ? 00:00:00 postgres: stats collector
david 32452 32445 0 12:35 ? 00:00:00 postgres: logical replication launcher
$ sudo netstat -autnlp |grep 5432
tcp 0 0 127.0.0.1:5432 0.0.0.0:* LISTEN 32445/postgres

From the output, we can tell a posgres server with pid 32445 is listening on port 5432, and all the other required servers are also running, such as background writer which issues writes of “dirty” (new or modified) shared buffers. Without any change to the default configuration, the above shows how many servers are supposed to start after issuing a pg_ctl start command.

9. Connect a client to Postgres server

To connect a psql client to the postgres server locally, you can run the command below in the same terminal.

1
2
3
4
5
6
$ psql -U postgres
psql (12.1)
Type "help" for help.
postgres=# \c
You are now connected to database "postgres" as user "postgres"
postgres=#

Now, if you check the postgres processes again, a new postgres server should show in the list,

1
2
3
$ ps -ef |grep postgres
david 721 6008 0 13:02 pts/1 00:00:00 psql -U postgres
david 723 32445 0 13:03 ? 00:00:00 postgres: postgres postgres [local] idle

Here, psql is the client running on the same Linux machine, and a new posgres process with pid 723 is the new server to deal with all the requests coming from the client psql with pid 721.

10. Attach postgres to debug a simple query

Now, we are finally ready to attach this new postgres server to trace a simple query in Eclipse.
Right click on project pgdev, select Debug As, then select Debug Configurations…
Right click on C/C++ Attach Application, then fill in the posgres binary path in C/C++ Application.

GitHub Logo

After all the setting is done by referring above screenshot, click Apply, then click Debug.

A Select Processes window will pop up, type “postgres” to show all running postgres servers, then select postgres server with pid 723 which is the one connected to the psql client. Click OK to launch the debugging window in Eclipse.

GitHub Logo

Well, you probably will end up with an error like below. This is caused by an Ubuntu built-in feature which doesn’t allow ptrace of a non-child process by any non-root users.

GitHub Logo

To resolve this issue, we need to temporarily disable this feature by issue a command below,

1
2
3
4
5
6
7
$ cat /proc/sys/kernel/yama/ptrace_scope
1
$ echo 0 | sudo tee /proc/sys/kernel/yama/ptrace_scope
[sudo] password for avid:
0
$ cat /proc/sys/kernel/yama/ptrace_scope
0

To permanently disable this feature, edit the file /etc/sysctl.d/10-ptrace.conf.

1
2
$ sudo vi /etc/sysctl.d/10-ptrace.conf
kernel.yama.ptrace_scope = 0

Once the permission issue has been fixed, relaunch the debug by attaching to running postgre server with pid 723 again, then you should see below window, press F8 to resume this postgre process.

GitHub Logo

11. Debug a simple query

Now, back to the psql client terminal, create a table and insert a few records, and then perform a simple query on this table.

1
2
3
4
5
6
7
8
9
10
11
12
postgres=# CREATE TABLE test (id serial PRIMARY KEY, name VARCHAR(20));
CREATE TABLE
postgres=# INSERT INTO test VALUES(1, 'test1');
INSERT 0 1
postgres=# INSERT INTO test VALUES(2, 'test2');
INSERT 0 1
postgres=# SELECT id, name FROM test;
id | name
----+-------
1 | test1
2 | test2
(2 rows)

If everything works fine, then, switch back to Eclipse, to set up a breakpoint by entering b exec_simple_query in Debugger Console.

GitHub Logo

or using the search function in Eclipse to find out exec_simple_query function definition, i.e. line 985 in ./sandbox/postgres/src/backend/tcop/postgres.c, and right click on the left side bar and select Toggle Breakpoint, then one tiny dot will be showing up to indicate the breakpoint is on.

GitHub Logo

Then, click on Resume button or press F8, or enter c in the Debugger Console to continue postgre process. When this postgres server is running again, then switch back to the psql client terminal and repeat the previous SELECT query command.

At this time, you should see the psql client is hanging without any results returned.
Now, switch back to Eclipse. You should also see this postgres process stopped in exec_simple_query function. If you enter bt in Debugger Console, then you should be able to see the backtrace below highlighted.

GitHub Logo

To check any function and value in the backtrace, for example, frame 5 PostmasterMain, type f 5 in Debugger Console and then Enter. Eclipse will navigate you to the function immediately and highlight it. From there you can use Ctrl + left click to jump into the function definition and check the details.

Image-11
GitHub Logo

After finishing all the check, then resume the postgres process, and then switch to the psql client terminal, you should see the results is returned.

Enjoy your debugging with Eclipse for PostgreSQL.

Reference:

1. Newbie to PostgreSQL – where to start

2. Trace Query Processing Internals with Debugger

3. Working with Eclipse