1. Overview
PostgreSQL supports many secure ways to authenticate users, and one typical way is to use GSSAPI with Kerberos. However, when I was trying to investigate one issue which is related with GSSAPI in PostgreSQL, I couldn’t find a tutorial that I can follow to setup the environment easily. After some effort spent on Kerberos environment setup, I decided to write a blog to share what I have learned.
Since PostgreSQL GSSAPI user authentication does involve many background knowledge, I separate this blog into 3 parts:
- part-1 will be focusing on the basic concepts used in Kerberos, Servers/Clients/Services/Users setup, and environment verification;
- part-2 will discuss all related configuration files required on PostgreSQL for using GSSAPI user authentication;
- part-3 will explain how to check GSSAPI authentication, encryption and user principal information for different connection options to have a better understanding about GSSAPI on PostgreSQL.
2. Basic Concepts for Kerberos
Kerberos is a network authentication protocol, which is designed to allow users to prove their identities over a non-secure network in a secure manner. This protocol is an industry-standard protocol for secure authentication with the messages designed to against spying and replay attacks. It has been built into a wide range of software such as, Chrome, Firefox, OpenSSH, Putty, OpenLDAP, Thunderbird and PostgreSQL etc. There are some open source implementations available such as, krb5 implemented by MIT used by most of the Unix-like Operating Systems, and heimdal used by OSX. Before dive into any detailed environment setup, some key concepts used in Kerberos need to be explained here.
Realm: Realm is equivalent to a domain or a group that all the users and servers belong to. It is required during Kerberos installation. For example, HIGHGO.CA, will be used as the Realm in this blog (change it according to your needs).
Principal: any users and services are defined as a principal in Kerberos. For example, david, postgres, postgres/pg.highgo.ca etc.
Instance: Kerberos uses Instance to manage service principals and especially for administrative principals. For example, root/admin where root is the principal and /admin is the instance.
SS: Service Server provides the services. For example, pg.highgo.ca is a server provide PostgreSQL database access service.
KDC: Key Distribution Center contains one database of all principals and two components:
- AS: Authentication Server is responsible for the initial authentication request from users triggered by
kinit. - TGS: Ticket Granting Server assigns the requested resource on a Service Server to the users. In this blog, both AS and TGS are all deployed on the same KDC server, i.e.
kdc.highgo.ca.
TGT: Ticket Granting Ticket is a message used to confirm the identity of the principals and to deliver session keys which is used for future secured communication among user, TGS, and SS.
Keytab: a file extracted from the KDC principal database and contains the encryption key for a service or host. For example, postgres.keytab is the keytab file and will be used on PostgreSQL server, i.e. hg.highgo.ca.
Client: a workstation needs to access a Service Server. For example, psql running on a Client machine and want to connect to PostgreSQL server.
3. Kerberos environment setup
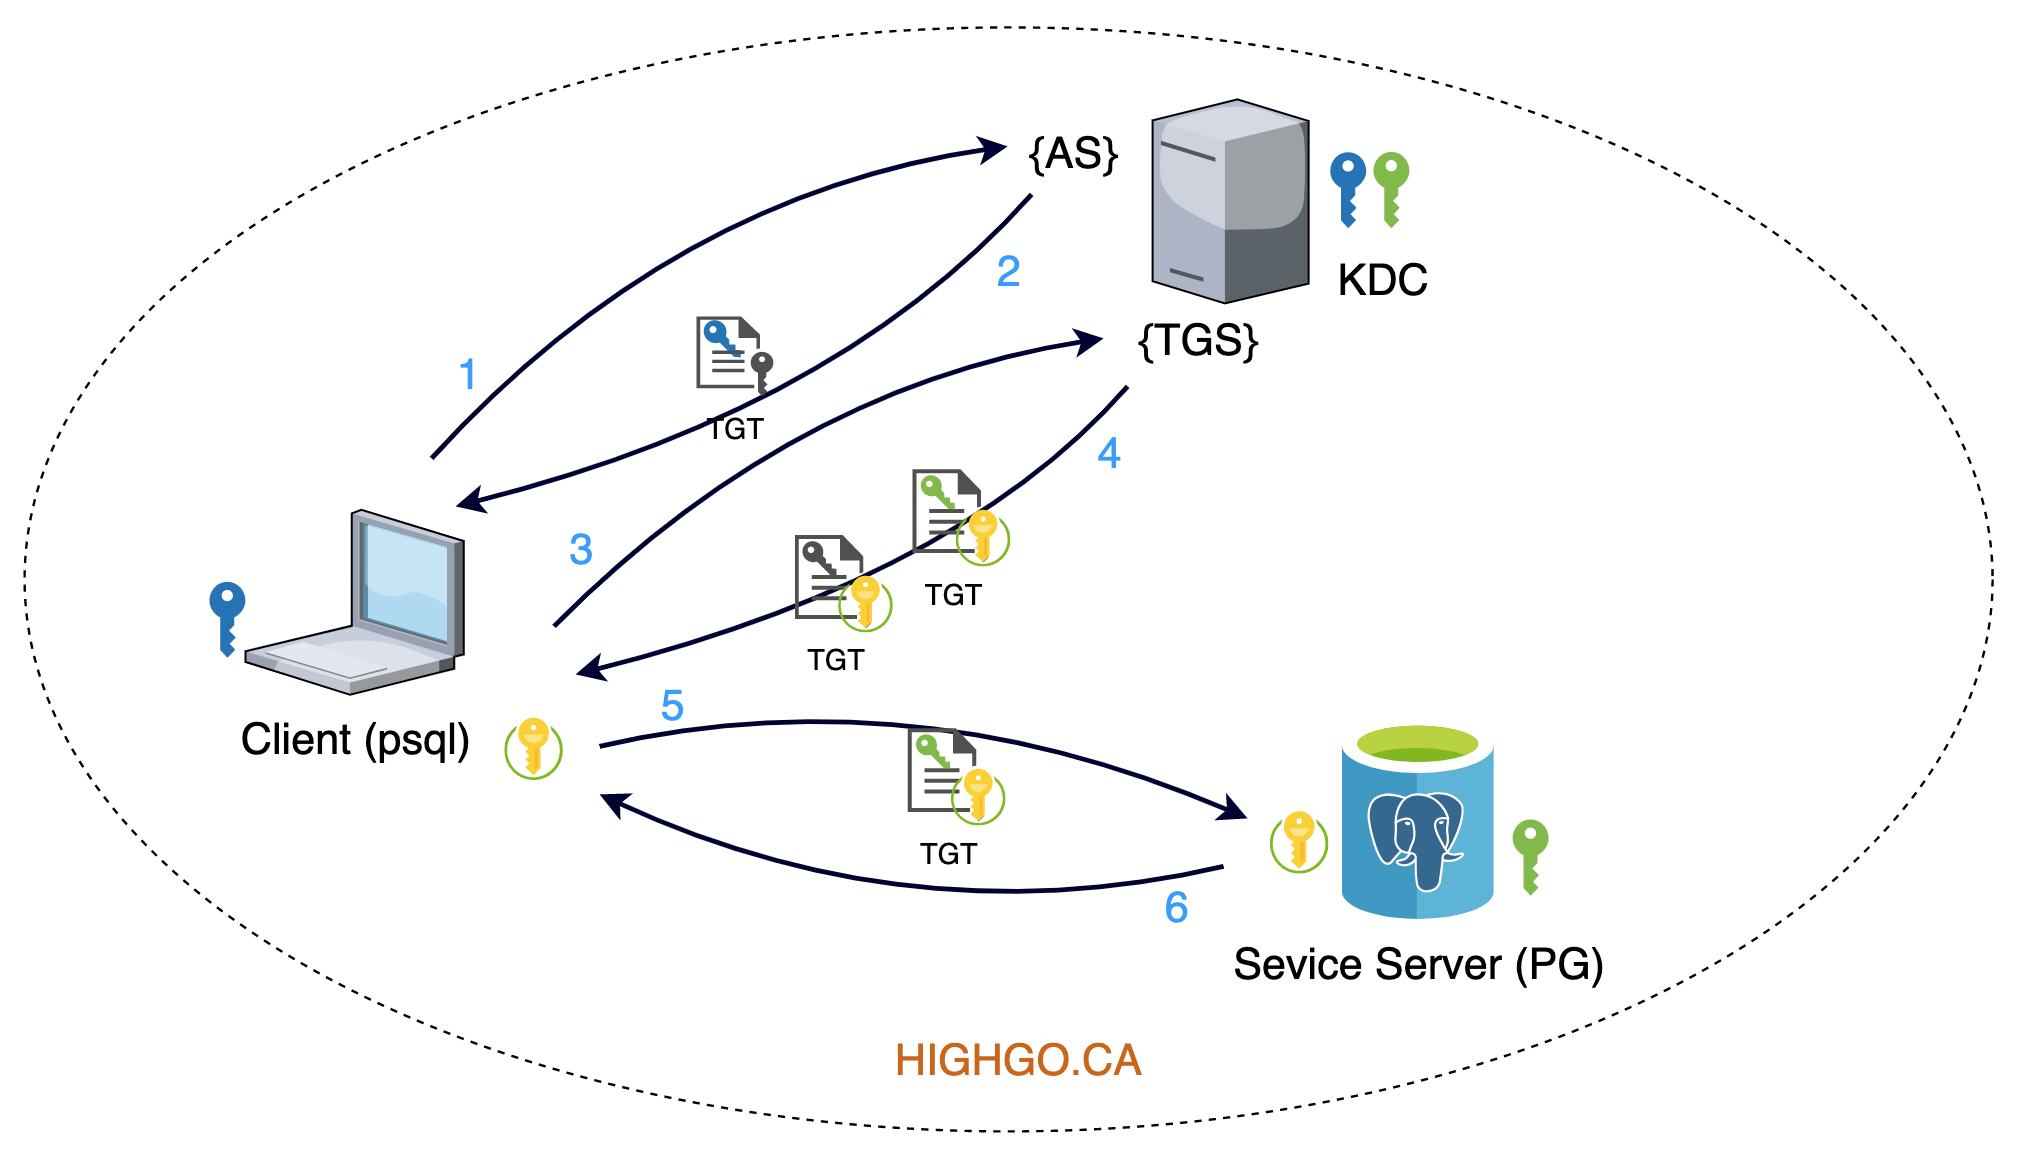
When PostgreSQL authenticates a user with Kerberos, the overall processes in above diagram can be interpreted in below order.
- Client initiates the authentication process, AS sends Client a temporary session key (grey key) encrypted with Client’s key (blue key);
- Client uses the temporary session key to request services, TGS grants the services and sends two copies of the communication session keys (yellow key): one encrypted using temporary session key and another encrypted using Service Server’s key (green key);
- Client forwards the communication session key to Service Server(PG) to confirm the user authentication. If it succeeded then both Client and Service Server will use the communication session key for the rest of the communication.
The realm, hostnames, and IP addresses used in this diagram are list below.
- Realm: HIGHGO.CA
- KDC (AS+TGS): kdc.highgo.ca (192.168.0.101)
- Service Server (Postgres Server): pg.highgo.ca (192.168.0.102)
- Client (psql): client (192.168.0.103)
In the following sections, we will discuss the setup in details. Here is the list of all the steps.
- setup hostname and IP addresses for each machine
- install Kerberos server packages on KDC server machine
- add admin principal to KDC server
- install Kerberos client packages on Client and Service server machine
- add Service server principal to KDC server
- add Client principal to KDC server
- verify principal on Service server machine
- verify principal on Client machine
3.1. Hostname and IP addresses
Because Kerberos protocol has a timestamp involved, all three machines need to have the clock to be synchronized at all the time. This can be done by setup an NTP client pointing some NTP servers in a production environment, but for simple, you can set all three machines in the same time zone with Internet connected. If you don’t have a DNS server ready or if you don’t want to use DNS, then you can manually set up the hostname by performing below commands on a Unix-like machine.
1 | $ sudo vim /etc/hostname |
Set kdc, pg and client accordingly to KDC, Service Server and Client machines
1 | $ sudo vim /etc/hosts |
Set below information to /etc/hosts for all three machines (change the hostname and IP addresses to fit your environment).
1 | 192.168.0.101 kdc.highgo.ca kdc |
After the setup for all three machines are done, restart all three machines.
3.2. KDC server installation
To setup Kerberos on KDC machine, two packages, i.e. krb5-kdc and krb5-admin-server need to be installed.
1 | $ sudo apt install krb5-kdc krb5-admin-server |
During the installation, the Kerberos will first ask for configuration of the realm. If you have the hosts setup already following about steps, then the realm will automatically show up, then simply click OK.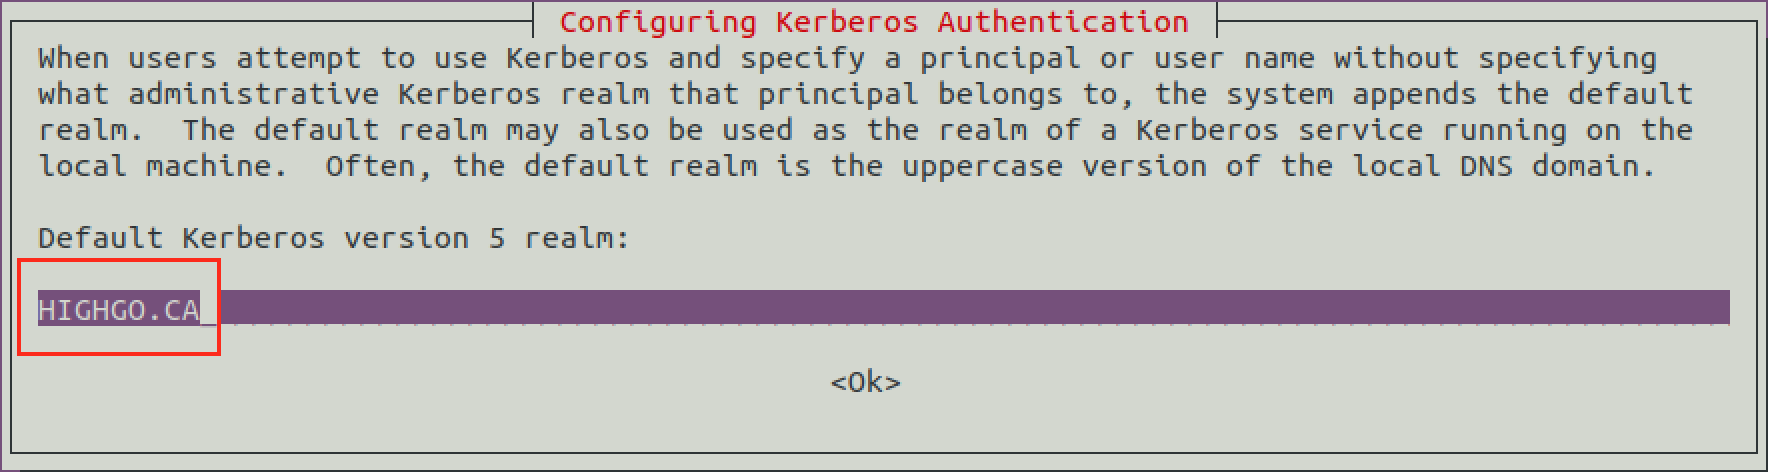
Then it will ask to configure the Kerberos server, in our case, enter kdc.highgo.ca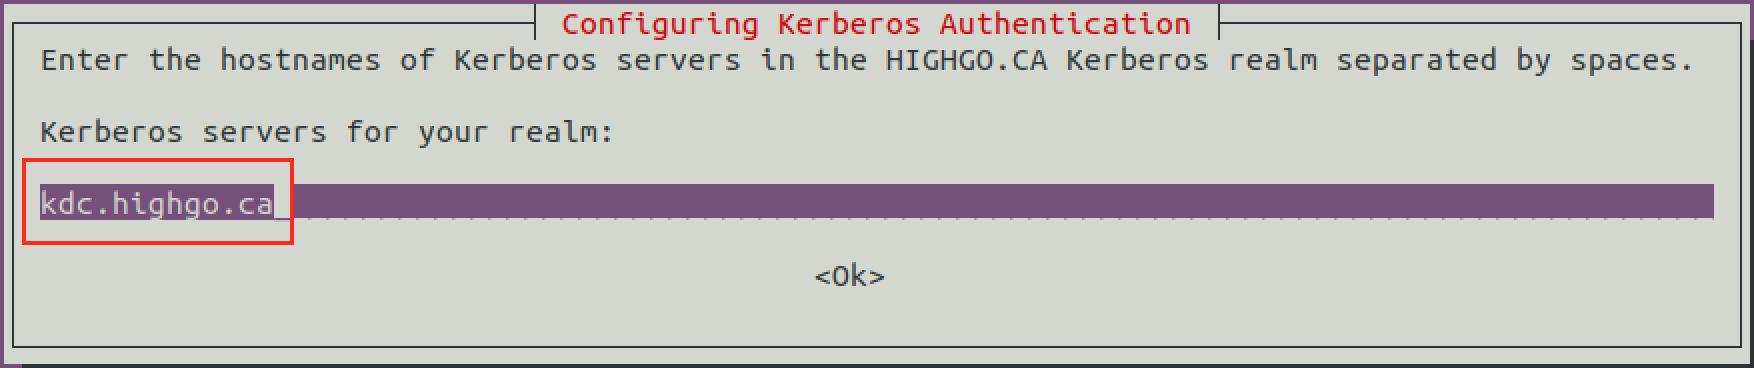
And then ask for the administrative server, in our case, again, kdc.highgo.ca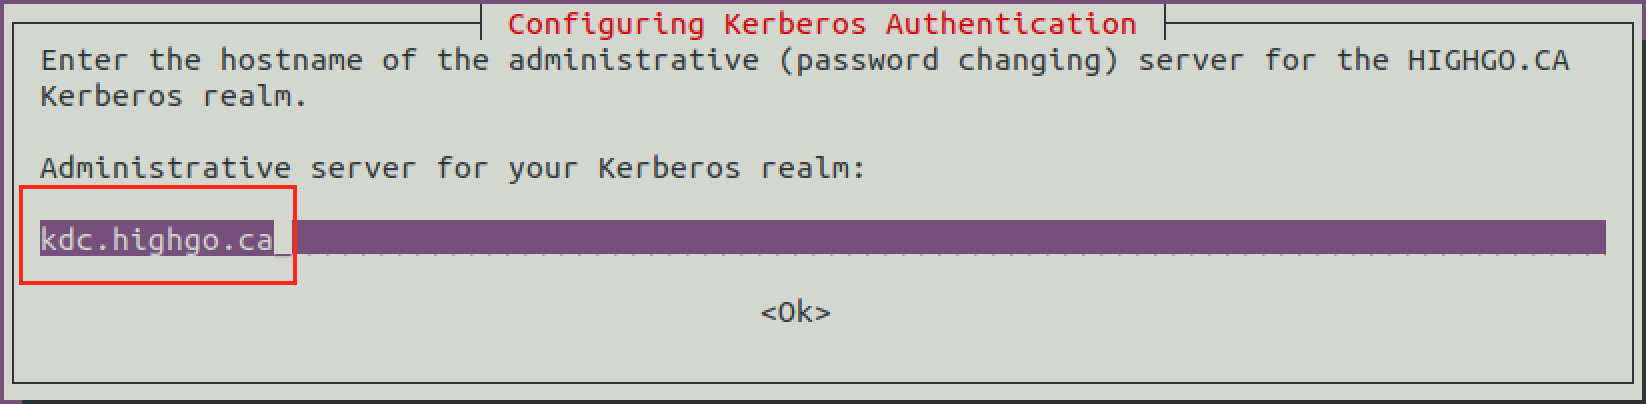
In the last step, it will remind you to use krb5_newrealm to setup the realm. Simply click OK.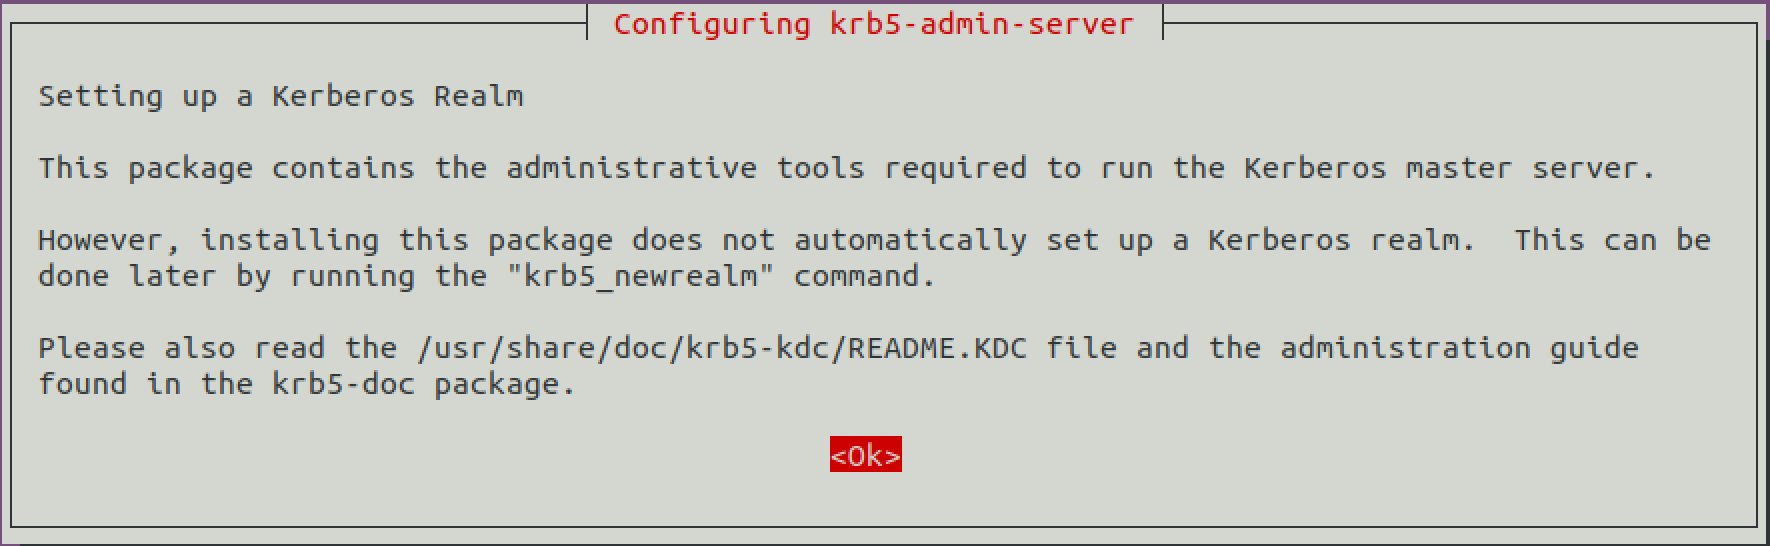
Now, let’s run the krb5_newrealm with sudo to set up the master key for KDC database.
1 | $ sudo krb5_newrealm |
Before start the Kerberos configuration, here are some basic kerberos tools need to know.
- kadmin.local: KDC database administration tool used manage principal and policy.
- kinit: used to obtain and cache Kerberos ticket-granting ticket.
- klist: used to list principal and tickets held in a credentials cache, or the keys held in a keytab file.
- ktutil: used to read, write, or edit entries in a keytab.
- …
3.3. Admin Principal setup
Once KDC server has been installed, we need to create an admin user to manage principals, and it is recommended to use a different username. In our case, root/admin. Below are the commands used for the setup.
1 | $ sudo kadmin.local |
You can check the principal root/admin by running listprincs root/admin.
1 | kadmin.local: listprincs root/admin |
Next, we need to assign the appropriate access control list to the admin user in the Kerberos configuration file /etc/krb5kdc/kadm5.acl which is used to manage access rights to the Kerberos database.
1 | $ sudo vim /etc/krb5kdc/kadm5.acl |
The above configuration gives all privileges to admin principal root/admin.
Now, finally it is time to restart Kerberos service.
1 | $ sudo systemctl restart krb5-admin-server.service |
Once Kerberos service is running again, we can perform a quick test. First, try klist to see if any credentials cache exists, then try to see if root/admin can be authenticated. If no error, then try to use klist again to list the principal cached.
1 | $ klist |
The “No credentials cache found” tells us there is no principal has been authenticated yet. Let’s run kinit root/admin to see if we can get it authenticated.
1 | $ kinit root/admin |
If no error during root principal init, then run klist again.
1 | $ klist |
If the credentials cache is found, then the KDC administrative principal setup is done.
3.4. Service Server and Client installation
For Service Server and Client, we only need to install the client/user related packages. Run below commands on both Service Server and Client machines.
1 | $ sudo apt install krb5-user libpam-krb5 libpam-ccreds auth-client-config |
Same as KDC Server setup, it will ask for Realm, Kerberos server and Administrative server. Enter exactly the same information used for KDC Server and then click OK. After the installation is done, we should have below information configured in /etc/krb5.conf
1 | [realms] |
Now, back to KDC Server side to add principals for Service Server and Client.
3.5. Add principal for Service Server
Add a principal
postgreswhich is the database user and the Linux login user.1
2
3
4
5
6$ sudo kadmin.local
kadmin.local: addprinc postgres
WARNING: no policy specified for postgres@HIGHGO.CA; defaulting to no policy
Enter password for principal "postgres@HIGHGO.CA":
Re-enter password for principal "postgres@HIGHGO.CA":
Principal "postgres@HIGHGO.CA" created.Add a principal
postgres/pg.highgo.caas a principle instance for Service server1
2
3
4
5kadmin.local: addprinc postgres/pg.highgo.ca
WARNING: no policy specified for postgres/pg.highgo.ca@HIGHGO.CA; defaulting to no policy
Enter password for principal "postgres/pg.highgo.ca@HIGHGO.CA":
Re-enter password for principal "postgres/pg.highgo.ca@HIGHGO.CA":
Principal "postgres/pg.highgo.ca@HIGHGO.CA" created.Extract the service principal from KDC principal database to a keytab file, which will be used to configure PostgreSQL Server. The file should be saved to current folder when run below commands.
1
2
3
4
5$ ktutil
ktutil: add_entry -password -p postgres/pg.highgo.ca@HIGHGO.CA -k 1 -e aes256-cts-hmac-sha1-96
Password for postgres/pg.highgo.ca@HIGHGO.CA:
ktutil: wkt postgres.keytab
ktutil: exit
3.6. Add principal for Client
- add a principal
davidfor Client, this is the login user for Clinet OS, and later will be used to log into database1
2
3
4
5kadmin.local: addprinc david
WARNING: no policy specified for david@HIGHGO.CA; defaulting to no policy
Enter password for principal "david@HIGHGO.CA":
Re-enter password for principal "david@HIGHGO.CA":
Principal "david@HIGHGO.CA" created. - check all the principals using
listprincsto confirmdavid@HIGHGO.CA,postgres@HIGHGO.CAandpostgres/pg.highgo.ca@HIGHGO.CAare all successfully created.1
2
3
4
5
6
7
8
9
10
11kadmin.local: listprincs
K/M@HIGHGO.CA
david@HIGHGO.CA
kadmin/admin@HIGHGO.CA
kadmin/changepw@HIGHGO.CA
kadmin/kdc.highgo.ca@HIGHGO.CA
kiprop/kdc.highgo.ca@HIGHGO.CA
krbtgt/HIGHGO.CA@HIGHGO.CA
postgres/pg.highgo.ca@HIGHGO.CA
postgres@HIGHGO.CA
root/admin@HIGHGO.CA
3.7. Verify principal on Service Server
After the above principals have been created from KDC Server, let’s back to Service Server to verify the principal using klist and kinit.
1 | postgres@pg:~$ klist |
1 | postgres@pg:~$ kinit postgres/pg.highgo.ca |
1 | postgres@pg:~$ klist |
3.8. Verify principal on Client
Now, back to Client machine to verify the principal using klist and kinit.
1 | david@client:~$ klist |
1 | david@client:~$ kinit david |
1 | david@client:~$ klist |
If the principals verification are all success on both Service Server and Client machines, then we are ready to configure PostgreSQL and prepare GSSAPI user authentication with Kerberos.
4. Summary
In this blog, we explained the basic concepts used in Kerberos, performed a step by step setup on Ubuntu, added all the required principals to KDC, and also verified each principal which will be used in next two blogs.
Reference: