1. Overview
This tutorial provides detailed instructions to help a newbie setup the building and debugging environment with the latest Eclipse IDE for C/C++ Developers for current Postgres 12.1 release on LTS Ubuntu 18.04. Below is the key requirement.
- Linux: ubuntu-18.04.3-desktop-amd64
- Postgres: REL_12_STABLE branch
- Eclipse: eclipse-cpp-2019-12-R-linux-gtk-x86_64.tar.gz
2. Install Ubuntu 18.04 Desktop
Go to the Ubuntu official website to download the latest LTS Ubuntu 18.04.3 Desktop (64-bit) and Install it on a virtual machine such as VirtualBox. The option “Minimal Installation” with web browser and basic utilities is good enough for this tutorial.
3. Install git and checkout PostgreSQL source code
PostgreSQL has the source code available on github, in order to check out the source code, you need to install git using the command below.
1 | $ sudo apt install git -y |
PostgreSQL has a version 12 released in October 2019, and later was upgraded to 12.1 in November. This tutorial will use the latest PostgreSQL12 stable branch to explain how to build and debug the source code using the latest Eclipse IDE. Run the commands below to check out version 12.
1 |
|
Now, we are on PostgreSQL 12 stable release branch.
4. Install PostgreSQL build dependency
In order to build PostgreSQL source code, we need to install the basic build dependency with below command.
1 | $ sudo apt install -y pkg-config build-essential ibreadline-devbison flex |
With the command above, the basic libraries and utilities for building c and cpp code will be installed, such as, dpkg-dev, gcc, g++, make and libc6-dev. Moreover, the libraries and tools required by PostgreSQL such as libreadline, zlib, bison and flex will also be installed as well.
5. Configure PostgreSQL and generate Makefiles
Before importing PostgreSQL source code into Eclipse as a project, we need to use the configure script provided by PostgreSQL to generate the Makefiles. Run the command below to prepare the Makefiles for Eclipse later to use.
1 | $ ./configure --prefix=$HOME/eclipse-workspace/postgres --enable-debug CFLAGS='-O0' |
--prefix is used to define the installation path, in this case, all the PostgreSQl binaries, libraries, and utilities will be installed to $HOME/eclipse-workspace
--enable-debug is used to enable gdb debugging option, so that we can use Eclipse to set up a breakpoint to trace the source code.
--CFLAG is used to specify the compile options, -O0 is used to remove code optimization.
If all the dependency has been installed properly, then Makefile.global should be generated in ./src folder. To verify the Makefile.global has been created properly, using vi to open it and check the CFLAG parameter to make sure -g and -O0 are set. It should look like below.
1 | CFLAGS = -Wall -Wmissing-prototypes -Wpointer-arith -Wdeclaration-after-statement -Werror=vla -Wendif-labels -Wmissing-format-attribute -Wformat-security -fno-strict-aliasing -fwrapv -fexcess-precision=standard -Wno-format-truncation -g -O0 |
It is better to run the commands below to test if everything has been set up properly before import posgtres source code into Eclipse. After a while, if you see the message “All of PostgreSQL successfully made. Ready to install.” then we are ready to setup Eclipse IDE.
1 | $ cd $HOME/sandbox/postgres |
6. Install Eclipse IDE for C/C++ Developers
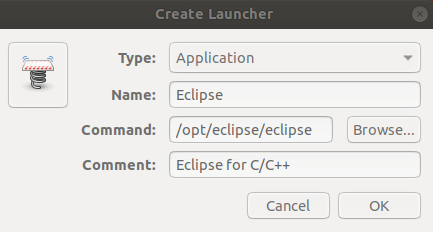
Now, go to the Eclipse website and download the latest Eclipse IDE for C/C++ Developers for Linux 64-bit. After the download is finished, simply untar the file to a folder, for example, /opt. If you prefer to open the Eclipse from Desktop, then you need to run below commands to set up the Desktop Shortcut.
1 | # Update Packages Index |
Make sure you choose the right eclipse binary and then fill in the Name and Comment.
Eclipse requires a JRE environment to be installed, so run below command before open Eclipse.
1 | $ sudo apt install default-jre -y |
7. Import Postgres project
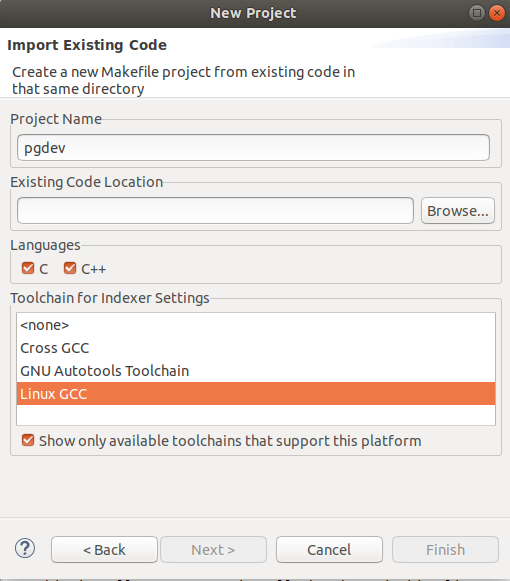
After the JRE environment has been installed successfully, double click eclipse icon from Desktop to open the IDE. From Project Explorer, click on Import project…, then fill in the information like below screenshot and then click Finish button.
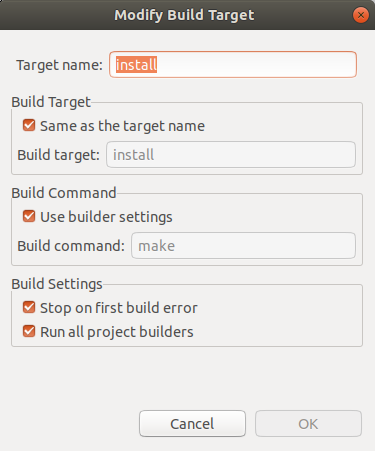
After project importing finished, right click on the project, select Build Targets, then Create…, and fill in install to the Target name, then click on OK.
To build and install PostgreSQL, right click on Build Target, then click Build…, and select install and click on Build.
It may take a while to compile all the source code and install the binaries, libraries, and utilities. Once finished, you should see a message from Eclipse Console “PostgreSQL installation complete.”
Open a Linux terminal, type below commands if PostgreSQL has been installed into the folder $HOME/eclipse-workspace/postgres.
1 | $ cd $HOME/eclipse-workspace/postgres |
8. Configure and start Postgres server
Now, run below commands to setup the environment variables PATH and PGDATA in the Linux terminal.
1 | $ export PATH=$HOME/eclipse-workspace/postgres/bin:$PATH |
Here, we set up the path for looking up all PosgreSQL binaries, create a new folder for PosgreSQL database files and settings and then export it as an environment variable PGDATA to this terminal.
After the environment has been setup, we need to use the same terminal to initialize the database and setup a superuser password. Notes, the database initialization needs to be done only once.
1 | $ initdb -D $HOME/pg12data/data/ -U postgres -W |
Now, it is time to bring up the postgres server from the terminal by using the command below.
1 | $ pg_ctl -D $HOME/pg12data/data/ -l logfile start |
To check if all the services has started properly, run below commands,
1 | $ ps -ef |grep postgres |
From the output, we can tell a posgres server with pid 32445 is listening on port 5432, and all the other required servers are also running, such as background writer which issues writes of “dirty” (new or modified) shared buffers. Without any change to the default configuration, the above shows how many servers are supposed to start after issuing a pg_ctl start command.
9. Connect a client to Postgres server
To connect a psql client to the postgres server locally, you can run the command below in the same terminal.
1 | $ psql -U postgres |
Now, if you check the postgres processes again, a new postgres server should show in the list,
1 | $ ps -ef |grep postgres |
Here, psql is the client running on the same Linux machine, and a new posgres process with pid 723 is the new server to deal with all the requests coming from the client psql with pid 721.
10. Attach postgres to debug a simple query
Now, we are finally ready to attach this new postgres server to trace a simple query in Eclipse.
Right click on project pgdev, select Debug As, then select Debug Configurations…
Right click on C/C++ Attach Application, then fill in the posgres binary path in C/C++ Application.
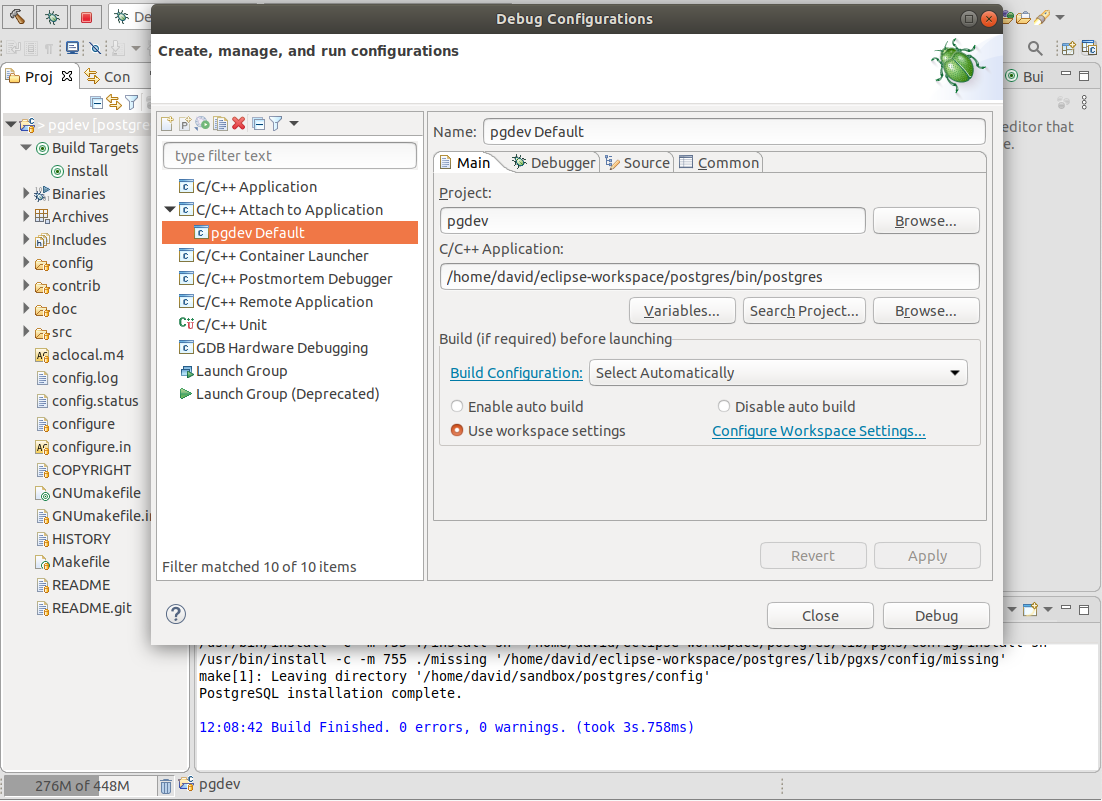
After all the setting is done by referring above screenshot, click Apply, then click Debug.
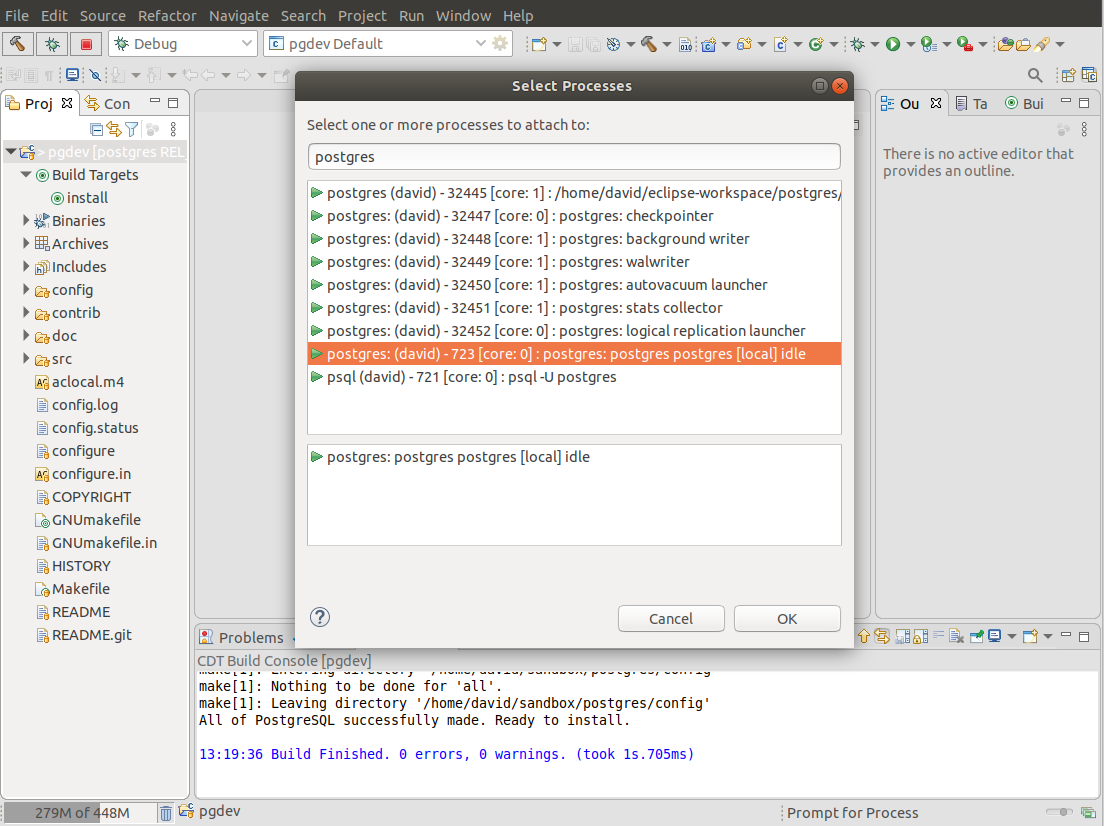
A Select Processes window will pop up, type “postgres” to show all running postgres servers, then select postgres server with pid 723 which is the one connected to the psql client. Click OK to launch the debugging window in Eclipse.
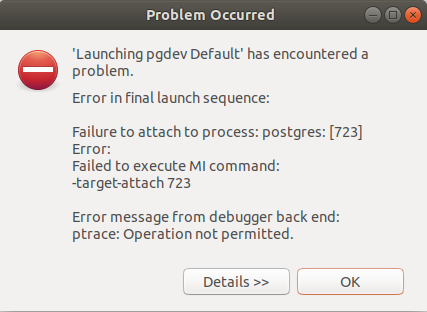
Well, you probably will end up with an error like below. This is caused by an Ubuntu built-in feature which doesn’t allow ptrace of a non-child process by any non-root users.
To resolve this issue, we need to temporarily disable this feature by issue a command below,
1 | $ cat /proc/sys/kernel/yama/ptrace_scope |
To permanently disable this feature, edit the file /etc/sysctl.d/10-ptrace.conf.
1 | $ sudo vi /etc/sysctl.d/10-ptrace.conf |
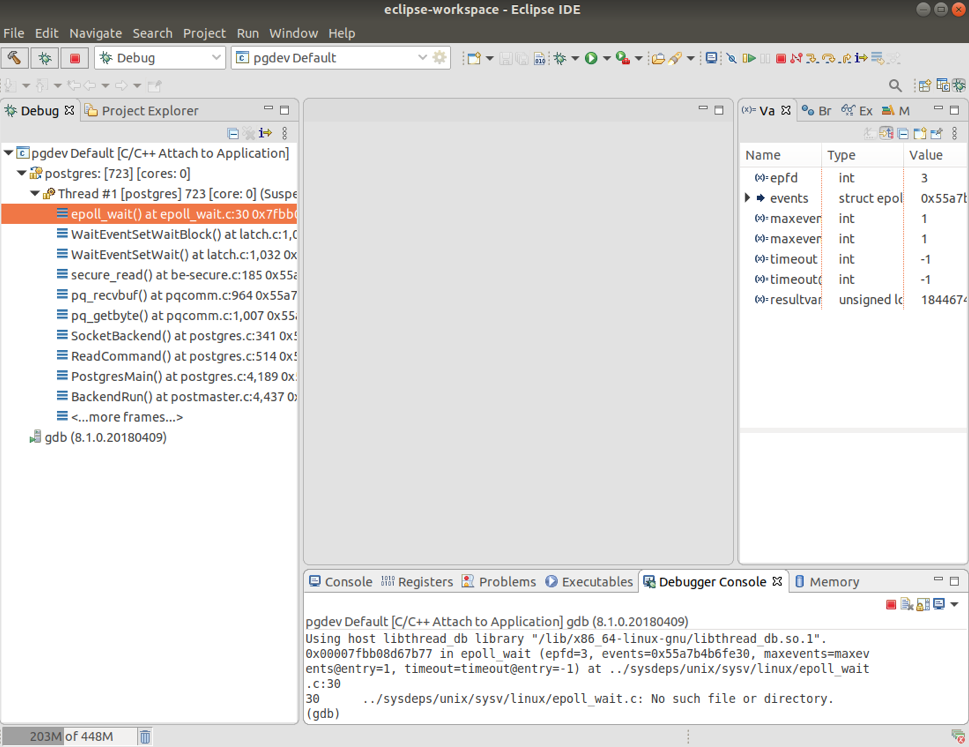
Once the permission issue has been fixed, relaunch the debug by attaching to running postgre server with pid 723 again, then you should see below window, press F8 to resume this postgre process.
11. Debug a simple query
Now, back to the psql client terminal, create a table and insert a few records, and then perform a simple query on this table.
1 | postgres=# CREATE TABLE test (id serial PRIMARY KEY, name VARCHAR(20)); |
If everything works fine, then, switch back to Eclipse, to set up a breakpoint by entering b exec_simple_query in Debugger Console.
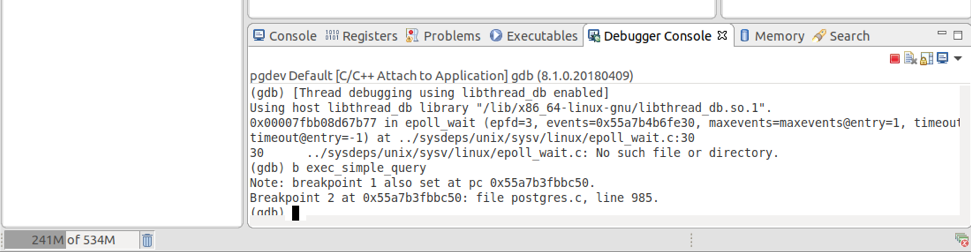
or using the search function in Eclipse to find out exec_simple_query function definition, i.e. line 985 in ./sandbox/postgres/src/backend/tcop/postgres.c, and right click on the left side bar and select Toggle Breakpoint, then one tiny dot will be showing up to indicate the breakpoint is on.

Then, click on Resume button or press F8, or enter c in the Debugger Console to continue postgre process. When this postgres server is running again, then switch back to the psql client terminal and repeat the previous SELECT query command.
At this time, you should see the psql client is hanging without any results returned.
Now, switch back to Eclipse. You should also see this postgres process stopped in exec_simple_query function. If you enter bt in Debugger Console, then you should be able to see the backtrace below highlighted.
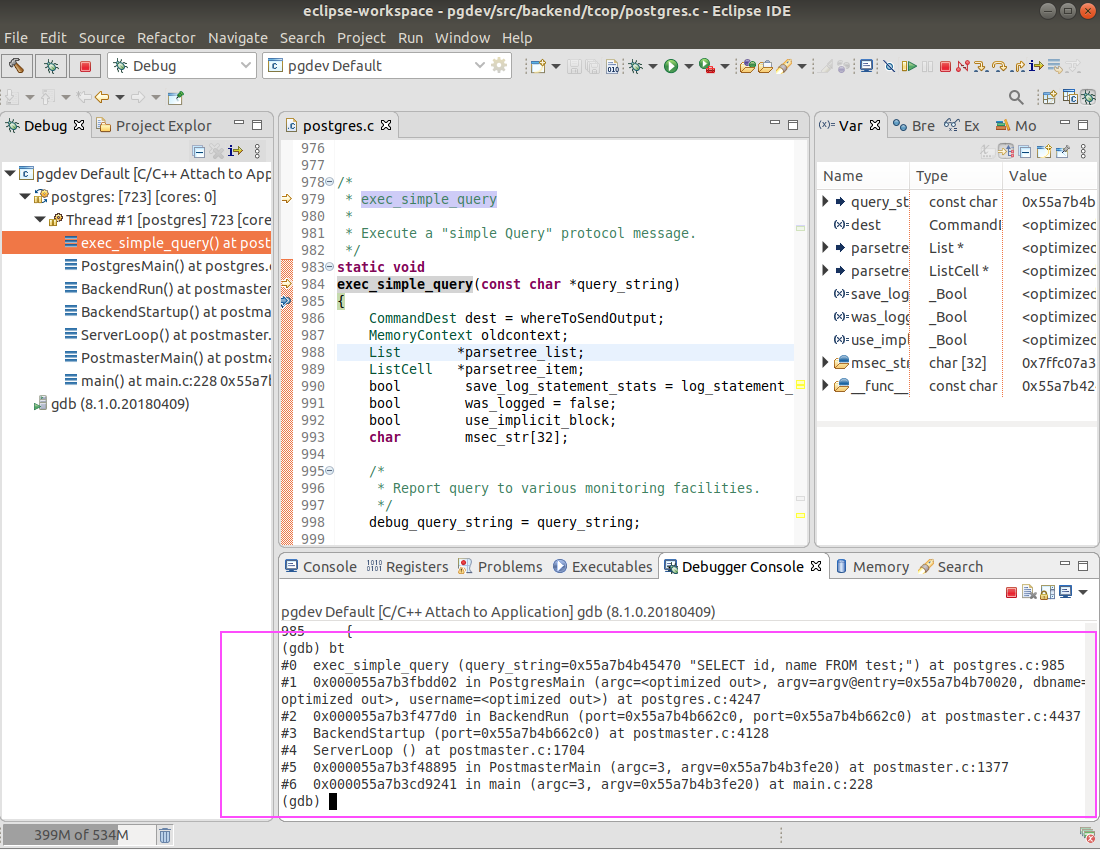
To check any function and value in the backtrace, for example, frame 5 PostmasterMain, type f 5 in Debugger Console and then Enter. Eclipse will navigate you to the function immediately and highlight it. From there you can use Ctrl + left click to jump into the function definition and check the details.
Image-11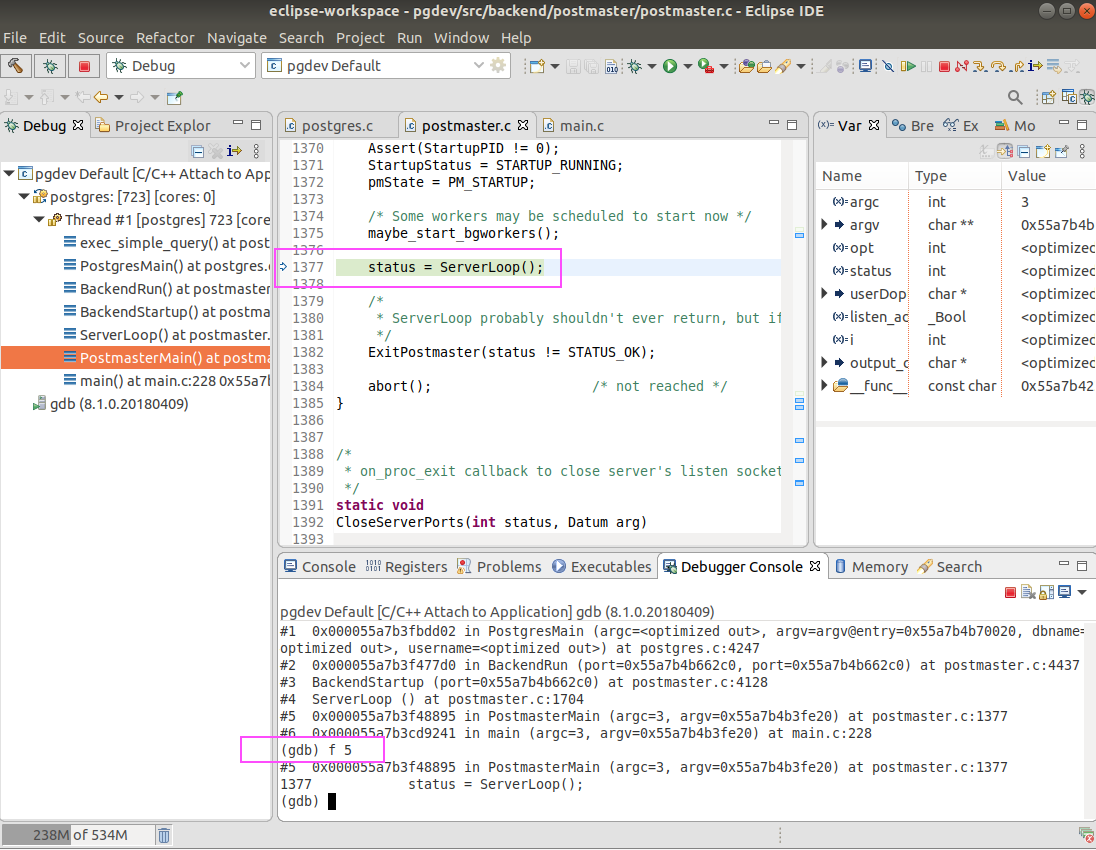
After finishing all the check, then resume the postgres process, and then switch to the psql client terminal, you should see the results is returned.
Enjoy your debugging with Eclipse for PostgreSQL.
Reference:
1. Newbie to PostgreSQL – where to start