When I was working on some backup and recovery related features for a project based on Postgres, I noticed that there is file called backup_label. By quickly google search, you can find some very nice blogs or books which discussed this topic, such as, The Internals of PostgreSQL, one of my favourite books. In this blog, I am going to talk it a little more based on my experience.
2. What is backup_label?
The backup_label is a file created in $PGDATA folder when there is an exclusive backup triggered by pg_start_backup() and the backup is in progress. This backup_label file will be removed once the pg_stop_backup() is executed. Here, the exclusive backup is one of the backup methods introduced to Postgres early, and as the name indicated, it does not support multiple backup activities at the same time. Because of this limitation, a frontend backup tool pg_basebackup is added to the Postgres later. This pg_basebackup client does allow multiple backup activities performed at the same time. Therefore, this kind of backup is called as non-exclusive backup. Both backup methods use the backup_label but in a different way.
In exclusive basebackup, the backup_label will be generated automatically on the source server side. To see how this file looks like, you can run a command like, select pg_start_backup('first backup'); from a psql console. Then you should be able to find a backup_label file in $PGDATA folder with the content like below,
In exclusive backup mode, the Postgres source server will generate this file when pg_sart_backup() is executed, and removed after pg_stop_backup(), however, in non-executive backup mode, such as using pg_basebackup client to perform a base backup, the backup_label is only streamed to the client side but not physical saved to the source Postgres server.
As you can see in above baseup_label file, it contains a similar checkpoint information compared to pg_controldata file. If a backup is used in recovery with this backup_label file present, then Postgres will use the checkpoint in backup_label to start the REDO process. The reason is that there could be multiple checkpoints happening during the backup process. After the recovery process is done, this backup_label file will be renamed as backup_label.old to indelicate the recovery finished properly. In simple words, with the backup_label file, the database has a consistent checkpoint to recover from a proper archive.
4. Does it impact any frontend tool?
The answer is yes. Some frontend tools will perform differently if a backup_label file is present. For example, if pg_ctl sees a backup_label file during smart shutdown process, it will wait for it to be removed by providing a waring message to the end user with something like,
1 2
WARNING: online backup mode is active Shutdown will not complete until pg_stop_backup() is called
Another example is the frontend tool pg_rewind which creates a backup_label to force a recovery to start from the last common checkpoint.
5. Summary
In this blog, I explained the backup_label file in Postgres. I believe the end users won’t pay attention to it most of the time, but if you do encounter some issues related with backup_label then I hope this blog can give you some clues.
In my previous blog, I briefly walked through how the bulk/batch insertion was done for postgres_fdw in PG14. In this blog, I am going to run some basic tests to compare the performance for before and after the batch insertion was introduced in postgres_fdw, so that we can have a general idea about whether this feature makes any difference.
2. PG Servers Setup
The key of the blog is to see if there is any difference for batch insertion. To make the testing simple, here is how I set up a simple environment.
As this bulk/batch insertion was introduced for PG14, so we need to switch to the stable PG14 branch, i.e. REL_14_STABLE. After checked out the source code, simply run the commands: configure, make and make install. Here are the commands used in this blog.
1
2
3
4
5
6
7
./configure --prefix=$HOME/sandbox/postgres/pgapp --enable-tap-tests --enable-debug CFLAGS="-g3 -O0" make && make install cd contrib/postgres_fdw/ make && make install export PGDATA=$HOME/sandbox/postgres/pgdata initdb -D $PGDATA pg_ctl -D $PGDATA -l logfile start
In order to test Foreign Data Wrapper, we need to start another PG Server. To make it easy, I simply start a PG Server on a Foreign data cluster and change the default port to a different one, for example, 5433. Below are the commands used to setup Foreign Server.
After the Foreign data cluster has been initialized, change the port to 5433, then start the Foreign PG Server.
1
2
vim $FPGDATA/postgresql.conf pg_ctl -D $FPGDATA -l logfile-f start
3. Foreign Tables Setup
Now, we can setup the basic Foreign Data Wrapper testing environment like below.
On the Local PG Server:
3.1. Create a Foreign Server using default batch settings
1 2
postgres=# create server fs foreign data wrapper postgres_fdw options (dbname 'postgres', host '127.0.0.1', port '5433'); CREATE SERVER
3.2. Create the user mapping
1 2
postgres=# create user mapping for david server fs options( user 'david'); CREATE USER MAPPING
3.3. Create Foreign Tables on Local PG Server
1 2
postgres=# create foreign table ft (id int, test text) server fs options(table_name 't'); CREATE FOREIGN TABLE
By default, the batch insertion size has been set to 1 as you can see from the source code.
1 2 3 4 5 6 7 8 9 10
/* * Determine batch size for a given foreign table. The option specified for * a table has precedence. */ static int get_batch_size_option(Relation rel) { ... /* we use 1 by default, which means "no batching" */ int batch_size = 1;
Now, repeate the process to create another two Foreign Tables with different batch size correspondingly, i.e. 10 and 100.
1 2 3 4 5
postgres=# create foreign table ft_batch10 (id int, test text) server fs options(batch_size '10', table_name 't10'); CREATE FOREIGN TABLE
postgres=# create foreign table ft_batch100 (id int, test text) server fs options(batch_size '100', table_name 't100'); CREATE FOREIGN TABLE
3.4. Create Tables on Foreign Server
On the Foreign PG Server side, create corresponding tables like below. Notes, you need to make the table names match the ones used in Local PG Server.
1 2 3 4 5 6 7 8 9
psql -d postgres -p 5433 postgres=# create table t (id int, test text); CREATE TABLE
postgres=# create table t10 (id int, test text); CREATE TABLE
postgres=# create table t100 (id int, test text); CREATE TABLE
4. Run the tests
Now, enable the timeing on Local PG Server, and simply run the commands below, and then record the timing for comparison.
insert into ft values(generate_series(1,1000),'hello, world'); select count(*) from ft; delete from ft ; insert into ft values(generate_series(1,1000000),'hello, world'); select count(*) from ft; delete from ft ; insert into ft values(generate_series(1,100000000),'hello, world'); select count(*) from ft; delete from ft ;
insert into ft_batch10 values(generate_series(1,1000),'hello, world'); select count(*) from ft_batch10; delete from ft_batch10 ; insert into ft_batch10 values(generate_series(1,1000000),'hello, world'); select count(*) from ft_batch10; delete from ft_batch10 ; insert into ft_batch10 values(generate_series(1,100000000),'hello, world'); select count(*) from ft_batch10; delete from ft_batch10 ;
insert into ft_batch100 values(generate_series(1,1000),'hello, world'); select count(*) from ft_batch100; delete from ft_batch100 ; insert into ft_batch100 values(generate_series(1,1000000),'hello, world'); select count(*) from ft_batch100; delete from ft_batch100 ; insert into ft_batch100 values(generate_series(1,100000000),'hello, world'); select count(*) from ft_batch100; delete from ft_batch100 ;
5. Check the results
Here are results from about tests.
1 2 3 4
1 10 100 55.634 ms 9.996 ms 25.545 ms 32155.960 ms (00:32.156) 5927.090 ms (00:05.927) 4754.158 ms (00:04.754) 3237972.881 ms (53:57.973) 623204.920 ms (10:23.205) 332998.911 ms (05:32.999)
6. Summary
In this blog, we simply run some basic tests to see if there is any performance improvement in postgres_fdw for the batch/bulk insertion. The results are very impressive: for 1k insertion, batch size 10 and 100 are 5 and 2 times and faster relatively; for 1 million insertion, batch size 10 and 100 are 5.5 and 6.5 times faser; for 100 millions insertion, batch size 10 and 100 are 5 and 9.5 times better.
postgres_fdw has been existing in PostgreSQL for many years, and it was one of the most popular interfaces used in many extensions. such as the PostgreSQL foreign data wrappers wiki page, and PostgreSQL Extension Network/PGXN. However, I had not touched this postgres_fdw in deep until I got a task about combing multiple columns from multiple tables using this amazing Foreign Data Wrapper interface. After some hack, I was be able to combine multiple columns from multiple tables into one table based on postgres_fdw, but I was just curious about how many enhancements has been done recently. After a simple git pull, I found actually there are some new features was introduced in PG14, such as Asynchronous Execution, Bulk Inserts, Truncate as well as some network connection related enhancement. In this blog, I will take a detail look at one of the enhancements, i.e. Bulk insertion, to see how it was implemented.
2. A detail looks at bulk insertion
I haven’t performed any benchmark test for bulk inserts in postgres_fdw to compare before and after yet, but you can find a very nice blog here as your reference, if I have time I will definitely run some benchmark test on a production server. For now, let’s take a look to see how it was implemented.
The first commit was done early 2021, and here is the details information about this features.
commit b663a4136331de6c7364226e3dbf7c88bfee7145 Author: Tomas Vondra <tomas.vondra@postgresql.org> Date: Wed Jan 20 23:05:46 2021 +0100
Implement support for bulk inserts in postgres_fdw Extends the FDW API to allow batching inserts into foreign tables. That is usually much more efficient than inserting individual rows, due to high latency for each round-trip to the foreign server. It was possible to implement something similar in the regular FDW API, but it was inconvenient and there were issues with reporting the number of actually inserted rows etc. This extends the FDW API with two new functions: * GetForeignModifyBatchSize - allows the FDW picking optimal batch size * ExecForeignBatchInsert - inserts a batch of rows at once Currently, only INSERT queries support batching. Support for DELETE and UPDATE may be added in the future. This also implements batching for postgres_fdw. The batch size may be specified using "batch_size" option both at the server and table level. The initial patch version was written by me, but it was rewritten and improved in many ways by Takayuki Tsunakawa. Author: Takayuki Tsunakawa Reviewed-by: Tomas Vondra, Amit Langote Discussion: https://postgr.es/m/20200628151002.7x5laxwpgvkyiu3q@development ```
As the author commented, two major functions, i.e. `postgresGetForeignModifyBatchSize` and `postgresExecForeignBatchInsert` were introduced to postgres_fdw to hook up with the extended FDW API. The extended FDW API can be found in `src/include/foreign/fdwapi.h`.
The corresponding implementation was done in `contrib/postgres_fdw/postgres_fdw.c`. Single row insertion
Function postgresExecForeignBatchInsert support multiple slots, planSlots as well as a new parameter, i.e. numSlots. So that it can insert multiple rows in one round communication to save the network communication overhead.
static int postgresGetForeignModifyBatchSize(ResultRelInfo *resultRelInfo)
1 2 3
The function basically allows to retrieve the number of row remote server will support in bulk insertion. Here, as the function has a note, if there is trigger defined for remote table with AFTER ROW or with RETURNING required, the bulk insertion is not allowed, otherwise the rule will be broken on remote server side.
Other than these two major new functions, there are some update in other functions, such as, `execute_foreign_modify`, which will build the bulk insertion query when it received insert operation, something like below.
if (operation == CMD_INSERT && fmstate->num_slots != *numSlots)
1
and another important change is `convert_prep_stmt_params` which has a loop to build the number of rows that server can accept.
for (i = 0; i < numSlots; i++)
Then rest of the changes are mainly to support the bulk insertion features, such as parse the `batch_size` in option. Another new function, `rebuildInsertSql` in `deparse.c` is used in `execute_foreign_modify` to build the actual number of rows before sending the query to remote server.
#### 3. Limitation
As it was mentioned in the commit message, only insertion is supported for bulk operations, delete and update are not supported yet. Hopefully, these bulk operations and interfaces can be added soon. So that, there will be even more extensions using FDW interface in the future.
#### 4. Summary
In this blog, we discussed a key performance improvement in postgres_fdw, i.e. bulk insertion and take a detail look at the source code level. I hope it can help when someone want to add a new feature to postgres_fdw or any continue improvement on bulk insertion.
_**Reference:**_
1. [F.35. postgres_fdw](https://www.postgresql.org/docs/14/postgres-fdw.html)
2. [Faster Bulk Insertion to Foreign Tables - Introduction to PostgreSQL 14 Committed Features](http://postgres-road.blogspot.com/2021/03/faster-bulk-insertion-to-foreign-tables.html)
3. [New Features in PostgreSQL 14: Bulk Inserts for Foreign Data Wrappers](https://www.percona.com/blog/2021/05/27/new-features-in-postgresql-14-bulk-inserts-for-foreign-data-wrappers/)
I was working on the PostgreSQL storage related features recently, and I found PostgreSQL has designed an amazing storage addressing mechanism, i.e. Buffer Tag. In this blog, I want to share with you my understanding about the Buffer Tag and some potential usage of it.
2. Buffer Tag
I was always curious to know how PostgreSQl can find out the tuple data blocks so quickly when the first time I started to use PostgreSQL in an IoT project, but I never got the chance to look it into details even though I knew PostgreSQL is an very well organized open-source project. Until I recently got a task which needs to solve some storage related issue in PostgreSQL. There is very detailed explanation about how Buffer Manger works in an online PostgreSQL books for developers The Internals of PostgreSQL, one of the best PostgreSQL books I would recommend to the beginner of PostgreSQL development to read.
Buffer Tag, in simple words, is just five numbers. Why it is five numbers? First, all the objects including the storage files are managed by Object Identifiers, i.e. OID. For example, when user creates a table, the table name is mapped to an OID; when user creates a database, the name is mapped to an OID; when the corresponding data need to be persistent on disk, the files is also named using OID. Secondly, when a table requires more pages to store more tuples, then each page for the same table is managed by the page number in sequence. For example, when PostgreSQL needs to estimate the table size before decide what kind of scan should be used to find out the tuple faster, it need to know the number of blocks information. Thirdly, it is easy to understand that data tuples are the major user data need to be stored, but in order to better manage these data tuples, PostgreSQL needs others information, such as visibility to manage the status of these data tuples, and free space to optimize files usage. So this ends up with five numbers, i.e. Tablespace, Database, Table, ForkNumber, BlockNumber.
Given these five numbers, PostgreSQL can always find out where the data tuples are stored, which file is used, and what size the table is etc.
3. How Buffer Tag is used
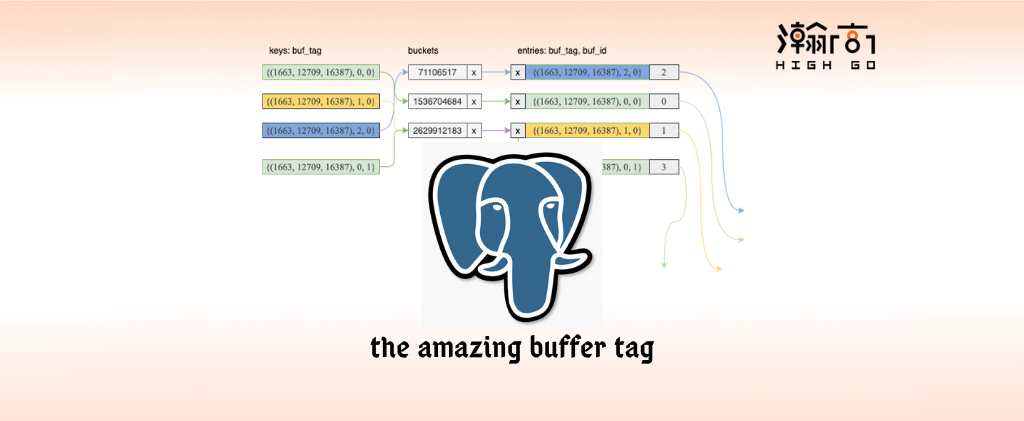
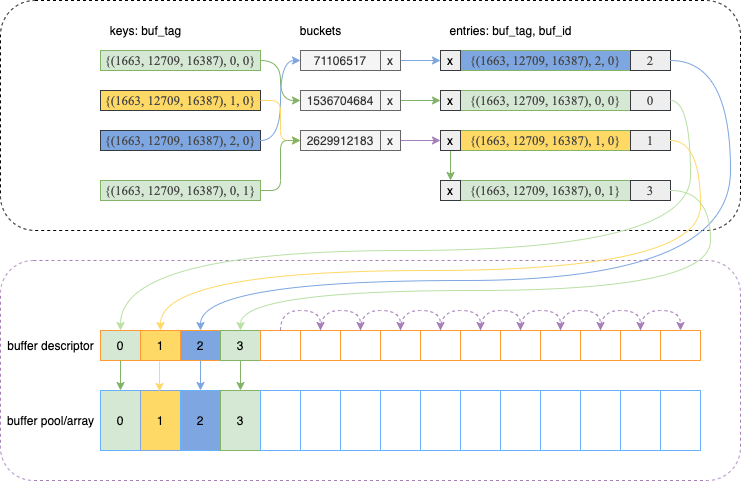
Now, we have the buffer tag, five numbers, but how it is used in PosggreSQL. One typical use case of buffer tag is to help buffer manager to manage the location of memory blocks in the buffer pool/array. In this case, a hash table was introduced to resolve the mapping between buffer tag and the location of memory block in buffer pool/array. Here is a picture to show relationship among buffer tag, hashtable, buffer descriptor, and buffer pool/array.
For example, the first green buffer tag {(1663, 13589, 16387), 0, 0} indicates a table space 1663, a database 12709, and a table 16387 with forkNumber 0 (main fork for tuples) which stored in a file at block 0. The buffer tag has a hash value 1536704684 which has been assigned to the memory block 0 managed by buffer manager at this moment. Since buffer descriptor is addressed using the same slot number as memory block in buffer pool/array, so they both share the same slot number 0, in this case.
With the above relationship, PostgreSQL can find out the memory block location or assign buffer slot to a new memory block for particular buffer tag.
The other typical use case of buffer tag is to help the storage manager to manage the corresponding files. In this case, the blockNumber is always to 0 since it doesn’t require multiple blocks to store more data. Here, you can create your use case of buffer tag. For example, use the buf_id as the number of blocks for each database relation instead of using it to indicate the memory block location. Moreover, you can also use the buffer tag plus the hashtable to manage multiple information such as having both buf_id for location of the memory block and adding a new attribute total to manage the number of blocks. You can achieve this by define a different buffer lookup entry. For example,
The original buffer lookup entry using buffer tag to lookup the location of memory block.
1 2 3 4 5 6
/* entry for buffer lookup hashtable */ typedef struct { BufferTag key; /* Tag of a disk page */ int id; /* Associated buffer ID */ } BufferLookupEnt;
Below is an example of buffer lookup entry which can lookup both the location of memory block and the number of blocks used by this particular buffer tag.
1 2 3 4 5 6 7
typedef struct { BufferTag key; /* Tag of a disk page */ int id; /* Associated buffer ID */ int total; /* the total number of X */ } ESRelLookupEnt; `
4. Summary
In this blog, we discussed what is Buffer Tag, how it is used in PostgreSQL and some potential usage of Buffer Tag to address the mapping issues between tables to storage files as well as the lookup issues.
PostgreSQL supports many System Information Functions, such as Session Information Functions, Access Privilege Inquiry Functions, Schema Visibility Inquiry Functions, System Catalog Information Functions, Transaction ID and Snapshot Information Functions, etc. However, you may want build some special functions and integrate them into the PostgreSQL. This blog is going to walk through the steps about how to build your own System Information Functions into PostgreSQL.
2. Analyze the requirement
Since there are so many functions built-in PostgreSQL already, you should perform some research and analysis before you decide to create a new one. In this blog, I want to check the transaction id after each savepoints in an ongoing transaction, so that I can perform some visibility check before the whole transaction is committed. For example, I have a query like below, but I can’t figure out the transaction id after each savepoint if I use existing System Information Function .
As you can see, I always get the same Transaction ID even after a savepoint using existing txid_current() function. In this case, I decide to create my own system information function to retrieve the information I want.
3. System Information Function template
To create your own System Information Function, you need to check the System Catalogs to see in which category it can fit. For the case mentioned above, I chose the catalog pg_proc which stores information about functions, procedures, aggregate functions, and window functions. The document System Catalog Initial Data provides more detailed description and examples about the .dat file format and the rules to define your own OID.
Now, let’s define a function, say current_xid_list();. Below is an example about how the function initial data may look like.
1 2 3 4 5
# function to get the top and sub transactions XIDs { oid => '5566', descr => 'get current transaction list', proname => 'current_xid_list', provolatile => 's', prorettype => 'txid_snapshot', proargtypes => '', prosrc => 'current_xid_list' },
Here, you need to generate your OID which doesn’t create any conflict. In the official PostgreSQL document, 69.2.2. OID Assignment, it descripts how the OIDs are managed and also provides a script src/include/catalog/unused_oids to list the unused OIDs. For example, if you run the script like below, you will get a list of OIDs that are not used by PostgreSQL yet.
In my case, I picked the OID 5566 just for easy to remember. However, if you are planning to generate a System Information Function as patch and later submit to PostgreSQL community, then you better follow the rule to minimize the risk of OID collisions with other patches. What the PostgreSQL community recommended is a random OID number between 8000—9999. Here how it is described in the official document, When choosing OIDs for a patch that is not expected to be committed immediately, best practice is to use a group of more-or-less consecutive OIDs starting with some random choice in the range 8000—9999.
After this system information initial data definition, we need to define the actual c function which can help to retrieve the information we need. In the case above, there might be a bunch of SAVEPOINTs in one transaction, so we need return a list of those ongoing transaction IDs. Below is an example, which refer to the way that how the function txid_current_snapshot was built.
/* * Same as txid_current_snapshot(), but returns top and sub transactions list * * Return current top and sub transactions in TXID format * * Note that both top-transaction and sub-transaction XIDs are included. */ Datum current_xid_list(PG_FUNCTION_ARGS) { TxidSnapshot *snap; uint32 nxip, i; TxidEpoch state; Snapshot cur; xl_xact_assignment *sublist; TransactionId curxid = GetCurrentTransactionIdIfAny();
cur = GetActiveSnapshot(); if (cur == NULL) elog(ERROR, "no active snapshot set");
load_xid_epoch(&state);
StaticAssertStmt(MAX_BACKENDS * 2 <= TXID_SNAPSHOT_MAX_NXIP, "possible overflow in txid_current_snapshot()");
/* fill */ GetCurrentSubTransactionIdList(sublist); snap->xmin = sublist->xtop; snap->xmax = curxid; snap->nxip = sublist->nsubxacts; for (i = 0; i < snap->nxip; i++) snap->xip[i] = sublist->xsub[i];
sort_snapshot(snap);
/* set size after sorting, because it may have removed duplicate xips */ SET_VARSIZE(snap, TXID_SNAPSHOT_SIZE(snap->nxip));
PG_RETURN_POINTER(snap); }
In the above function, you can define your data format. We decided to define a function which can help retrieve the transaction IDs within current transaction.
for (s = CurrentTransactionState; s != NULL; s = s->parent) { if (s->state == TRANS_ABORT) continue; if (!FullTransactionIdIsValid(s->fullTransactionId)) continue;
Now, if you recompile PostgreSQL with above changes (of course, you need to declare the functions in proper files), you should be able to use your own System Information Function to see the difference based on what we has discussed at the beginning.
4. Testing
Once build success, restart the PostgreSQL server. Now, let’s try the previous SQL query again. As you can see, a different transaction ID 489 after a checkpoint is showing up.
If you add another savepoint, and then compare your newly added function current_xid_list() with existing txid_current(), you can see that current_xid_list() displays not only the top transaction ID, but also all the transaction IDs after each savepoint.
8. Summary
In this blog, we discussed PostgreSQL System Information Functions, and perform a simple walk-through about how to create your own System Information Function following the official document, and run some simple tests.
PostgreSQL supports different type of replications, i.e. logical and physical. There are many tutorials discussed about the replications. This blog is a simply walk-through of the WAL Streaming replication using the latest Postgresql-13 on Ubuntu 18.04.
2. Install Postgresql-13 from source code
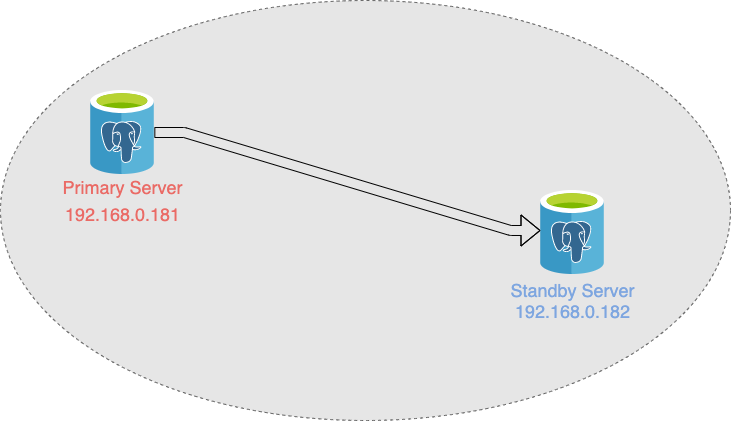
In this blog, we will install Postgresql from the source code, so that this environment can be used for later development. Simply prepare two Ubuntu 18.04 using VirtualBox with below Network settings:
1 2
Primary: 192.168.0.181 Standby: 192.168.0.182
It is pretty simple to install postgres from source code. Here we checkout the Postgresql-13 stable branch from github.
1 2 3 4 5
$ mkdir sandbox $ cd sandbox/ $ git clone https://github.com/postgres/postgres $ cd postgres/ $ git checkout REL_13_STABLE
Install the basic build environment on Ubuntu 18.04 and then compile and install Postgres by using below commands,
1 2 3
$ sudo apt install -y pkg-config build-essential libreadline-dev bison flex $ ./configure --prefix=$HOME/sandbox/postgres --enable-debug CFLAGS='-ggdb -O0' $ make clean && make && make install
Setup the environment for Postgres database, for example,
In order to setup the WAL streaming replication, first, let’s create a new database by running the command below,
1
initdb -D $PGDATA
then we need to add the permission to pg_hba.conf file to enable a Standby server to access a Primary server.
1
host replication all 192.168.0.182/32 trust
and then update postgresql.conf file to let the Primary server listen on all network interface so that a standby can connect to it.
1 2 3
listen_addresses = '*'
synchronous_standby_names = '*'
After all the changes changes, we can start the Primary server,
1
pg_ctl -D $PGDATA -l /tmp/logfile start
4. Setup Standby Server
Once the Primary server is up, we need to create a backup base. This can be done on either Primary side or Standby side. Below is the command we can run on Standby server directly.
At this point, most of the tutorial will discuss about the recovery.conf setup. However, PG has removed recovery.conf file and merged the corresponding configuration to postgresql.conf. Without knowing this, if you simply follow some old tutorials, you may get an error like below,
1
FATAL: using recovery command file "recovery.conf" is not supported
The reason is that the recovery.conf has been removed and the relevant configuration has been merged into postgresql.conf. For details, please check the commit below.
commit 2dedf4d9a899b36d1a8ed29be5efbd1b31a8fe85 Author: Peter Eisentraut <peter_e@gmx.net> Date: Sun Nov 25 16:31:16 2018 +0100
Integrate recovery.conf into postgresql.conf recovery.conf settings are now set in postgresql.conf (or other GUC sources). Currently, all the affected settings are PGC_POSTMASTER; this could be refined in the future case by case. Recovery is now initiated by a file recovery.signal. Standby mode is initiated by a file standby.signal. The standby_mode setting is gone. If a recovery.conf file is found, an error is issued. The trigger_file setting has been renamed to promote_trigger_file as part of the move. The documentation chapter "Recovery Configuration" has been integrated into "Server Configuration". pg_basebackup -R now appends settings to postgresql.auto.conf and creates a standby.signal file. Author: Fujii Masao <masao.fujii@gmail.com> Author: Simon Riggs <simon@2ndquadrant.com> Author: Abhijit Menon-Sen <ams@2ndquadrant.com> Author: Sergei Kornilov <sk@zsrv.org> Discussion: https://www.postgresql.org/message-id/flat/607741529606767@web3g.yandex.ru/
Now, let’s just make a simple change for some basic parameters to Standby Server postgresql.conf file.
1 2
primary_conninfo = 'host=192.168.0.181 port=5432 user=xbox1804 password=mypassword' # connection string to sending server primary_slot_name = 'standby1_slot' # replication slot on sending server
5. Create replication slot on Primary Server
In order to allow the Standby to connect to Primary, we need to create the corresponding replication slot like below.
postgres=# select slot_name, slot_type, active, wal_status from pg_replication_slots; slot_name | slot_type | active | wal_status ---------------+-----------+--------+------------ standby1_slot | physical | f | (1 row)
6. Start Standby Server
Once the replication slot has been created i.e. ‘standby1_slot’, let’s start the Standby server.
1
pg_ctl -D $PGDATA -l /tmp/logfile start
If the Standby server is setup properly, then you should see below message from the log file.
1
LOG: started streaming WAL from primary at 0/3000000 on timeline 1
Now, if you check the replication slot on Primary server again, you should see the replication slot is active and the wal_status has been changed to reserved.
1 2 3 4 5
postgres=# select slot_name, slot_type, active, wal_status from pg_replication_slots; slot_name | slot_type | active | wal_status ---------------+-----------+--------+------------ standby1_slot | physical | t | reserved (1 row)
7. Test WAL Streaming replication
After all the settings has been done properly, we can start a simple test to verify the wal streaming replication setup. First, let’s check if there is any relations on Primary server, for example,
1 2
postgres=# \d Did not find any relations.
You can do the same check on Standby server side. After that, let’s create a table on Primary server,
1 2 3 4 5 6 7 8
postgres=# create table tbl1(id int, text varchar(10)); CREATE TABLE postgres=# \d List of relations Schema | Name | Type | Owner --------+------+-------+---------- public | tbl1 | table | vbox1804 (1 row)
Then simply insert one record like below,
1 2 3 4 5 6 7 8 9
postgres=# insert into tbl1 values (1, 'helloworld'); INSERT 0 1 postgres=# select * from tbl1; id | text ----+------------ 1 | helloworld (1 row)
postgres=#
Now, if you check on the Standby server, you should be able to see the table and a record have been replicated.
1 2 3 4 5 6 7 8 9 10 11 12 13 14 15 16
postgres=# \d Did not find any relations. postgres=# \d List of relations Schema | Name | Type | Owner --------+------+-------+---------- public | tbl1 | table | vbox1804 (1 row)
postgres=# select * from tbl1; id | text ----+------------ 1 | helloworld (1 row)
postgres=#
8. Summary
This blog simply walk-through a very basic WAL streaming replication, if you want to know more about the replication, you can always check it out on Postgresql official website.
PostgreSQL is a great open source database developed and maintained by many great software engineers around the world. In each release, there are many features added to this open source database. For example, one feature is very helpful for developer is backtrace_functions introduced in PostgreSQL 13 , which allows a developer to dump out the backtrace when certain errors happened on the server. In this blog, I am going to explain it in a little bit more detail.
2. What is backtrace_functions?
The backtrace_functions option is an option introduced for developers as it is described here. You can specify a list of c function names separated by comma, if an error is raised and matches any c function in the given list, then the backtrace will be logged into the logfile. This is very useful for debugging some specific areas of the source code, especially when the error happens randomly. As the document also mentioned, this option is not available on all platforms, and quality of the backtraces depends on the compilation options. For this reason, all the examples used in this blog were tested on Ubuntu 18.04 with gcc version 7.5.0.
3. How to make it work?
This feature was first committed in Nov, 2019 as showing below.
To use this feature, you need to add the key word backtrace_functions to postgresql.conf file with the c function names. It can be either a single c function name or a list of c function names separated by comma. In this blog, we use circle_in as an example. Here is what I added to my postgresql.conf file.
After restart the server, use psql connect to the server and enter below SQL queries (The postgresql source code used in this example is based on PostgreSQL13 development branch in March 2020, you can create your own error if you want to test this feature).
1 2 3 4
postgres=# create temp table src (f1 text); postgres=# INSERT INTO tbl_circle(a) VALUES('( 1 , 1 ) , 5'::circle ); ERROR: invalid input syntax for type circle: "( 1 , 1 ) , 5" LINE 1: INSERT INTO tbl_circle(a) VALUES('( 1 , 1 ) , 5'::circle );
An error is raised, now, if you dump the logfile, $ cat logfile you should see something like below,
2020-12-14 13:43:22.541 PST [25220] ERROR: invalid input syntax for type circle: "( 1 , 1 ) , 5" at character 34 2020-12-14 13:43:22.541 PST [25220] BACKTRACE: postgres: david postgres [local] INSERT(circle_in+0x1ca) [0x55bc1cdfaa8a] postgres: david postgres [local] INSERT(InputFunctionCall+0x7b) [0x55bc1cec375b] postgres: david postgres [local] INSERT(OidInputFunctionCall+0x48) [0x55bc1cec39c8] postgres: david postgres [local] INSERT(coerce_type+0x19a) [0x55bc1cb9d72a] postgres: david postgres [local] INSERT(coerce_to_target_type+0x9d) [0x55bc1cb9e0ed] postgres: david postgres [local] INSERT(+0x1c748f) [0x55bc1cba248f] postgres: david postgres [local] INSERT(transformExpr+0x14) [0x55bc1cba59f4] postgres: david postgres [local] INSERT(transformExpressionList+0x9f) [0x55bc1cbb273f] postgres: david postgres [local] INSERT(transformStmt+0x1a47) [0x55bc1cb782d7] postgres: david postgres [local] INSERT(parse_analyze+0x4f) [0x55bc1cb7957f] postgres: david postgres [local] INSERT(pg_analyze_and_rewrite+0x12) [0x55bc1cd9fd62] postgres: david postgres [local] INSERT(+0x3c531f) [0x55bc1cda031f] postgres: david postgres [local] INSERT(PostgresMain+0x1f04) [0x55bc1cda25b4] postgres: david postgres [local] INSERT(+0x34c168) [0x55bc1cd27168] postgres: david postgres [local] INSERT(PostmasterMain+0xeff) [0x55bc1cd2827f] postgres: david postgres [local] INSERT(main+0x4a4) [0x55bc1ca9b4e4] /lib/x86_64-linux-gnu/libc.so.6(__libc_start_main+0xe7) [0x7f6c22eeab97] postgres: david postgres [local] INSERT(_start+0x2a) [0x55bc1ca9b5aa] 2020-12-14 13:43:22.541 PST [25220] STATEMENT: INSERT INTO tbl_circle(a) VALUES('( 1 , 1 ) , 5'::circle );
As we can see the error is happening in circle_in function, which is called by function InputFunctionCall, so on and so forth. This is exactly like the backtrace when you are debugging the source code using gdb, but you may also find that some function names are showing up as a hex string, such as 0x3c531f. The reason some function names are not showing up is because they are static functions. For these functions, we need to use the addr2line to convert the addresses into file names and line numbers. For example,
1
addr2line 0x3c531f -f -e `which postgres`
, where -f displays the function names as well as file and line number, -e used to specify the name of the executable for which addresses should be translated.
It depends on the compilation parameters, if you compile the postgre with default CFLAG, you may get something like below,
Now, we get the function name, file name and the line number.
4. Summary
This blog simply discussed one very useful option introduced to PostgreSQL 13 for developers. I use this option a lot during my daily development work, and it helps me quickly locate the errors. I also use this feature when someone reports an error which happens randomly. To debug such issue, I simply enable it with the c function names. When the error happens again, then I can get the exactly backtrace. The backtrace_functions does make my work much easier when tracing a bug.
Previously, we discussed the MAIN fork file and corresponding extension at Heap file and page in details. This blog will explain a little bit more about the Free Space Mapping file and corresponding extension.
2. What is a Free Space Mapping file
A Free Space Mapping, FSM, file is a file that keeps tracking the availability of free space inside a page. The FSM file is used to quickly locate a page with enough free space to hold a record to be stored during insertion, and it will be updated during an insertion or a vacuum on the table.
Start from PostgreSQL 8.4 each relation has its own extensible FSM files stored on disk. The FSM file is stored under its relation folder. From previous example,
1 2
postgres=# create table orders1 (id int4, test text) using heap; postgres=# insert into orders1 values(1, 'hello world!');
You will see the heap files under the database folder like below,
1 2 3 4
$ ls -ltrh /home/user/pgdata/base/12705/16384* -rw------- 1 user user 24K Oct 8 14:33 /home/user/pgdata/base/12705/16384_fsm -rw------- 1 user user 8.0K Oct 8 14:34 /home/user/pgdata/base/12705/16384_vm -rw------- 1 user user 512K Oct 8 14:34 /home/user/pgdata/base/12705/16384
Where 16384 is the table orders1’s oid, and 16384_fsm is the corresponding Free Space Mapping file.
3. How the Free Space Mapping files are managed
Before PostgreSQL 8.4, the FSM is maintained in memory with the limitation of fixed-size. Now, all FSM files are on disk and can be extended in the same way as heap segmentation files. The FSM files will be updated during an insertion and a Vacuum process either periodically or triggered manually. In some conditions, the FSM may need to be rebuilt, for example, if a leaf node’s value is less than the root node or if there is truncate operation.
FSM file is mainly used to quickly locate a page for insert operation and in the meantime it helps to speed up the insertion by trying to inert records in existing pages instead of extend a new page. By doing this, it not only help speed up the insertion but also help improve the selection performance. Moreover, the user to implement various strategies, like preferring pages closer to a given page, or spreading the load across the table.
4. What is inside in an FSM page
Inside the FSM page, there are two binary tree structure are used: low-level binary tree is used to record the amount of free space on each heap page; high-level binary tree is used scale up the low-level data structure. For details, please reference the README.
5. The extension for FSM
The pg_freespacemap extension provides the functions that allow you to inspect the free space in each page for a given relation/table. So far, there is only one function provide in pg_freespacemap, i.e. pg_freespace. This function can be used retrieve the amount of free space on each page by giving different parameters. To use this extension,
1 2 3 4 5 6
postgres=# create extension pg_freespacemap; CREATE EXTENSION postgres=# create table orders1 (id int4, test text); CREATE TABLE postgres=# insert into orders1 values(generate_series(1,1000), 'hello world!'); INSERT 0 1000
postgres=# delete from orders1 where id%2=1 and id < 158; DELETE 79 postgres=# delete from orders1 where id%4=1 and id >= 158 and id < 315; DELETE 39 postgres=# delete from orders1 where id%8=1 and id >= 315 and id < 472; DELETE 19 postgres=# delete from orders1 where id%16=1 and id >= 472 and id < 629; DELETE 10 postgres=# delete from orders1 where id%32=1 and id >= 629 and id < 786; DELETE 5 postgres=# delete from orders1 where id%64=1 and id >= 786; DELETE 3 postgres=# vacuum orders1; VACUUM postgres=# SELECT * FROM pg_freespace('orders1'); blkno | avail -------+------- 0 | 3776 1 | 1856 2 | 896 3 | 480 4 | 224 5 | 96 6 | 5184 (7 rows)
Now, we can see the amount of free space is different and it depends on how many records has been deleted.
retrieve free space for a specific page The pg_freespace also allow you to check the amount of free space available in a specified page, for example,
insert using free space From the above delete examples, we know how many records deleted in each page, in other words, the maximum records can fit in for each page. Let’s perform some insertion test.
From the results above, we can see the records was inserted to the first page, instead of allocating a new page.
6. Summary
We explained why there is a free space mapping file under corresponding relation folder, how the free space mapping files are managed, and demonstrated how to use the extension pg_freespacemap to check what happens when user performed some insert, delete and vacuum. In next blog, I will explain the visibility mapping files.
PostgreSQL is a great open source database, and many users chose it because of the efficiency of its central algorithms and data structures. As a software developer, I was always curious about how each part was done, such as the physical files storage. The reason is that I always see a lot of files and folders were created after a simple initdb command. For example,
1 2 3 4 5 6
$ ls -ltr /home/user/pgdata drwx------ 4 user user 4096 Oct 8 13:38 pg_logical drwx------ 5 user user 4096 Oct 8 13:38 base drwx------ 2 user user 4096 Oct 8 13:38 global …. … -rw------- 1 user user 3 Oct 8 13:38 PG_VERSION
I can do a simple command like below to check the file PG_VERSION, but what about the rest of the files and folders?
1 2
$ cat /home/user/pgdata/PG_VERSION 14
In this blog, I am going to share what I learned about the heap files under base folder.
1. How the Heap files are created?
To explain this, let’s take a look at two key data structures.
RelFileNode defined in src/include/storage/felfilenode.h.
1 2 3 4 5 6
typedef struct RelFileNode { Oid spcNode; /* tablespace */ Oid dbNode; /* database */ Oid relNode; /* relation */ } RelFileNode;
Where, spcNode is the tablespace oid, dbNode is the database oid, and relNode is table oid. The table oid will be used as the file name to create the corresponding heap file. However, the Heap files will not be created unless you insert the first record to the table. For example,
1 2
postgres=# create table orders1 (id int4, test text) using heap; postgres=# insert into orders1 values(1, 'hello world!');
You will see the heap files under the database folder like below,
1 2 3 4
$ ls -ltrh /home/user/pgdata/base/12705/16384* -rw------- 1 user user 24K Oct 8 14:33 /home/user/pgdata/base/12705/16384_fsm -rw------- 1 user user 8.0K Oct 8 14:34 /home/user/pgdata/base/12705/16384_vm -rw------- 1 user user 512K Oct 8 14:34 /home/user/pgdata/base/12705/16384
Where 16384 is the table orders1’s oid. To verify it, there is a built-in function pg_relation_filepath which returns the first heap file segment with a relative path to the environment variable PGDATA. For example,
Where, MAIN_FORKNUM represents heap files, FSM_FORKNUM represents free space mapping files, and VISIBILITYMAP_FORKNUM represents visibility mapping files. In above example, the physical files map to the enum values MAIN_FORKNUM, FSM_FORKNUM and VISIBILITYMAP_FORKNUM are 16384, 16384_fsm and 16384_vm correspondingly. The rest of this blog will focus on heap file.
2. How the Heap files are managed?
Heap file, as the fork name MAIN_FORKNUM indicated, is the main file used to store all the data records. The heap file will be divided into different segments when it exceeds 1GB that is the default settings. The first file is always named using the filenode (table oid), and subsequent segments will be named as filenode.1, filenode.2 etc. In theory, the segmentation rule also applies to free space mapping and visibility mapping files, but it seldom happens since free space mapping file and visibility mapping file are not increasing as fast as heap files.
3. How does a Page look like?
To make the data management easier, each heap file is splitted into different pages with a default size 8KB. The data structure for each page is defined by below data structures:
ItemIdData
1 2 3 4 5 6
typedef struct ItemIdData { unsigned lp_off:15, /* offset to tuple (from start of page) */ lp_flags:2, /* state of line pointer, see below */ lp_len:15; /* byte length of tuple */ } ItemIdData;
ItemIdData is the line pointer in a page, which is defined in src/include/storage/itemid.h.
HeapTupleFields
1 2 3 4 5 6 7 8 9 10 11
typedef struct HeapTupleFields { TransactionId t_xmin; /* inserting xact ID */ TransactionId t_xmax; /* deleting or locking xact ID */
union { CommandId t_cid; /* inserting or deleting command ID, or both */ TransactionId t_xvac; /* old-style VACUUM FULL xact ID */ } t_field3; } HeapTupleFields;
HeapTupleFields is part of the header for each tuple, defined in src/include/access/htup_details.h.
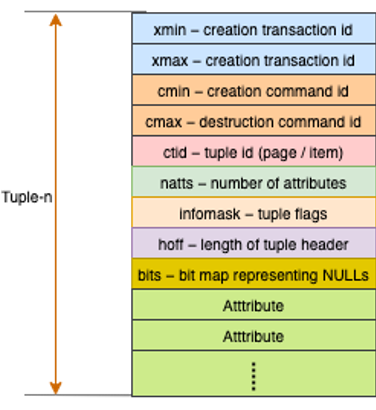
#define FIELDNO_HEAPTUPLEHEADERDATA_BITS 5 bits8 t_bits[FLEXIBLE_ARRAY_MEMBER]; /* bitmap of NULLs */
/* MORE DATA FOLLOWS AT END OF STRUCT */ };
HeapTupleHeaderData is the tuple data structure, defined in defined in src/include/access/htup_details.h.
A high level picture for a tuple looks like the picture below.
But, this may be still hard to understand for an end user. Don’t worry, PG provides an extension pageinspect.
4. The extension for Page
The pageinspect extension provides the functions that allow you to inspect the contents of database pages at a low level, which is very useful for debugging purposes. Here are the main functions provided by pageinspect. To use this extension, you have to install it first, and then add it to your PG server. For example,
heap_page_items heap_page_items returns all the records within given page. It includes line pointers, tuple headers as well as tuple raw data, i.e. lp | lp_off | lp_flags | lp_len | t_xmin | t_xmax | t_field3 | t_ctid | t_infomask2 | t_infomask | t_hoff | t_bits | t_oid | t_data. All the tuples will be displayed at the moment when the page is loaded from heap file into buffer manager, no matter whether the tuple is visible or not. For example,
heap_tuple_infomask_flags heap_tuple_infomask_flags will help decode the tuple header attributes, i.e. t_infomask and t_infomask2 into a human-readable set of arrays made of flag names, with one column for all the flags and one column for combined flags. For example,
1 2 3 4 5 6
postgres=# SELECT t_ctid, raw_flags, combined_flags FROM heap_page_items(get_raw_page('orders1', 0)), LATERAL heap_tuple_infomask_flags(t_infomask, t_infomask2) WHERE t_infomask IS NOT NULL OR t_infomask2 IS NOT NULL; t_ctid | raw_flags | combined_flags ---------+----------------------------------------------------------+---------------- (0,1) | {HEAP_HASVARWIDTH,HEAP_XMIN_COMMITTED,HEAP_XMAX_INVALID} | {} (0,2) | {HEAP_HASVARWIDTH,HEAP_XMIN_COMMITTED,HEAP_XMAX_INVALID} | {} (0,3) | {HEAP_HASVARWIDTH,HEAP_XMIN_COMMITTED,HEAP_XMAX_INVALID} | {}
5. What happens on heap page when performing insert, delete and vacuum
Now, we have learned something about heap file and the page inspect extension. Let’s see how the tuples are managed when user performs some insert, delete and vacuum on a table.
Insert First, let insert 200 records to a brand new table orders1,
As you can see, after 200 records were inserted, PG created two pages: the 1st page has 157 tuples, and the 2nd page has 43 tuples. If you try to access the 3rd page, then you will some errors like below,
1
2
postgres=# SELECT * FROM heap_page_item_attrs(get_raw_page('orders1', 2), 'orders1'::regclass); ERROR: block number 2 is out of range for relation "orders1"
Now, for all the odd records, the t_max points to a different transaction (delete) id, and t_infomask2 indicates the tuple has been deleted. For more detailed information, please check t_infomask2 definition.
Insert a new record If you insert a record now, you will find the new record is inserted into the first empty slot. In this example, the first line \\xe8030000 is the new record with id=1000.
postgres=# SELECT * FROM heap_page_item_attrs(get_raw_page('orders1', 2), 'orders1'::regclass); ERROR: block number 2 is out of range for relation "orders1"
After the vacuum full, there are some changes, 1) all dead tuples were removed, the rest tuples were shuffled and merged into the 1st page, and the 2nd page was deleted. 2) the new record 1id=10021 was inserted to the very end. 3) No access to the 2nd page, since it has been deleted.
This extension provides an easy way to observe how a heap page is changed when performing insert, delete and vacuum. The same behaviour can be observed on the heap file when using hexdump command (checkpoint may require to force the memory page to be flushed to heap file after each operation).
6. Summary
We explained how the heap files are created, the internal data structure of heap file and page (a segment of a heap file), and demonstrated how to use the extension pageinspect to check what happens when user performed some insert, delete and vacuum. In the coming blogs, I will explain the free space mapping file and the visibility mapping file in the same way.
PostgreSQL is a great open source database, not only because it supports lot of database features, but also because it supports different network setup. For example, you can set it up on an IPv6 enabled network in just a few steps. This blog will demonstrate how to setup PostgreSQL on an IPv6 network in Linux.
Before we dive into the detail, let’s discuss a little bit IPv6. IPv6 was developed by the Internet Engineering Task Force (IETF) in late 1998 and was intended to replace IPv4. With the IPv4 address exhaustion issue, after about two decades, IPv6 now is finally coming into the real picture. Below is the state of IPv6 Deployment in 2018:
1
2
3
* Over 25% of all Internet-connected networks advertise IPv6 connectivity. * Google reports 49 countries deliver more than 5% of traffic over IPv6, with new countries joining all the time. * Google reports 24 countries whose IPv6 traffic exceeds 15%.
If you check your home internet modem/router and most likely you will find the IPv6 is already enabled. There are many documents and RFCs explain IPv6 in much more detail. For example, IP Version 6 Addressing Architecture defined in RFC 4291. In this blog, I will just explain some simple concepts which is required in this demo.
2. Setup IPv6 network
Link-local address
Not like IPv4, all the interface of an IPv6 enabled host require a link-local address. The link-local address will always start with the prefix fe80:: and it is generated during TCP/IP stack boot up on that interface. The interesting part is that link-local address doesn’t request a DHCP server or any manual configuration. The link-local can be set to derive from the MAC address of the interface, in this case, if you know the MAC of the interface then you can create the link-local address by simply copy and paste the MAC to a link-local calculator.
Global address
However, there is a limitation as the name indicated, it only works between the hosts which are directly connected. To allow the communication cross the internet or multiple routers, the host needs to have a global address. There are many different ways to setup a global IPv6 address. Here, we introduce three typical ways: Manually, DHCPv6 and SLAAC.
To manually setup an IPv6 global address, you can use either ip or ifconfig. For example,
1 2 3
sudo ip -6 addr add 2020:1:0:0::db1/64 dev eth0
sudo ifconfig eth0 inet6 add 2020:1:0:0::db1/64
Since IPv6 allows the HEX characters, you can make your own customized IPv6 address for fun. For example, configure a PostgreSQL server with IPv6 address like, :db:feed, :da7a:ba5e, :db1, :db2 etc,.
Stateless address autoconfiguration (SLAAC) requires to have a router which broadcast the router advertisement periodically. The router should also response to router solicitation request from any host machine. Once the host receive the router advertisement, it will use the prefix to generate the global IPv6 address automatically. Below is an example, Install the Router Advertisement Daemon (radvd) on PostgreSQL server side,
Configure a new IPv6 address on Postgres server for radvd daemon to use
1
sudo ip -6 addr add 2020:1:0:0::db1/64 dev eno1
Then start the radvd daemon, sudo radvd -l /etc/radvd.conf Now, if you check the ip address on the client machine side, you should see something like below,
where, 2020:2::1004 is the global IPv6 address assigned by the DHCPv6 server.
3. Connetivity test using ping6
PostgreSQL server
Network interface: eno1
link-local: fe80::1c79:293f:1b6e:c826
IPv6 global address(SLAAC): 2020:1::db1
IPv6 global address(DHCPv6): 2020:2::db1
psql client IPs
Network interface: enp0s3
link-local: fe80::8005:8b22:cd7d:ee39
IPv6 global address generated(SLAAC): 2020:1::8dcf:b8be:dbcc:26c6
IPv6 global address assigned(DHCPv6): 2020:2::1004
ping6 test from server to client
1 2 3 4 5 6 7 8 9 10 11 12 13 14
$ ping6 fe80::8005:8b22:cd7d:ee39%eno1 PING fe80::8005:8b22:cd7d:ee39%eno1(fe80::8005:8b22:cd7d:ee39%eno1) 56 data bytes 64 bytes from fe80::8005:8b22:cd7d:ee39%eno1: icmp_seq=1 ttl=64 time=0.582 ms 64 bytes from fe80::8005:8b22:cd7d:ee39%eno1: icmp_seq=2 ttl=64 time=0.572 ms
$ ping6 2020:1::8dcf:b8be:dbcc:26c6 PING 2020:1::8dcf:b8be:dbcc:26c6(2020:1::8dcf:b8be:dbcc:26c6) 56 data bytes 64 bytes from 2020:1::8dcf:b8be:dbcc:26c6: icmp_seq=1 ttl=64 time=0.576 ms 64 bytes from 2020:1::8dcf:b8be:dbcc:26c6: icmp_seq=2 ttl=64 time=0.601 ms
$ ping6 2020:2::1004 PING 2020:2::1004(2020:2::1004) 56 data bytes 64 bytes from 2020:2::1004: icmp_seq=1 ttl=64 time=0.896 ms 64 bytes from 2020:2::1004: icmp_seq=2 ttl=64 time=0.631 ms
ping6 test from client to server
1 2 3 4 5 6 7 8 9 10 11 12 13 14
$ ping6 fe80::1c79:293f:1b6e:c826%enp0s3 PING fe80::1c79:293f:1b6e:c826%enp0s3(fe80::1c79:293f:1b6e:c826%enp0s3) 56 data bytes 64 bytes from fe80::1c79:293f:1b6e:c826%enp0s3: icmp_seq=1 ttl=64 time=0.144 ms 64 bytes from fe80::1c79:293f:1b6e:c826%enp0s3: icmp_seq=2 ttl=64 time=0.220 ms
$ ping6 2020:1::db1 PING 2020:1::db1(2020:1::db1) 56 data bytes 64 bytes from 2020:1::db1: icmp_seq=1 ttl=64 time=0.825 ms 64 bytes from 2020:1::db1: icmp_seq=2 ttl=64 time=0.520 ms
$ ping6 2020:2::db1 PING 2020:2::db1(2020:2::db1) 56 data bytes 64 bytes from 2020:2::db1: icmp_seq=1 ttl=64 time=0.508 ms 64 bytes from 2020:2::db1: icmp_seq=2 ttl=64 time=0.486 ms
4. Configure PostgreSQL for IPv6
Edit the postgresql.conf file to allow Postgres listen on different interfaces
1
listen_addresses = '*'
Edit the host-based authentication file to allow client machine to connect with different source IPs.
1 2 3 4
# IPv6 local connections: host all all fe80::8005:8b22:cd7d:ee39/128 trust host all all 2020:1::8dcf:b8be:dbcc:26c6/128 trust host all all 2020:2::1004/128 trust
psql client connect to Postgres server using link-local address with interface name
1 2 3 4 5 6 7 8 9 10
$ psql -d postgres -U david -h fe80::1c79:293f:1b6e:c826%enp0s3 psql (14devel) Type "help" for help.
postgres=# SELECT datname,pid, usename, client_addr FROM pg_stat_activity where usename='david'; datname | pid | usename | client_addr ----------+-------+---------+--------------------------- | 24170 | david | postgres | 24244 | david | fe80::8005:8b22:cd7d:ee39 (2 rows)
psql client connect to Postgres server using global address(Stateless address)
1 2 3 4 5 6 7 8 9
$ psql -d postgres -U david -h 2020:1::db1 psql (14devel) Type "help" for help.
postgres=# SELECT datname,pid, usename, client_addr FROM pg_stat_activity where usename='david'; datname | pid | usename | client_addr ----------+-------+---------+----------------------------- | 24131 | david | postgres | 24149 | david | 2020:1::8dcf:b8be:dbcc:26c6
psql client connect to Postgres server using global address(Stateful address)
1 2 3 4 5 6 7 8 9
$ psql -d postgres -U david -h 2020:2::db1 psql (14devel) Type "help" for help.
postgres=# SELECT datname,pid, usename, client_addr FROM pg_stat_activity where usename='david'; datname | pid | usename | client_addr ----------+-------+---------+-------------- | 24170 | david | postgres | 24235 | david | 2020:2::1004
5. Typical errors
Using link-local to connect Postgres without the interface name
1 2 3 4
$ psql -d postgres -U david -h fe80::1c79:293f:1b6e:c826 psql: error: could not connect to server: could not connect to server: Invalid argument Is the server running on host "fe80::1c79:293f:1b6e:c826" and accepting TCP/IP connections on port 5432?
psql client using a wrong global address as source address
1
2
$ psql -d postgres -h 2020:2::db1
psql: error: could not connect to server: FATAL:  no pg_hba.conf entry for host "2020:1::8dcf:b8be:dbcc:26c6", user "dbtest", database "postgres"
This is due to multiple IPv6 global addresses available on the same interface. In this case, the application, i.e. psql should have an option to select the preferred IPv6, otherwise, the kernel will pick up the IPv6 global address based on predefined policy and rules. Please check Source Address Selection for details. A simple solution is the remove other global IPv6 addresses, and disable the corresponding service i.e. radvd or DHCPv6 server.
6. Summary
We demonstrated how to setup a simple IPv6 network with one Postgres server and one psql client. To enable the IPv6 configuration is pretty simple on PostgreSQL side, but some the basic IPv6 knowledge is required.


