1. Overview
“Postgres, is a free and open-source relational database management system (RDBMS) emphasizing extensibility and SQL compliance.” This is the highlight of PostgreSQL in a sentence from Wikipedia. Yes, the extensibility of PostgreSQL is extremely useful when you have some special requirements. This blog will discuss how to use logical decoding output plugin to replicate multiple PostgreSQL servers to a single MongoDB server and the environment setup using docker compose for a quick Proof of Concept.
2. Logical decoding output plugin
Start from version 9.5, PostgreSQL provides a solution to allow users to write their own decoding logic to reformat the output before sending it to the subscriber through a wal sender. This feature is called logical decoding output plugin. With this feature, other applications can get a specific data format from PostgreSQL database easily, and then use their own existing tools or algorithms to continue the data analysis. For example, replicating multiple Postgres servers to a single MongoDB server and then perform the real-time analytics and data visualization in MongoDB. There are many different decoding plugins available at here, however wal2mongo is only one can generate a JavaScript format data that can be used by MongoDB directly. You can use it following this blog to practice how data replication can be done from multiple Postgres databases to a MongoDB database using logical decoding output plugin.
- Logical decoding output plugin framework
The logical decoding output plugin framework has a few predefined callback interfaces. These callbacks are registered in an initialization function named _PG_output_plugin_init, which will be called when the plugin is loaded as a shared library. After hookup with these interfaces by referring to the example test_decoding, the output decoding plugin will get notified about the changes that is happening via various callback interfaces. In these callback interfaces, the one will get noticed each time when an insert, update or delete happens is LogicalDecodeChangeCB. Most of the output formatting related logic should be done in a function which is registered to this interface, such as, map a Postgres data type to a MongoDB native data type.
Before writing your own logical decoding plugin, two basic things need to be mentioned here: one is the change callback interface is triggered based on each row, i.e. if you have multiple rows changed in one transaction, then you will get multiple times call back; the other is that the callback is triggered only by the row changes that have been safely saved to WAL files. The changes that were rolled back by the transaction will not trigger the callback.
- wal2mongo decoding plugin
wal2mongo is a logical decoding plugin, it mainly converts the DML operation such as insert, update and delete into a JavaScript format which later can be imported into MongoDB by using mongo client.
- Logical decoding data changes flow
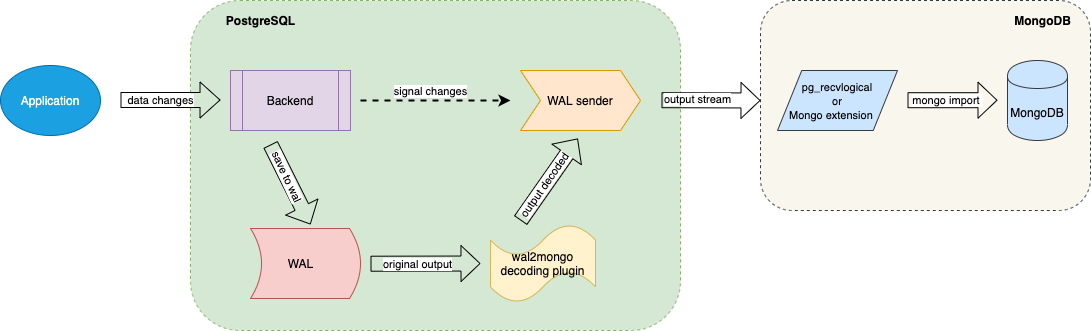
The diagram above shows the data changes flow. We can usepsqlclient to simulate the Application and perform database operation such as create table, insert records, update records and then delete records. The Postgres server backend will save the database changes to WAL first and then notify the WAL sender. The WAL sender will read the changes from WAL and get the output decoded bywal2mongoand then send the changes to the connected subscriber, i.epg_recvlogicalin this blog.pg_recvlogicalwill save the output as a JavaScript file, then later it will be imported to MongoDB usingmongoclient.
To exercise this, we need to change wal_level to logical and make sure max_wal_senders is at least 2, then restart Postgres server after the changes.
- Example of
wal2mongooutput
wal2mongo is designed to replicate the data changes from Postgres to MongoDB, not like a Postgres standby which need to replicate everything. Therefore, the focus is on the mostly used DML operation such as INSERT, UPDATE and DELETE. The diagram below shows the steps inclduing create a table, insert some records, do some update, and then perform a delete and how the data output looks like. Here, you have to change the table replica identity to full, otherwise, you won’t be able to replicate the UPDATE correctly.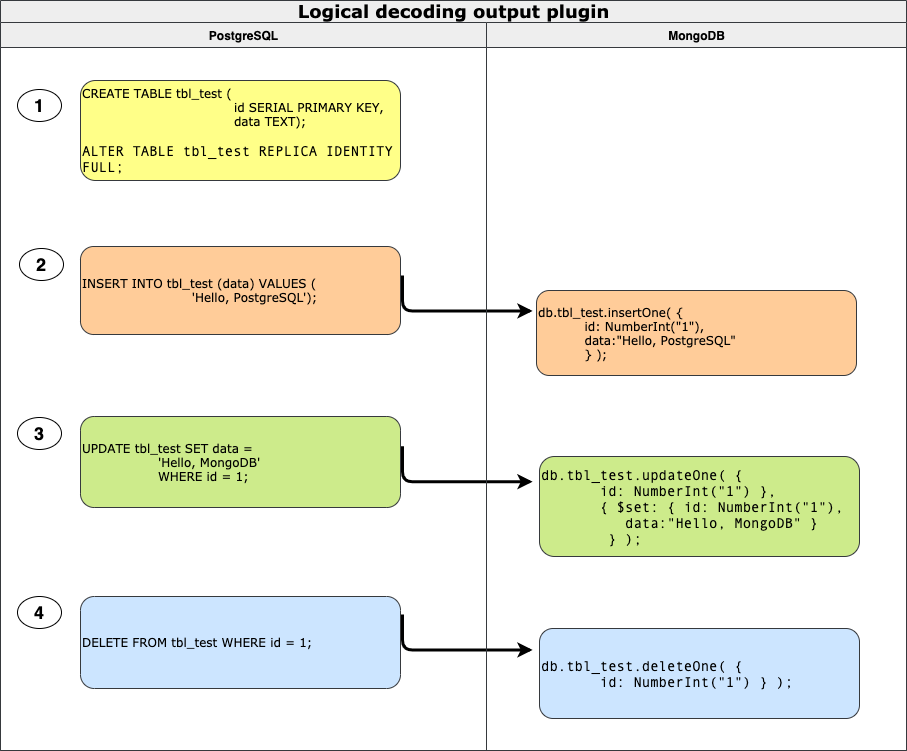
2. Automatic the environment setup using docker compose
Setup an environment like the one mentioned above to test a logical output plugin may take some time, especially when a user just wants to give a quickly try. I will introduce an easy way using docker to do the work. A Docker environment can be very useful when you want to practice a new technology which requires a complicated setup, or multiple machines to be available. It also help when you need such an environment from time to time, especially when you need it to be available “immediately” and then discard it after you finished your work.
To achieve such an environment with multiple Postgres servers and one MongoDB server, I built two docker images: one is a dedicated postgres with wal2mongo installed, and the other one is a dedicated mongod with the pg_recvlogical tools installed. Here is a cluster environment running on a sinlge physical machine using the files available at here.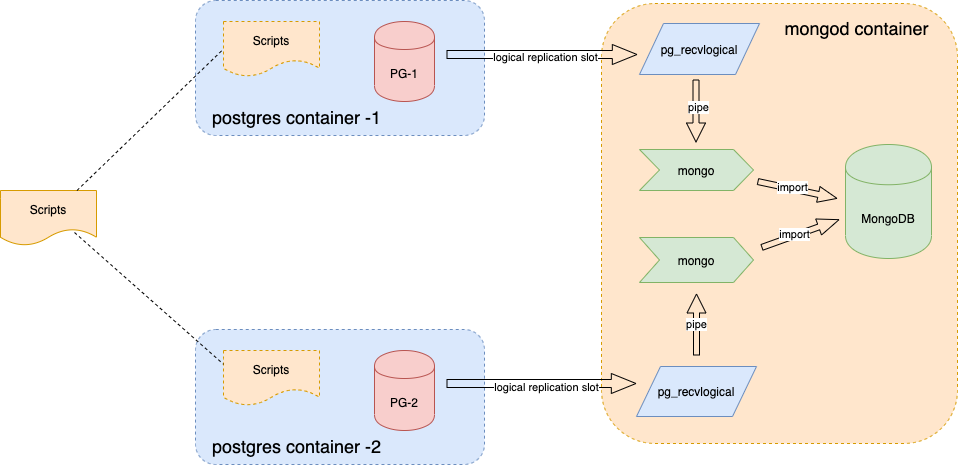
- Dockerfile for postgres
This Dockerfile is to build a docker image with the latest PostgreSQL 12.2 offical release and thewal2mongoinstalled.1
2
3
4
5
6
7
8
9
10
11
12
13
14
15
16
17
18
19
20FROM centos:centos7
MAINTAINER The CentOS Project <cloud-ops@centos.org>
RUN yum -y install https://download.postgresql.org/pub/repos/yum/reporpms/EL-7-x86_64/pgdg-redhat-repo-latest.noarch.rpm
RUN yum -y update; yum -y install sudo epel-release yum-utils net-tools which \
postgresql12-server postgresql12 \
git gcc make clang zlib-devel readline-devel postgresql12-devel; yum clean all
RUN usermod -aG wheel postgres
RUN echo "export PATH=/usr/pgsql-12/bin:$PATH" | tee -a /var/lib/pgsql/.bashrc
RUN echo "postgres ALL=(root) NOPASSWD:ALL" > /etc/sudoers.d/postgres && chmod 0440 /etc/sudoers.d/postgres
USER postgres
RUN eval "sudo -E env "PATH=$PATH" USE_PGXS=1 make CLANG=/usr/bin/clang with_llvm=no install"
VOLUME ["/var/log/pgsql", "/var/lib/pgsql"]
EXPOSE 5432
COPY run.sh .
CMD ["/run.sh"]
What inside the run.sh script is just a simple postgres start command. The way I used it here is to avoid rebuild the image when you want to start the container in different ways.
1 | #!/bin/bash |
Dockfile for mongod
The dockerfile for mongod has the offical MongoDB 4.25 release and pg_recvlogical 12.2 installed.1
2
3
4
5
6
7
8
9
10
11
12
13
14
15
16
17FROM centos:centos7
MAINTAINER The CentOS Project <cloud-ops@centos.org>
COPY mongodb.repo /etc/yum.repos.d/
RUN yum -y install mongodb-org-4.2.5 mongodb-org-server-4.2.5 \
mongodb-org-shell-4.2.5 mongodb-org-mongos-4.2.5 \
mongodb-org-tools-4.2.5 postgresql12-contrib; yum clean all
RUN mkdir -p /data/db
RUN usermod -aG wheel mongod
RUN echo "mongod ALL=(root) NOPASSWD:ALL" > /etc/sudoers.d/mongod && \
chmod 0440 /etc/sudoers.d/mongod
RUN echo "export PATH=/usr/pgsql-12/bin:$PATH" | tee -a /root/.bashrc
VOLUME ["/data/db", "/var/log/mongodb"]
EXPOSE 27017
ENTRYPOINT ["/usr/bin/mongod", "--bind_ip_all"]Service compose file
The service docker compose file is to help setup two Postgres servers and one MongodDB servere, and make sure they are be able to communicate using hostname.1
2
3
4
5
6
7
8
9
10
11
12
13
14
15
16
17
18
19
20
21
22
23
24
25
26
27
28
29version: '3.0'
services:
mongo:
restart: always
image: "mongod:4.2.5"
ports:
- "27017:27017"
volumes:
- ./data/mgdata:/data/db
- ./scripts/p2m.sh:/p2m.sh
pg1:
restart: always
image: "postgres:12.2"
ports:
- "5432"
volumes:
- ./data/pg1data:/var/lib/pgsql/12/data
- ./scripts/data_gen.sh:/data_gen.sh
pg2:
restart: always
image: "postgres:12.2"
ports:
- "5432"
volumes:
- ./data/pg2data:/var/lib/pgsql/12/data
- ./scripts/data_gen.sh:/data_gen.shYou can easily extend the Postgres servers by adding more instances to this service docker compose file.
To build the containers, run command docker-compose -f service-compose.yml up -d. After a while, you should see two Postgres servers and one MongoDB server are running like below.
1 | $ docker ps |
To setup the logical replication slot on each postgres server, and connect to each slot using pg_recvlogical then pipe the data changes to mongo client and feed the changes to MongoDB automaticlly, run a command like this docker exec -it pg2mongo_mongo_1 bash /p2m.sh 1 2. Where the p2m.sh is a simple demo script to allow you using pg_recvlogical to create slot, and connect to the slot then dump the message to a internal pipe. Then the mongo client will read the pipe and import the changes to MongoDB. You can check it by log into the mongod container and type a ps -ef to see the running services.
Generate database changes
To simulate the data changes, you can usepgbench. There are two ways to do it: one is to log into each postgres instance and type the pgbench command; the other way is to map a local script to all postgres instances, then run the script from your host machine. For exampledocker exec -it pg2mongo_pg1_1 bash /data_gen.shVerify the data changes
To verify the data changes, you can log into the mongod container, and then use the mongo cient to check the data changes imported automatically. For example,1
2
3
4> use mycluster_postgres_w2m_slot2;
switched to db mycluster_postgres_w2m_slot2
> db.pgbench_accounts.count();
10028Modify the output plugin and reinstall it
You can log into any postgres server and find out the source code and make some changes, then recompile, install it and run a regression test, etc. For example,1
2
3
4
5
6
7
8
9
10
11docker exec -it pg2mongo_pg1_1 bash
bash-4.2$ cd /var/lib/pgsql/sources/wal2mongo/
...
bash-4.2$ USE_PGXS=1 make clean CLANG=/usr/bin/clang with_llvm=no
...
bash-4.2$ USE_PGXS=1 make CLANG=/usr/bin/clang with_llvm=no
...
bash-4.2$ USE_PGXS=1 make installcheck-force CLANG=/usr/bin/clang with_llvm=no
...
bash-4.2$ sudo -E env "PATH=$PATH" USE_PGXS=1 make CLANG=/usr/bin/clang with_llvm=no install
...
3. logical decoding output plugin limitations
The logical decoding output plugin is pretty useful feature, but still has some limitations. For example,
- Only physical relation tables can trigger logical decoding callback, views and sequences cannot trigger
- The tables must have primary key and replica identity need to be set properly
- Database schemas are not be able to be replicated
- No large objects can be replicated
…
4. Summary
In this blog, we discussed how to use the logical decoding output plugin to replicate multiple PostgreSQL servers to a single MongoDB server, and provide a docker environment setup to perform a quick Proof Of Concept.